
Arduino Uno

The Arduino Uno is a widely used microcontroller board based on the ATmega328P microcontroller. It features 14 digital input/output pins, six analog inputs, a USB connection for programming, a power jack, an ICSP header, and a reset button. The board operates at 5V and can be powered via the USB port or an external power source.
The Arduino Uno is designed for ease of use, making it an excellent choice for both beginners and experienced electronics enthusiasts. It supports a variety of programming languages, primarily C and C++, and can be programmed using the Arduino Integrated Development Environment (IDE), which simplifies the coding process by providing a user-friendly interface and a rich library of pre-written code.
In terms of connectivity, the Arduino Uno can interface with various sensors, actuators, and other electronic components through its digital and analog pins. This versatility allows for the creation of a wide range of applications, from simple LED blinking projects to complex robotics and IoT systems.
The board also includes a built-in LED on pin 13, which serves as a useful debugging tool. Additionally, the Arduino community offers extensive resources, including tutorials, forums, and project examples, which can greatly assist users in their prototyping endeavors.
Overall, the Arduino Uno serves as a robust platform for electronic prototyping, fostering innovation and creativity in the field of electronics.Well I finally got round to purchasing an Arduino Uno Open Source Prototyping Platform and first impressions are. 🔗 External reference
Related Circuits
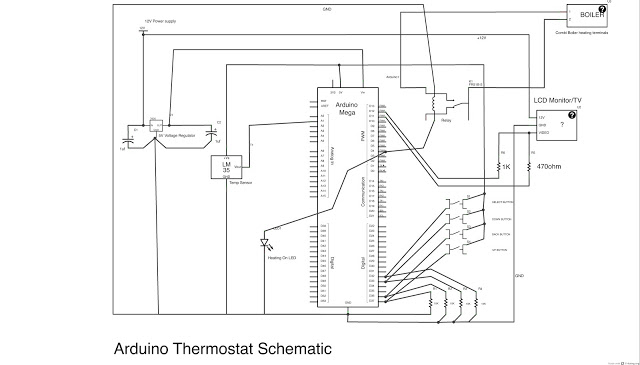
This post outlines the steps taken to build an Arduino-based thermostat, as demonstrated in accompanying videos. The first video showcases a preliminary version of the menu system, providing an overview of the features. The second video presents the completed...

Posts about a tutorial written by Harandi and Amirsab. The content refers to a series of instructional posts focused on a particular tutorial authored by individuals identified as Harandi and Amirsab. These posts likely encompass various topics related to electronics,...
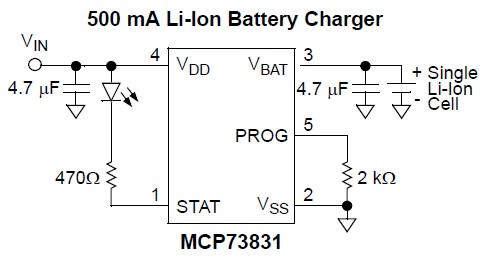
A Lithium Polymer Ion Battery is included with the Lilypad Development Board from SparkFun. There is an inquiry regarding whether the battery will charge when it is connected to the Lilypad Arduino while simultaneously connecting the Lilypad Arduino using...
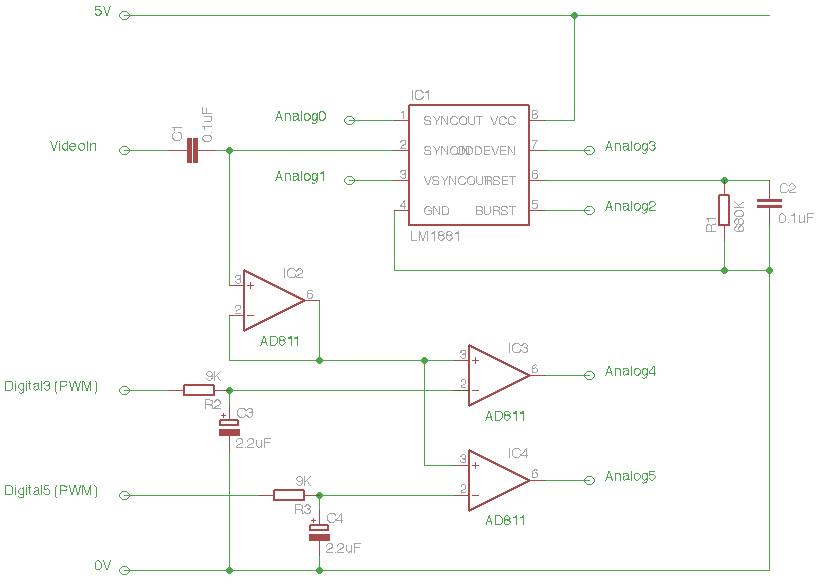
The Arduino Eye Shield is a circuit board that can be plugged on top of the Arduino, enabling it to interpret analog video (PAL or NTSC) from a camera or other source. This provides the Arduino with visual capabilities,...
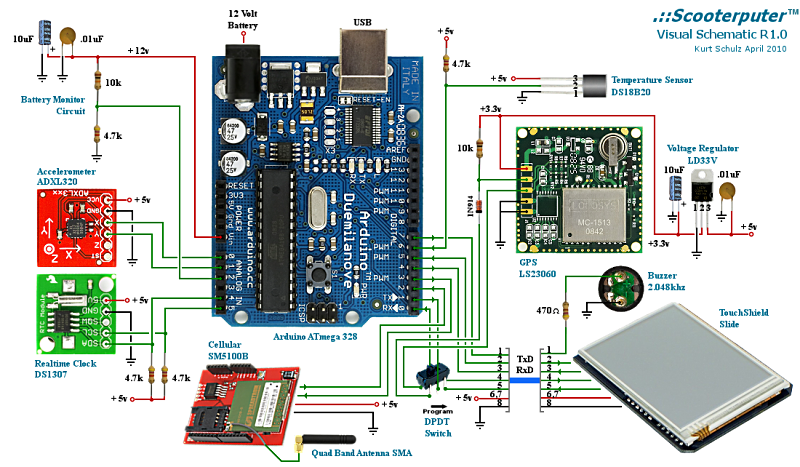
Powerful for its size and cost, and extremely easy to learn and use. A voltage monitor was added to a scooter to warn when the battery might need recharging, instead of waiting for the electric starter to fail. An...
This example demonstrates a technique for calibrating sensor input. The Arduino takes sensor readings for five seconds during startup and tracks the highest and lowest values obtained. These sensor readings during the first five seconds of the sketch execution...