
ATmega16 Programmer
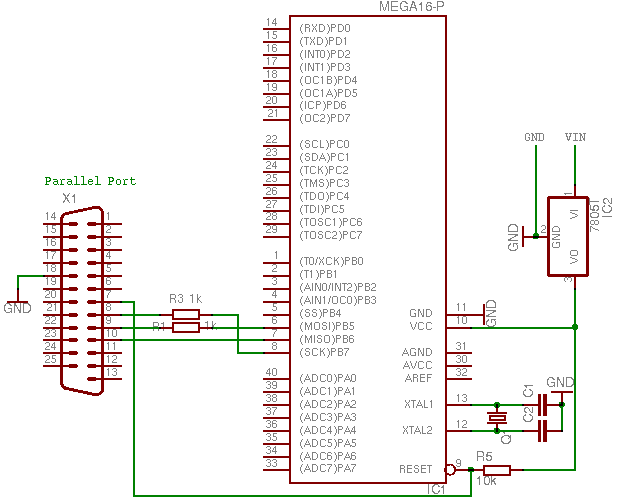
It is possible to bypass the external crystal and capacitors since the AVR microcontroller includes a built-in oscillator that operates at a default frequency of 1 MHz. This frequency suffices for general applications but is inadequate for precise timing needs, such as serial communication, which requires an external oscillator and the appropriate fuse bits to be set. After constructing the programmer, software is required to compile the written C code into a hex file, which can then be uploaded to the microcontroller. A notable advantage of using AVR devices is that GCC supports AVR programming, and it is compatible with both Linux and Windows operating systems, facilitating code development across different platforms.
A Makefile is necessary to streamline the creation of the hex file for programming the microcontroller. The provided Makefile has been adapted for the BSD programmer and the ATmega16 microcontroller. When using it, the source filename should be specified after PRJSRC (line 79). For ATmega32 users, the MCU option (line 68) must be adjusted accordingly. The first command in the Makefile generates the hex file, while the second command invokes avrdude to write the hex file to the microcontroller. If permission issues arise when accessing the parallel port, the permissions for the /dev/parport0 device need to be modified using root privileges. In case the /dev/parport0 device is absent, specific commands must be executed as root to create it.
For Windows users, particularly those with WinXP or Windows 2000, it is essential to install a driver provided with WinAVR to enable direct writing to the parallel port. This can be accomplished by running the "install_giveio.bat" file located in the WinAVR installation directory under the bin folder. This installation is a one-time requirement. After setting up WinAVR, at least two files are needed: the C program (ending in .c) and a Makefile. The Programmer's Notepad can be utilized for writing the programs. The Makefile can be generated using the MakeFile Generator or adapted from the Linux version, ensuring necessary changes are made, including altering the AVRDUDE_PORT to lpt1 instead of /dev/parport0 (line 111).
To compile and upload the program onto the microcontroller, users can select "Tools->[WINAVR] Make All" in Programmer's Notepad to compile the code and check for errors, followed by "Tools->[WINAVR] Program" to write the code onto the microcontroller. For those using the Linux Makefile, commands must be executed in the command prompt, navigating to the directory containing the C files and using the same commands as in Linux. The AVR microcontrollers are supplied with the internal oscillator set to 1 MHz by default, allowing for immediate use without external components.The Atmel ATmega series of microcontrollers are very popular due to the large number of peripherals inbuilt in them. They have features such as internal PWM channels, 10-bit A/D converters, UART/USART and much more, which are useful for a lot of applications and external hardware is reduced as these are built-in.
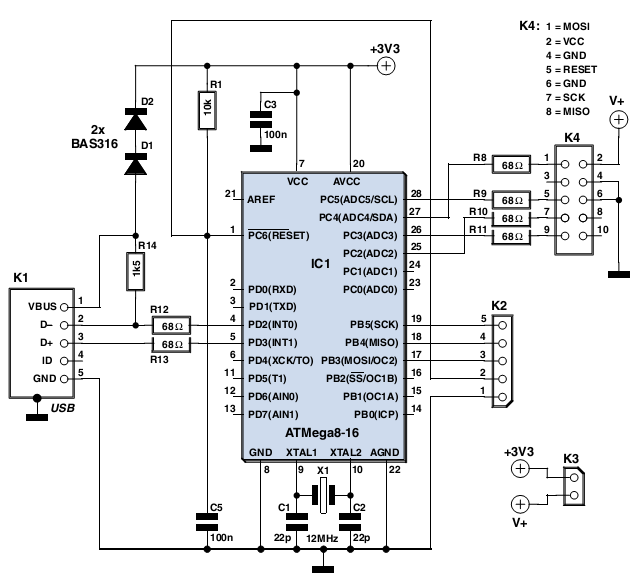
The programmer shown below is a SP I based in-circuit programmer, meaning that you can program your microcontroller while it is placed in your application circuit, although you`ll have to remove the external connections from the pins used by the programmer (MOSI, MISO, SCK, RESET) while programming. The interface is called "BSD", which is pretty standard, so you won`t have much problem with software support.
You can skip the crystal and the two capacitors, since the AVR comes with its built-in oscillator, which is turned on by default. It has 1 MHz frequency and is good enough for general purposes, but is not good for precise timing applications like serial communication.
For such applications, you need put the external oscillator and write the proper fuse bits to enable it. After making the programmer, you would need some software to first compile the C code you write to a hex file and then to write this hex file onto the microcontroller.
One good part about using AVR devices is that GCC has support for AVR. GCC is available for both Linux and Windows, so you won`t have problems of writing codes in different operating systems. You will need a Makefile to simplify the generation of the hex file to be burnt onto the microcontroller.
Take it from here. The Makefile has been taken from and changed a bit for the bsd programmer and the ATmega16 microcontroller. While using it, put your source filename after PRJSRC (line 79). If you are using ATmega32, then you would also need to change the MCU option (line 68) to atmega32. The first command generates the hex file which would be burnt onto the microcontroller. The second one actually calls avrdude which writes the hex file onto the microcontroller. If there is some problem of permission while writing to the parallel port, then you will have to change the permissions of /dev/parport0 device.
Give the following command as root: For writing to the microcontroller you will need to have the /dev/parport0 device. If the /dev/parport0 device does not exist, then issue the following commands as root: Once you have WinAVR installed, you need at least two files: your program (ending in.
c) and a makefile. You can use the Programmer`s Notepad to write your programs. The makefile can be generated using the MakeFile Generator or else you can also use the same file as in Linux. I prefer the latter approach. In the Makefile generator, choose the proper options, and give the C source file. Save the Makefile in the same directory as your source file. If you used the Makefile from in the Linux section, you need to make the changes as given above and also have to change the AVRDUDE_PORT to lpt1 instead of /dev/parport0 (line 111).
Note for WinXP/Windows 2000: You need to install a driver (provided with WinAVR) to be able to write directly to the parallel port. Go to the directory where you installed WINAVR, then go into bin. There you will find a file called "install_giveio. bat". Run that file, it will install the driver it requires. You just have to do this once. If you used the Makefile Generator, you can use the Programmer`s Notepad to compile and write the program onto the microcontroller.
Choose "Tools->[WINAVR] Make All" to compile. Check for errors, and then "Tools->[WINAVR] Program" to write the code onto the microcontroller. If you used the Linux Makefile, you will need to use the command prompt. Start the command prompt and go to the directory where your C files are kept. Then you can just use the same commands as in Linux: The AVR microcontrollers are shipped with the internal oscillator (1 MHz) turned on. To use an ex 🔗 External reference
Related Circuits
Most individuals have likely installed one of the many software tools that facilitate programming the PIC 16C84 on their computers. Among the most popular options is the RIR02 from Silicon Studios. The circuit detailed below is one of the...
ISP Programmer. Please purchase USB programming cables and start using AVR Studio, avrdude, etc. The source code is now considered abandonware and will remain on Sourceforge indefinitely. This software supports programming of Atmel microcontrollers, including 89Sxx (51), ATtiny, ATmega,...
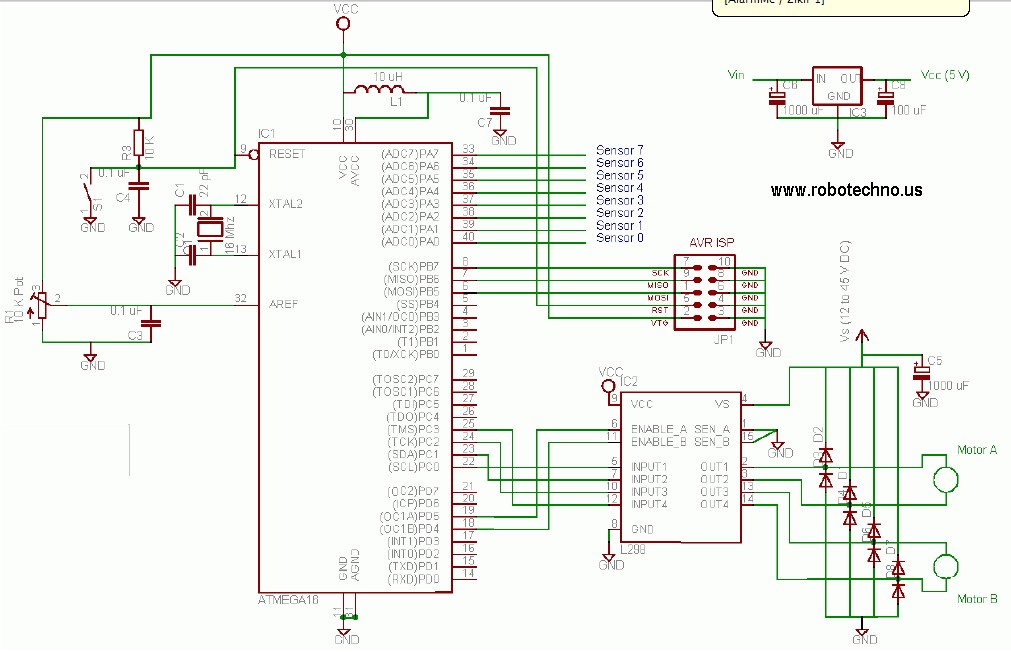
This line follower robot utilizes the following components: eight phototransistor proximity sensors, an ATMega16 microcontroller, an L298 motor driver, and is programmed using the C programming language. The line follower robot is designed to navigate along a designated path by...
Diode D1 and resistor R1 provide VDD isolation during the programming of 24-pin devices. The jumper J3 must be shorted for 24-pin device programming and left open for 28-pin device programming. The following EEPROMs are pin-compatible with their EPROM...
C0QBmk~%24(KGrHqIOKkIEq4M%2Bu,)1BK2zHH580Q~~_35.gif)
This time, information will be shared about the schematics of radios, specifically the schematic of a programmer radio, along with the latest information available on Onmilwiki. The schematic of a programmer radio typically includes various components essential for its operation,...
In the past, it was straightforward to utilize the parallel port of a standard PC to program various types of AVR microcontrollers. Currently, one must purchase a programmer that connects to the PC via USB, which increases the complexity...
Warning: include(partials/cookie-banner.php): Failed to open stream: Permission denied in /var/www/html/nextgr/view-circuit.php on line 713
Warning: include(): Failed opening 'partials/cookie-banner.php' for inclusion (include_path='.:/usr/share/php') in /var/www/html/nextgr/view-circuit.php on line 713