
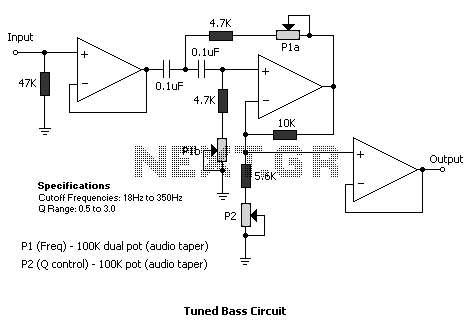
Bass Tuning circuit
Then increase the frequency of the filter. Notice how the sound gets thinner. Then increase the Q control until you hear an audible ringing at the frequency you selected. Now decrease the frequency control slowly until the desired tuning is achieved. Vary the Q control for the desired amount of resonance. Do this separately for the kick drum and the bass guitar. You will find settings that make them complement each other without stepping on each other sonically. In other words, the tunings should not be the same for both. You just have to fiddle around until it sounds best to you. Make a tape of this and listen to it on different systems, such as the car, the boom box, other people's stereos. Make a mental note of what tunings sound best in most places, and get used to how this sounds on your headphones! Your brain is correctly calibrated to the particular headphones by listening to many of your favorite CDs on them. As with any skill you develop, practice is essential. Learn to calibrate your ears to how a familiar CD sounds in the headphones as compared to speakers in various places. This is how you can learn to get correct sounding mixes using headphones. But you must use really good headphones. Go back to your reference CD often at first so that you can strengthen your aural memory. After a while, you will not need to use your reference CD as often. Keep bass frequencies in the middle and in mono. Be sure bass frequencies are not applied to the two channels out of phase, or else an unpleasant "pulling" sensation will occur. Try to record things in true stereo, using two mikes to maintain accurate sonic images. Use reverb judiciously to balance items placed to one side in the mix. Example: When putting tambourine in the left channel, create real stereo space using a stereo reverb. Be sure to have a sufficient amount of reverb to create a convincing sonic image. When using reverb on vocals, it is important to create a stereo reverb space around the vocals and not dead center. Real reverb does not occur dead center and in mono. Things should sound as they actually do in real space unless you are trying to create an effect. Be wary of boosting lower bass. Headphones will not deliver bass to the entire body so the usually pleasant sensation of bass is lacking. Excessive bass will have an annoying effect. Such excessive bass is also not good in mixes that will be played through speakers in the future, since most speakers will either be pushed into distortion or will poorly reproduce this bass and amplifier power will be wasted. It is a good idea to check the mix with speakers to be sure that the bass tonal balance is correct. If the bass tonal balance sounds good with speakers but has an annoying character with known high-quality headphones, then the lowest bass frequencies should be cut in the mix. Such lower bass frequencies are usually wasted with speakers.
The described circuit functions as a specialized audio processing unit, primarily designed for enhancing the low-frequency response of individual audio tracks, specifically targeting bass instruments such as the bass drum and bass guitar. This circuit employs a tunable high-pass filter with a roll-off characteristic of 12 dB per octave, allowing for precise control over the low-end frequency response.
The tuning circuit consists of two main controls: Frequency and Q. The Frequency control adjusts the cutoff frequency of the filter, while the Q control modifies the resonance at the selected frequency. At minimum settings, the circuit has a neutral effect, preserving the original sound. As the Frequency is increased, the low-end content is attenuated, resulting in a thinner sound. Adjusting the Q control introduces resonance, which can enhance the perceived fullness of the sound when set correctly.
For optimal results, the tuning process should be conducted separately for the kick drum and bass guitar to ensure they complement each other in the mix without overlapping in frequency response. This process involves iteratively adjusting the Frequency and Q settings while listening critically to the changes in tonal balance.
Moreover, the circuit is designed to mitigate the effects of room acoustics by allowing close-miking techniques, which can reduce the influence of ambient sound on the recorded signal. It is recommended to maintain bass frequencies in mono and centered in the mix to prevent phase cancellation issues that can arise from stereo recordings.
In addition to the tuning capabilities, the circuit can be integrated into a broader mixing setup that includes stereo recording techniques and judicious use of reverb to create spatial effects. Care should be taken to avoid excessive low-frequency boosts, as this can lead to distortion and an unbalanced mix, particularly when played back on various systems. Regular monitoring across different playback systems is essential for achieving a well-balanced final mix.A circuit that tailors the low end of particular items such as the bass drum and bass guitar to be used for individual tracks during mixdown, not across the entire mix. With the circuit, I can set the low end rolloff characteristic and stored energy of each of these items separately.
There is stored energy in the speaker/cabinet combination that adds body to the bass guitar that you can not get with typical equalizers. The tuning device allows you to get the bass drum to sit well with the bass guitar. There is little point in boosting the area below the cutoff of most speakers. As strange as it may seem, rolling off the bass content with a 12 db per octave, tunable high-lpass filter can actually give you a fatter and more defined bottom end than you would have if you let the response stay flat to 15hz.
The closer the mike is to the sound source in a given room, the less the room will have an effect on it. The tuning circuit applied to each of these low frequency signals can allow you to improve your bottom end.
It is beyond the scope of this article to provide a primer on drum miking. Let's just say, record it as best you can. It takes experience to get it right. There are two controls on the tuning circuit: Frequency and "Q". The tuning circuit is a variable frequency, low cut filter with a resonance control, which is referred to as "Q". Set the Q to minimum, and set the frequency to minimum. Things will sound pretty much as they did without the circuit. Then increase the frequency of the filter. Notice how the sound gets thinner. Then increase the Q control until you hear an audible ringing at the frequency you selected. Now decrease the frequency control slowly until the desired tuning is achieved. Vary the Q control for the desired amount of resonance. Do this separately for the kick drum and the bass guitar. You will find settings that make them compliment each other without stepping on each other sonically.
In other words, the tunings should not be the same for both. You just have to fiddle around until it sounds best to you. Make a tape of this and listen to it on different systems, such as the car, the boom box, other peoples stereos. Make a mental note of what tunings sound best in most places, and get used to how this sounds on your headphones!
Your brain is correctly calibrated to the particular headphones by listening to many of your favorite CDs on them. As with any skill you develop, practice is essential. Learn to calibrate your ears to how a familiar CD sounds in the headphones as compared to speakers in various places.
This is how you can learn to get correct sounding mixes using headphones. But you must use really good headphones. Go back to your reference CD often at first so that you can strengthen your aural memory. After a while you will not need to use your reference CD as often. Keep bass frequencies in the middle and in mono. Be sure bass frequencies are not applied to the two channels out of phase, or else an unpleasant "pulling" sensation will occur. Try to record things in true stereo, using two mikes to maintain accurate sonic images. Use reverb judiciously to balance items placed to one side in the mix. Example: When putting tambourine in the left channel, create real stereo space using a stereo reverb.
Be sure to have a sufficient amount of reverb to create a convincing sonic image. When using reverb on vocals, it is important to create a stereo reverb space around the vocals and not dead center. Real reverb does not occur dead center and in mono. Things should sound as they actually do in real space unless you are trying to create an effect. Be wary of boosting lower bass. Headphones will not deliver bass to the entire body so the usually pleasant sensation of bass is lacking.
Excessive bass will have an annoying effect. Such excessive bass is also not good in mixes that will be played through speakers in the future, since most speakers will either be pushed into distortion or will poorly reproduce this bass and ampl[ifier power will be wasted. It is a good idea to check the mix with speakers to be sure that the bass tonal balance is correct. If the bass tonal balance sounds good with speakers but has an annoying character with known high quality headphones, then the lowest bass frequencies should be cut in the mix.
Such lower bass frequencies are usually wasted with speakers. 🔗 External reference
Related Circuits
This functioning radio was built for an electronics module. The specified design was modified to include batteries, a switch, and a speaker instead of headphones. An additional amplifier circuit was required to power the speaker driver. Although not necessary,...
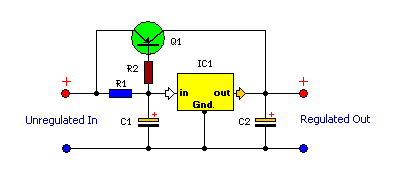
This is a compact and highly functional circuit that can be constructed on a veroboard. Voltage regulators such as the LM708 and LM317 series (among others) may occasionally require a load. The circuit utilizes voltage regulators, which are essential components...
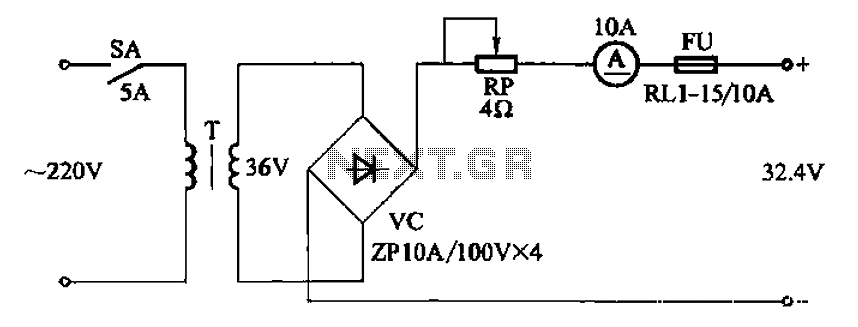
The adjustment potentiometer RP can modify the charging current. The adjustment potentiometer, designated as RP, serves a critical role in regulating the charging current within an electronic circuit. This component is typically a variable resistor that allows for fine-tuning of...
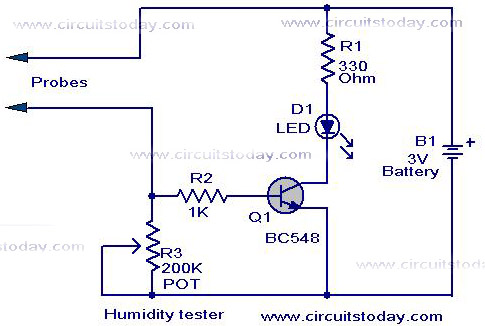
A simple humidity tester circuit using only an LED, a transistor, and a few resistors is explained with a clear circuit schematic. The humidity tester circuit is designed to provide a visual indication of humidity levels using basic electronic components....
The NE556 timer can function as an indicator for the static state of a digital logic audible terminal. An audible logic probe is beneficial for visually inspecting a component while simultaneously checking the logic state at another point far...

This Lazy Old Geek is also an Arduino enthusiast. One of the common microcontrollers used by Arduinos is the Atmega328 chip. To utilize Arduino software, the Atmega must be equipped with bootloader software. There is a notable difference between...