
breadboard circuits
This tutorial serves as an introductory guide for individuals new to electronics, focusing on the fundamental principles of circuit assembly using a breadboard. A breadboard is a reusable platform that allows for the easy construction of electronic circuits without the need for soldering.
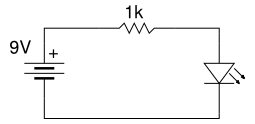
The circuit described in this tutorial involves the use of a Light Emitting Diode (LED) and a resistor, which are basic components commonly utilized in electronic projects. The LED serves as an indicator light, illuminating when current flows through it, while the resistor is used to limit the current to prevent damage to the LED.
To build the circuit, the following steps should be followed:
1. **Materials Required**:
- A breadboard
- An LED
- A resistor (typically 220 ohms for a standard LED)
- Connecting wires
- A power source (such as a 9V battery or a DC power supply)
2. **Understanding the Breadboard**:
The breadboard consists of horizontal and vertical strips of conductive metal. The horizontal rows are usually used for power connections, while the vertical columns are utilized for connecting components. It is essential to understand the layout of the breadboard to effectively place components.
3. **Circuit Assembly**:
- Begin by inserting the LED into the breadboard. The longer leg of the LED is the anode (positive), and the shorter leg is the cathode (negative).
- Connect the anode of the LED to one end of the resistor.
- Insert the other end of the resistor into the breadboard, ensuring it connects to a power rail.
- Connect a wire from the cathode of the LED to the ground rail of the breadboard.
- Finally, connect the power source to the power and ground rails of the breadboard.
4. **Testing the Circuit**:
Once all connections are made, power on the circuit. The LED should light up, indicating that the circuit is functioning correctly. If the LED does not illuminate, double-check all connections and ensure that the LED is correctly oriented.
This simple circuit serves as a foundational exercise for beginners, allowing them to gain hands-on experience with basic electronic components and breadboard usage. Understanding how to manipulate these components lays the groundwork for more complex electronic projects in the future.Beginners Tutorial 1: Building a Circuit on Breadboard - how to build a simple and easy circuit on breadboard for beginners in electronics. Learn to use a LED and resistor.. 🔗 External reference
Related Circuits
The 786A multi-functional double-tube fluorescent emergency circuit is illustrated in Figure 2-129. This circuit shares similarities with Figure 2-125. The 786A multi-functional double-tube fluorescent emergency circuit is designed to provide illumination during power outages or emergencies. It utilizes two fluorescent...
The circuits on this page are for motor controls using Push buttons and would typically be found in commercial and industrial installations. The circuits do not show the wiring of the motors themselves as this depends on the particular...

High Power Siren Circuit. This article discusses a robust siren circuit suitable for various applications. A complementary transistor pair (BC557 & BC337) is configured as an oscillator to directly drive the speaker. Transistor Q1 (BC557) is utilized to ensure...

This circuit is designed to operate an electric strike or an electromagnetic lock on a door. It does not control the door's opening or closing but rather activates a small electromagnetic strike that unlocks the door. The opener features...

This design circuit is a tone control circuit that utilizes the popular Baxandall configuration, a straightforward circuit layout that allows for continuous boost and cut control. The circuit is inexpensive to construct and is frequently implemented in commercial products....
It may seem that due to the numerous flashlight projects undertaken, there is a significant collection of lights. The inductor can be altered to set the current level, but the total current fluctuates with the battery supply, decreasing as...