
cheap motors with arduino

The SN754410 is not as straightforward to use as a motor shield, requiring numerous connections. For two motors, six Arduino output pins are necessary, along with a 5V reference, ground, four wires connecting to the two motors, and two wires for the motor power supply. To facilitate the workshop, several circuits were assembled on mini-breadboards to minimize the complexity for the students. These circuits resemble small white structures with numerous wires extending from them. The programming associated with the SN754410 is also more complex than that of motor shields. Each motor requires an enable pin on the Arduino to control the motor's speed, necessitating one of the Arduino's PWM output pins (9, 10, or 11), in addition to two logic pins that can be any digital output pins. To rotate the motor in one direction, the first logic pin is set high and the second low; to reverse the direction, the pins are switched, with the first low and the second high. Although this programming is manageable, conveying it to high school students with minimal programming experience poses a challenge. To simplify the process, a drop-in library was created to streamline the code significantly. This library defines a Motor object that can be initialized with the specific pins required, starting with the enable pin followed by the two logic pins. This approach aims to make motor control more accessible for the students, who will have various project options, including creating light displays with LEDs or generating sound with piezo buzzers.
The SN754410 provides a cost-effective and manageable solution for controlling DC motors in educational settings, allowing for hands-on experience with electronics and programming while minimizing the risk of errors during assembly. The design and implementation of the associated library further enhance the learning experience by abstracting complexities, thus enabling students to focus on creativity and innovation in their projects.Motor shields worked well - but they cost around $50 each, more than the Arduino itself. That`s fine for a single one, but I`m teaching an Arduino workshop (this Thursday!) for high school girls, and I needed something I could buy more cheaply so I could get more of them. (Incidentally, if any women in the Bay Area want to help with the workshopthis Thursday, June 28 2012, I could definitely use a few more helpers! Please drop me an email. ) What I found on the web and on the Arduino IRC channel was immensely confusing to someone who isn`t an electronics expert - most people recommended things like building custom H-bridge circuits out of zener diodes. But it`s not that complicated after all. I got the help I needed from ITP Physical Computing`s DC Motor Control Using an H-Bridge. It turns out you can buy a chip called an SN754410 that implements an H-bridge circuit - including routing a power source to the motors while keeping the Arduino`s power supply isolated - for under $2.
I ordered my SN754410 chips from Jameco and they arrived the next day. (Technically, the SN754410 is a "quad half-bridge" rather than an "dual h-bridge". In practice I`m not sure of the difference. There`s another chip, the L298, which is a full h-bridge and is also cheap to buy - but it`s a bit harder to use because the pins are wonky and it doesn`t plug in directly to a breadboard unless you bend the pins around. I decided to stick with the SN754410; but the L298 might be better for high-powered motors. ) Now, the SN754410 isn`t as simple to use as a motor shield. It has a lot of wires - for two motors, you`ll need six Arduino output pins, plus a 5v reference and ground, the four wires to the two motors, and the two wires to the motor power supply.
Here`s the picture of the wiring, made with Fritzing. With all those wires, I didn`t want to make the girls wire them up themselves - it`s way too easy to make a mistake and connect the wrong pin (as I found when doing my own testing). So I`ve wired up several of them on mini-breadboards so they`ll be more or less ready to use. They look like little white mutant spiders with all the wires going everywhere. The programming for the SN754410 is a bit less simple than motor shields as well. For each motor, you need an enable pin on the Arduino - the analog signal that controls the motor`s speed, so it needs to be one of the Arduino`s PWM output pins, 9, 10 or 11 - plus two logic pins, which can be any of the digital output pins.
To spin the motor in one direction, set the first logic pin high and the second low; to spin in the other direction, reverse the pins, with the first one low and the second one high. That`s simple enough to program - but I didn`t look forward to trying to explain it to a group of high school students with basically no programming experience.
To make it simpler for them, I wrote a drop-in library that simplifies the code quite a bit. It defines a Motor object that you can initialize with the pins you`ll be using - the enable pin first, then the two logic pins. Initialize them in setup() like this: I hope this will make motors easier to deal with for the girls who choose to try them.
(We`ll be giving them a choice of projects, so some of them may prefer to make light shows with LEDs, or music with piezo buzzers. ) 🔗 External reference
Related Circuits
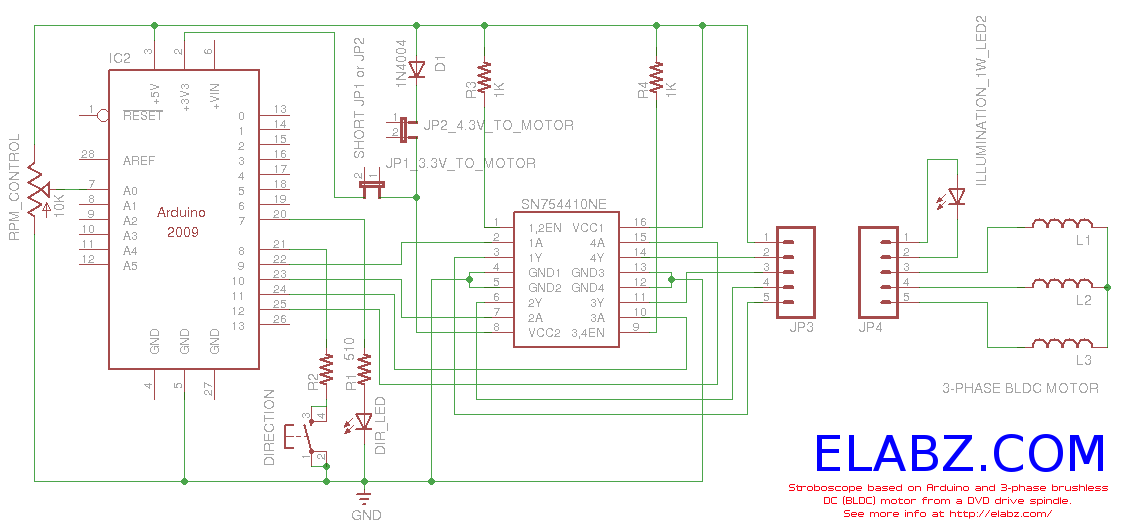
Constructing a stroboscope (zoetrope) using an Arduino and the spindle motor from a damaged Xbox 360 DVD drive. Includes zoetrope animations, Arduino code, and circuit schematic. The project involves utilizing an Arduino microcontroller to control the spindle motor extracted from...
Faulty readings from the DS18B20 temperature sensors used in tank thermometers were likely caused by the waterproofing method involving heat shrink and silicone. This situation provided an opportunity to enhance the code for better tolerance against erroneous readings. The...
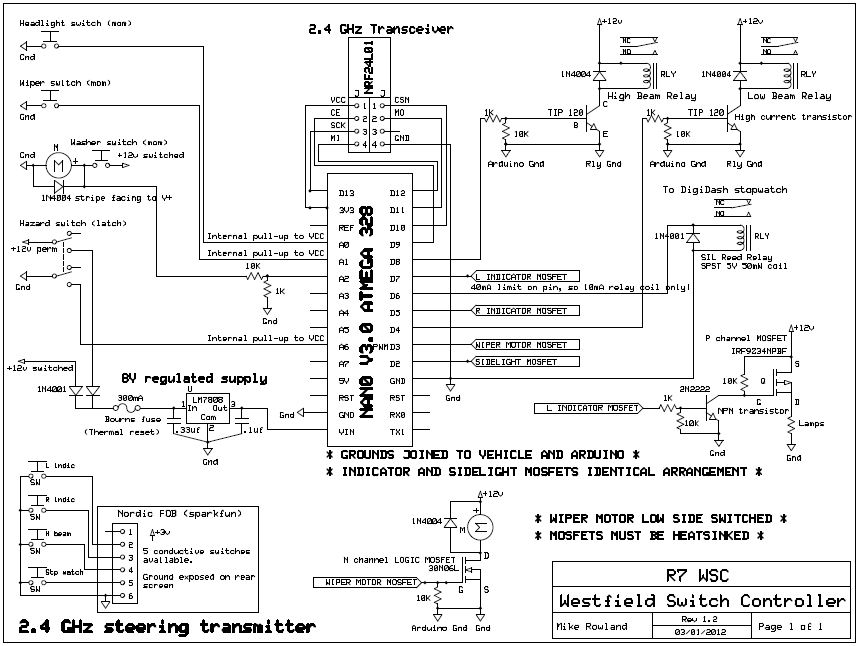
The core of the switch controller is an Arduino Nano microcontroller, which will serve as the interface between the dashboard switches, wireless steering wheel buttons, and the vehicle's lighting, indicators, windscreen wipers, and DigiDash2 GPS stopwatch. This setup facilitates...
An intervalometer for the Canon 400D camera has been developed. This device is based on an Arduino platform and utilizes code adapted from the creator of the Intervaluino project. The intervalometer is a specialized electronic device designed to automate the...
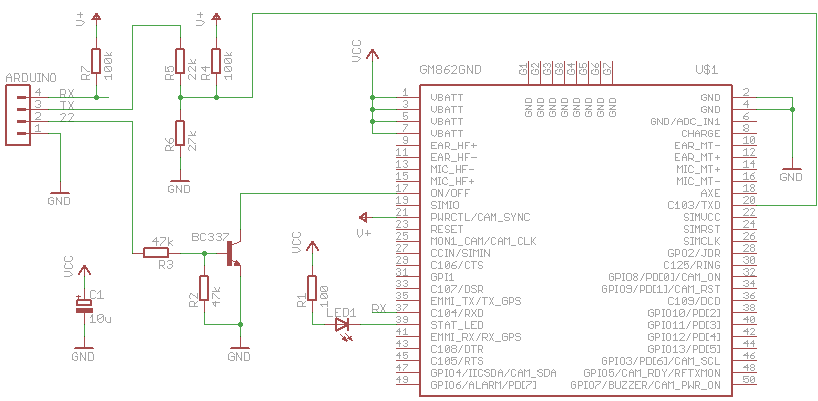
The Arduino can communicate over various networks, including Ethernet, Bluetooth, Wi-Fi, XBEE, and GPRS. A Telit GM862-GPS module, which has GPRS and GPS capabilities accessible via AT commands, has been repurposed for use with the Arduino. The GM862's logic...
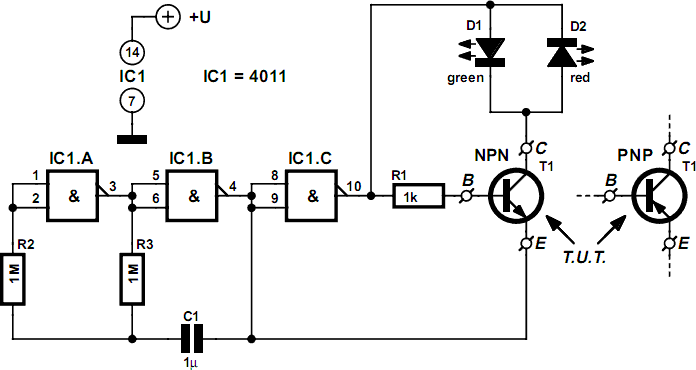
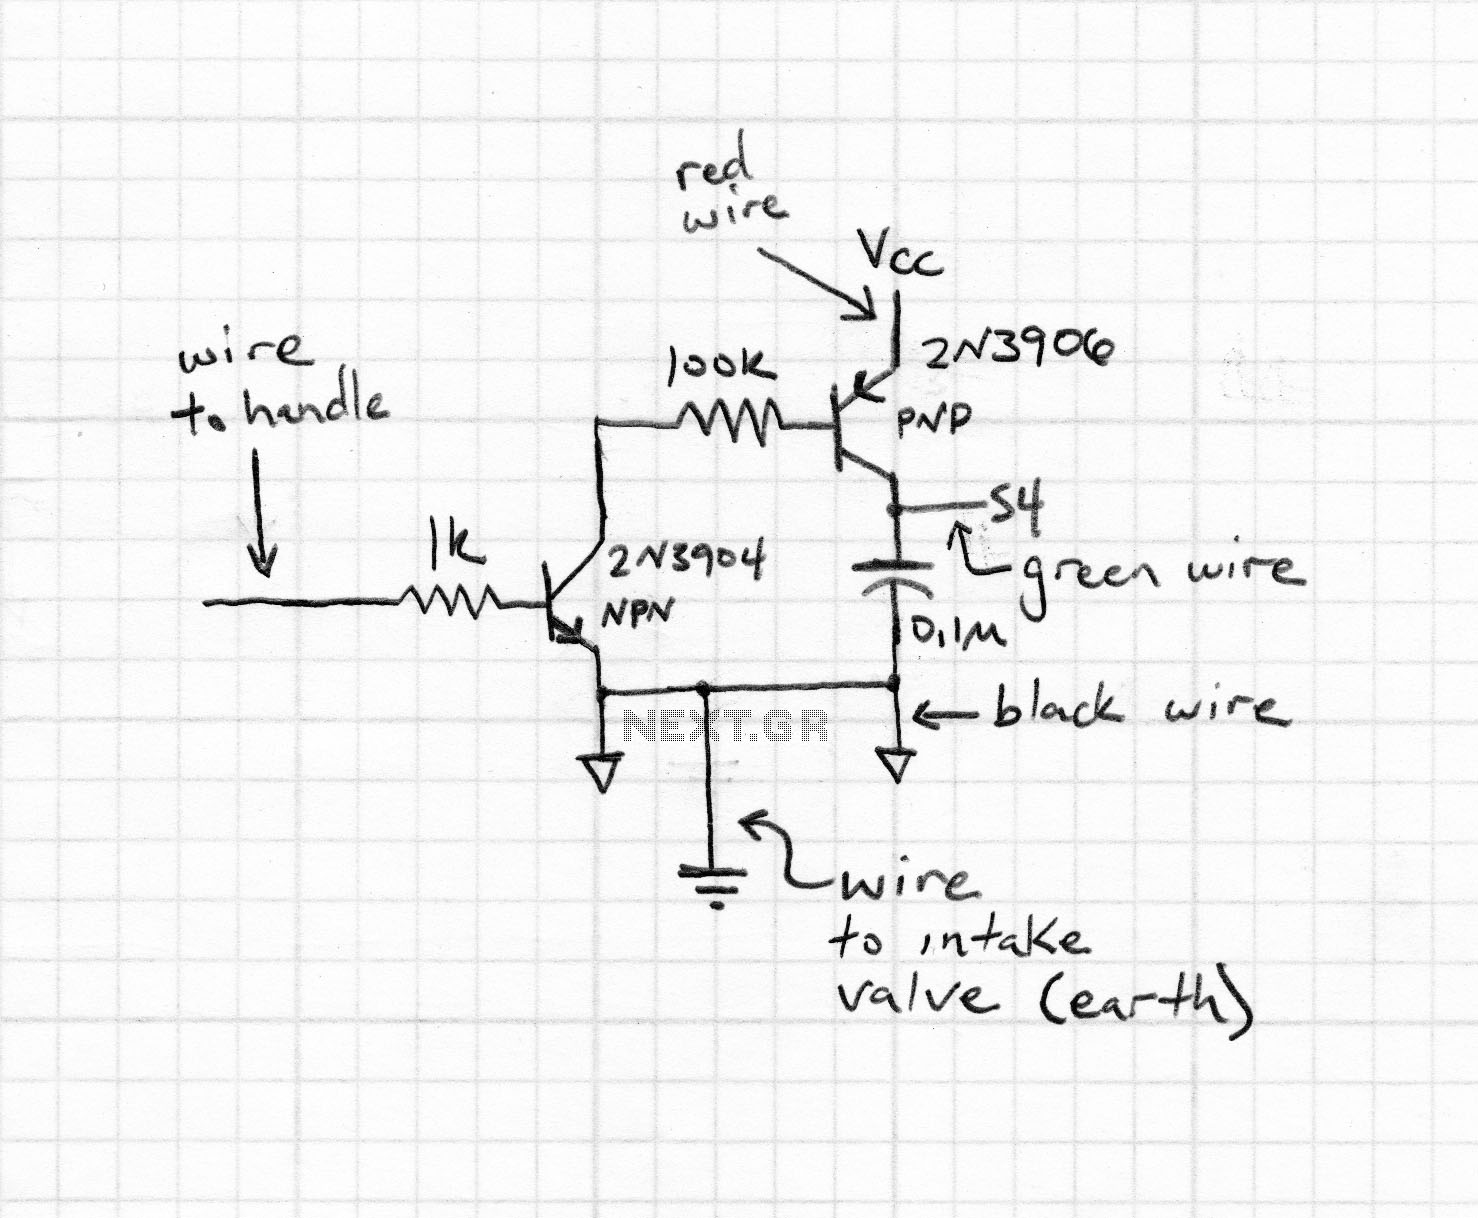
This small transistor tester employs a simple visual indication system to perform a quick go/no-go check on both NPN and PNP transistors. If the tested device is a functional NPN transistor, the green LED (D1) will flash, while the...