
Compact 3-in-1 Stripboard DIYduino with Integrated Sensor and L298N Motor Shield
The ArduinoISP Bootloader/Programmer Combination Shield serves as an effective tool for programming and bootloading ATMEGA microcontrollers in DIY projects. This shield is particularly useful for individuals looking to create their own Arduino-compatible boards, known as DIYduino. The integration of a USB to serial chip, such as that found in the Arduino Uno, facilitates the uploading of sketches and bootloaders efficiently.
The design process begins with the creation of a schematic, which is essential for developing a corresponding strip board layout. The adaptability of strip board designs allows for the use of various schematics, simplifying the prototyping process. The minimalist Arduino schematic was selected for its simplicity, providing a more manageable platform for the intended application. Adjustments to component values, particularly capacitors, were made to ensure stability in voltage regulation, crucial for maintaining the performance of the circuit.
The integration of an L298N motor driver into the design expands the functionality of the DIYduino, enabling it to control motors effectively. The connections between the L298N and the ATMEGA pins were carefully planned to ensure compatibility and optimal performance. The use of PWM pins allows for variable motor speed control, enhancing the versatility of the project.
A comprehensive parts list is critical for assembly, with considerations made for bulk purchasing to reduce costs. The distinction between essential and optional components is clearly marked, aiding in budget management and resource allocation. This meticulous approach to component selection and circuit design ensures that the final product is both functional and cost-effective.
Overall, the ArduinoISP Bootloader/Programmer Combination Shield, combined with the minimalist Arduino schematic and the L298N motor driver, represents a robust platform for developing custom Arduino-compatible devices. The careful planning and execution of this project exemplify the principles of efficient electronics design, providing a valuable resource for hobbyists and engineers alike.ArduinoISP Bootloader/Programmer Combination Shield (not shown) & Arduino with USB to serial chip (e. g. Arduino Uno ) to upload the bootloader and sketches to DIYduino. You can also use a USBtoSerial programmer for uploading a sketch and work around the Bootloader Shield and use the DIYduino you build here to load the bootloader.
To create the strip board layout I determined the schematic I wanted to create first. You can essentially do a strip board design with any schematic no matter if you invented it, downloaded it, or re-engineered it. For me the official Arduino schematic was a tad too complicated and essentially overkill for my purpose.
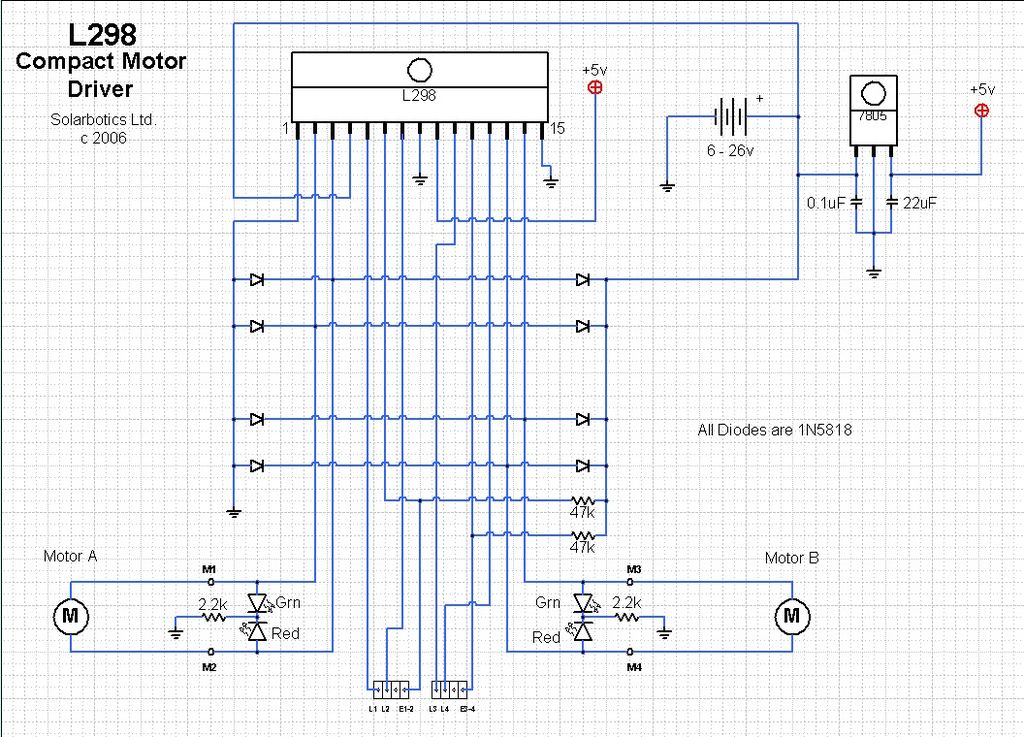
Instead I altered the much simpler schematic of the minimalist Arduino as shown in the first figure. This schematic was published and discussed on. 2. I changed the values of the capacitors that smooth potential voltage peaks at the 5V regulator. These are the values that I had available in my stock and they`ll do the job. 3. I crossed out the LED/resistor connected to Pin13 to safe parts. I only connected an LED/resistor temporarily to test the functionality of the DIYduino as described later. Then I combined the minimalist Arduino schematic with a schematic of a L298N motordriver that I found on solarbotics`s site.
I did this by connecting L1, L2, L3, and L4 (L298N pins 5, 7, 10, & 12) to the ATMEGA`s digital pins 7, 8, 13, & 12, respectively. Pins E1-2 and E3-4 (L298N pins 6 & 11) are connected to +5V for maximum motor speed at all times or to Arduino PWM pins 9 & 6 for adjustable motor speed, respectively.
I am also showing the ATMEGA 168/328 pin map, which help me to assign the proper ATMEGA pins and which can be found at. The table shows all the parts for the devices including prices from Jan, 2013. I considered some of the parts, such as jumper wires or resistors, as standard inventory that is likely purchased in bulk and not as individual parts.
Therefore I typically listed individual parts and noted with an asterisk when you would have leftovers, such as for example extra strip board which you can use on other projects. I did not consider the prices marked with the single asterisk for the total price of the device. Further note that item prices at Newark drop when you order a certain number of parts, typically if you order more than 10x.
I listed the highest individual prices here and also ignored any special offers or promotions. If you buy more the price will go down. On another note, not all of the parts listed here are really necessary for operation. The parts that you can omit are marked with a double asterisk. The bare bones price` is also indicated at the bottom of the table. Last not least, the ATMEGA 328 that I used required a bootloader. I recently created an instructable called ArduinoISP Bootloader/Programmer Combination Shield that addressed how to upload a bootloader to a virgin ATMEGA. You can also buy ATMEGAs that have a bootloader installed. They are almost double the price. For completion I listed one in the table. 🔗 External reference
Related Circuits

The LM35 series are precision integrated-circuit temperature sensors, whose output voltage is linearly proportional to the Celsius (Centigrade) temperature. The LM35 has an advantage over linear temperature sensors calibrated in Kelvin, as the user is not required to subtract...
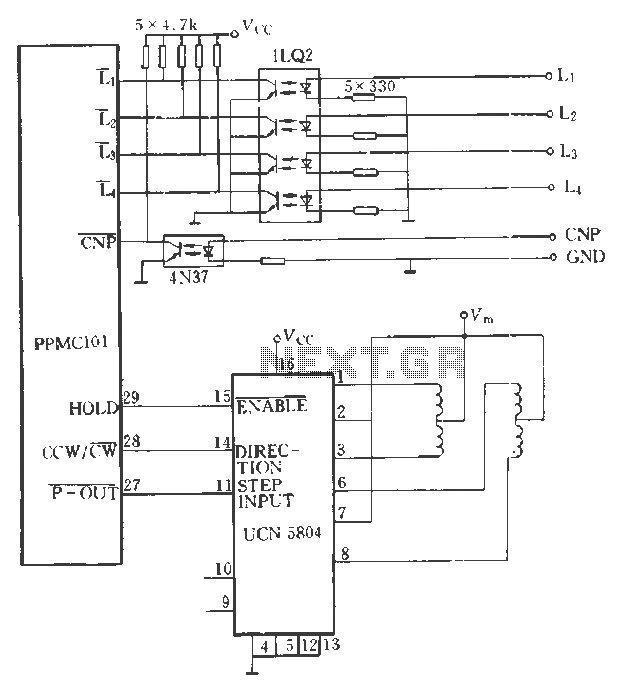
The PPMC external UChl 5804 demonstrates a four-phase stepping motor drive integrated circuit (IC) that is depicted in a downward motion. It utilizes the P-OUT, counterclockwise (ccw) / clockwise (cw), and HOLD outputs. The UCN5804 pins 9 and 10...
Stepper motors consist of a permanent magnet rotating shaft, known as the rotor, and electromagnets on the stationary part that surrounds the motor, referred to as the stator. One complete rotation of a stepper motor is illustrated. At position...
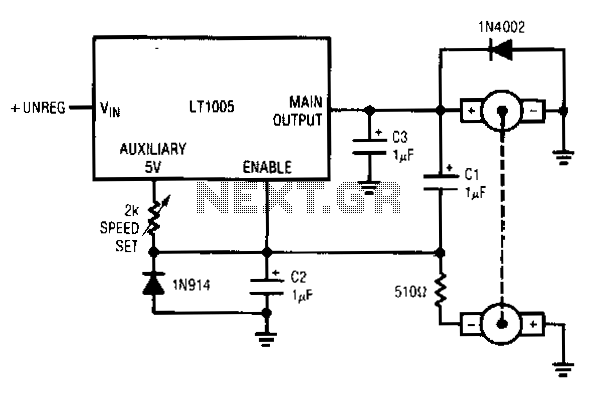
This circuit utilizes a tachometer to generate a feedback signal that is compared to a reference provided by the auxiliary output. Upon power application, the tachometer output is initially zero, allowing the regulator output to activate and supply current...
This Super Light Sensor responds to minute fluctuations in light levels, automatically adjusting from approximately 200 lux to 60,000 lux (from a modestly lit room to direct sunlight). It has various potential applications, such as detecting a car entering...
Previously, one magnet measured 2x2x3 cm; it has now been replaced with a round magnet measuring 1.5 x 2 cm. This change significantly impacts the motor's operation, allowing it to run on 1 V and 0.1 A, resulting in...