
DIY 6T9 Tube (Valve) Single-Ended Amplifier Kit
 Single-Ended Amplifier Kit")
The amplifier circuit is designed around vacuum tubes, specifically utilizing the 6T9 tube for amplification. The PCB layout is optimized for minimal signal path length, which helps reduce noise and interference. The power supply section incorporates a voltage regulation circuit to ensure stable operation of the amplifier under varying load conditions. The use of polypropylene capacitors for input and coupling stages provides excellent frequency response and low distortion, crucial for high-fidelity audio applications.
The output stage employs a push-pull configuration, allowing for improved efficiency and reduced harmonic distortion. The inclusion of snubber capacitors across diodes and filaments minimizes high-frequency noise, enhancing the overall sound quality. The ultra-linear tap on the output transformers allows for a unique operational mode that blends the characteristics of both triode and pentode operation, providing a rich tonal quality and dynamic range.
To further enhance the build quality, the use of rubber grommets for transformer mounting isolates vibrations that could affect the audio performance. The choice of a low-cost cooking pan for the chassis not only serves as a functional housing but also contributes to the aesthetic appeal of the amplifier, showcasing the craftsmanship involved in the DIY project.
The careful selection of components, attention to layout, and the incorporation of vibration-damping techniques contribute to the overall performance of the amplifier, making it a compelling choice for audio enthusiasts looking for a cost-effective yet high-quality tube amplifier solution.The PCB for this amplifier can be purchased from Spare Time Gizmos for $16US. In a single afternoon you can have the whole board assembled and dropped into a chassis of your choice. The value and type of component is laid-out in the parts list. But what I like to do is to put my own twist on each amp I build. If you are not an experienced valve am p building follow the parts specification to the letter. I increased the input and coupling capacitors to 0. 22 uF and used polypropylene types. These components are physically larger than what is meant for the PCB so some manipulation is required. I also like to use snubber capacitors across any possible noisy components such as 0. 01 uF poly caps. across the diodes and 1 uF capacitors across the filaments of the valves. Snubbers on the filtering caps is also a good idea and I used 0. 1 uF polies. I added an extra 200 uF of capacitance to the power supply and found that this helped the bass response.
I used a Hammond 369JX power transformer and Edcor XSE15-8-5K for the output transformers (OT). A smaller OT can be used but expect the bass and treble to suffer. The Edcor OTs are very reasonably priced and also have a ultra-linear (UL) tap so you can run the amp in true UL mode. I mounted the tube sockets on the back of the board so I could expose the cute little hot bottles outside the chassis.
A drilling template is provided with the boards. Instead of an expensive chassis I used a $7 cooking pan. Drilling thin metal can be more problematic than drilling a heavy chassis, so be patient with drilling. I mounted the power and OTs on rubber grommets that were sliced in half. This was done to reduce the potential for transformer vibrations reaching the tubes which can be microphonic.
The thin chassis is mounted on thick lacquered pine and silicon feet to also help absorb vibration. An Alps blue velvet 50k stereo potentiometer with an audio taper was used for signal attenuation. The front of the amp was finished off with a 4 oz solid brass knob. The brass knob and attenuator are expensive but what I saved on the chassis allows me to spend in other areas and still make this an inexpensive amp to build. Total cost for the amp was about $375AU (Hammond and other imported parts are expensive in Australia) but one can easily build this amp for about $250US in North America using good iron.
While the waves are not outstanding, there is no sign of ringing, overshoot or instability. The tilting at the top of the waves is caused by low frequency roll off, which is not entirely unexpected for a small and simple single-ended (SE) tube amp. The maximum rated power output is about 4W with only a Watt or two of good output. So depending on your room, efficient speakers are likely required. The big shock which will hit you when you play this amp, is the depth and breadth of the soundstage. With a pair of Fostex FE167E bookshelf speakers 3. 5 m apart the soundstage extends past my listening position 4. 5m back. The width of the sounds stage extends a couple of meters either side of the speakers. This occurred through other speakers also. Classical music through this amp is excellent. Some big orchestral heavy going tracks get a little muddied but string quartets etc. come though balanced and detailed. Voice and piano come though natural and earthy. Drums and cymbals have a "club atmosphere" like sound. I would recommend this little amp to new and experienced builders alike but teamed with some high efficiency speakers to really enjoy what it is capable of.
The image below shows the 6T9 tube amp with a NAD C542 cd player, DIY silver interconnect cables and Fostex FE167E bass reflex speakers. This makes for a great and musical combo. UPDATE 4 September 2008: I have completed a second 6T9 Tube Amplifier which operates in Ultra-Linear mode as opposed to Pentode mode.
For more information, see the Ultra-Linear 6T9 DIY Tube Amplifier Project page. 🔗 External reference
Related Circuits
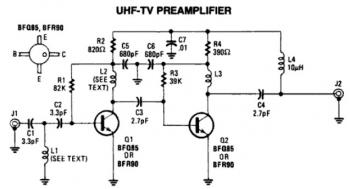
This is a low-cost, antenna-mounted UHF TV pre-amplifier circuit that can provide more than 25 dB of gain. The first stage of the pre-amplifier is biased for optimum gain. L1 and L2 are strip line equivalents with a length...
This is a successful vacuum tube project featuring a small amplifier where a 6V6GT output pentode is connected in triode mode, producing an output of approximately 4.5 watts. The project includes a single-ended audio amplifier with a resistive input...
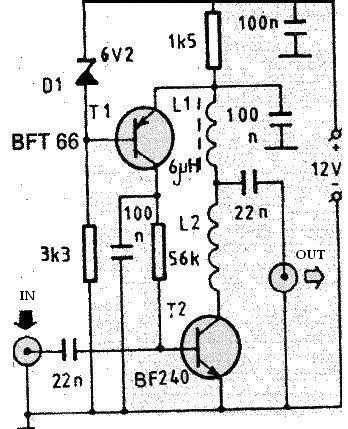
The PCB of this circuit should be positioned close to the antenna within a compact metallic enclosure. This VHF antenna circuit requires a 12 volts DC power supply, which can be sourced from a 12-volt battery, as the current...
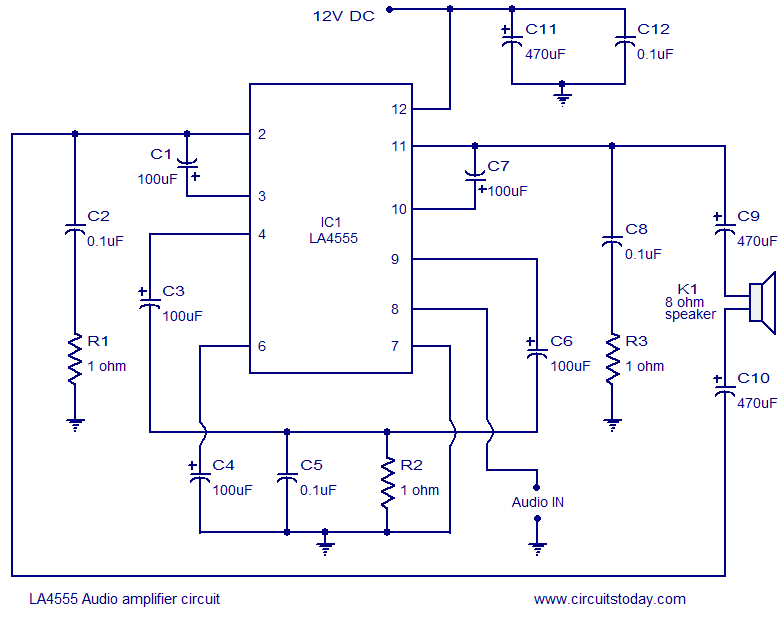
The LA4550 audio amplifier operates in a BTL (Bridge-Tied Load) configuration. This amplifier is capable of delivering 4W into an 8-ohm load when powered by a 12V power supply. The LA4550 is designed for audio amplification applications, particularly in situations...
The LM3886 high-performance audio power amplifier circuit schematic is a crucial component in sound reproduction within audio systems. This audio power amplifier utilizes the LM3886 integrated circuit to enhance sound quality and output. The LM3886 is a high-performance audio power...
This electret microphone amplifier is constructed using standard electronic components. It is designed to work with an electret microphone capsule, although it can also accommodate a dynamic microphone that has low resistance. The circuit operates with a supply voltage...