
Gag Circuits

The Dripper is a device that produces a slow dripping sound only when the lights are off. The circuit is based on a low-power version of the two-transistor flasher and is designed to run on a 9-volt battery for weeks. This circuit employs regeneration to amplify the ringing of the tuned circuit that generates the chirp sound, making it less sensitive to variations in transistor gains and inductor quality (Q). A potentiometer connected across the inductor controls the length of the chirp; shorter chirps mimic a dripping sound, while longer chirps resemble insect sounds. An optional CDS photocell can be added to stop the dripping sound when the lights are turned on. In darkness, the photocell exhibits very high resistance, causing the voltage at the base of the 2N4403 transistor to be set at approximately 6 volts by two resistors. The emitter capacitor charges toward this voltage through a 330k resistor, which determines the drip rate. When the emitter voltage exceeds the base voltage, the two transistors activate, completing the circuit and producing the dripping sound.
This project combines elements of electronics and creative illusion, making it an engaging endeavor for those interested in both fields. Careful assembly and attention to detail are crucial for achieving the desired effects in both the magic lamp and the Dripper circuit, ensuring a successful and entertaining outcome.This magic lamp appears to be an ordinary frosted light bulb with a rather unusual characteristic. Whenever your finger is touched across the base threads and center contact the lamp magically lights! Without wires! It is a most effective illusion if you don`t make a big production, "Hey! Check out this magic lamp!", but instead casually remove the bulb from a package of new bulbs and pretend to not notice when it lights. When your victim gasps and grabs the bulb for further investigation just explain away the flash as some sort of static electricity effect and act indifferent. Construction will probably involve several attempts unless you are familiar with glass working. Collect several old burned-out light bulbs and learn to remove the base without breaking the glass. The bases are glued on fairly well but with gentle prying and twisting they will break loose. Try not to scar the metal base too much if you want to reinstall it or alternately just peel it off and get a pristine base by breaking away the glass on another bulb.
Now the really tricky part is to break off the bottom of the bulb without shattering the whole thing. A glass cutter may be used to score a ring around the base to encourage the desired break. This break should be near the bottom so that when the bulb is remounted on the base the break will not show.
Keep your fingers out of the inside of the bulb so that the frosting doesn`t get a greasy fingerprint. Several factors should be considered when selecting a battery and lamp combination. First, the weight should be kept low if the victim will hold the bulb. Second, the lamp should be as bright as practical and should emit light in an omnidirectional pattern.
Try those "super Krypton" flashlight replacement bulbs and two AAA cells or one AA cell. A simple version may be constructed by connecting the battery, bulb and base in series such that the circuit is completed when a penny is connected across the base. The more sophisticated version shown in the diagram will respond to the resistance of moist skin and therefore requires less manual dexterity.
Mount the circuitry as deep in the base as possible so that it doesn`t show through the glass and mount the battery vertically out of the base by securing it with a good quality epoxy. Paint the battery, wires, and components white so they don`t show then fasten the bulb back into position with hot-melt glue.
Hot-melt glue will allow easy disassembly when the battery needs changing. Just when you get all comfy in bed you hear it. Drip. Drip. Drip. But when you stumble into the bathroom to give the faucet a twist, the dripping sound stops. After a few trips back and forth you venture out without turning on the lights- to "sneak up" on the drip. The only problem is that you can`t see anything! Well, this fate can befall a friend (hereafter referred to as "victim") with a little help from you and the Dripper.
The Dripper produces a slow dripping sound but only when the lights are off. The circuit is based on a low power version of the two-transistor flasher and should run on a 9 volt battery for weeks. This new circuit uses regeneration to increase the ringing of the tuned circuit that produces the chirp sound.
The circuit is therefore less sensitive to transistor gains and inductor Q. The potentiometer across the inductor controls the chirp length. A short chirp will sound most like a drip whereas a longer chirp sounds like some sort of insect. The CDS photocell is optional and will cause the dripping to stop when the lights are turned on. When dark, the photocell has a very high resistance and the voltage on the base of the 2N4403 is set by the two resistor to about 6 volts. The emitter capacitor begins charging toward this value through the 330k resistor which determines the drip rate.
When the emitter voltage rises above the base voltage the two transist 🔗 External reference
Related Circuits

The circuit in Figure 1 is a 4-bit asynchronous counter, also known as a ripple counter. It consists of four J-K flip-flops with their J and K inputs connected to logic 1. This configuration causes the output of each...

The final article on bipolar junction transistors (BJT) presents a variety of circuits, some practical and others more experimental. These circuits are capable of amplifying signals, filtering high and low frequencies, generating white noise, and flashing lamps. They can...

A digital audio frequency (AF) counter can be constructed using a minimal number of components by employing a single 7226B integrated circuit (IC) from Intensil, as depicted in the accompanying diagram. This circuit has an upper frequency limit of...

The motion sensor circuit depicted in Figure 1 operates when a 12-volt power supply is applied to the input point. The motion sensor circuit is designed to detect movement and trigger a response based on the presence of motion...

Both circuits utilize the GE SC146B, a 200 V, 10 A Triac for load current contacts. These triacs are activated by standard SBS (2N4992) trigger circuits, which are managed by a photo-Darlington configuration, functioning through the DA806 bridge as...
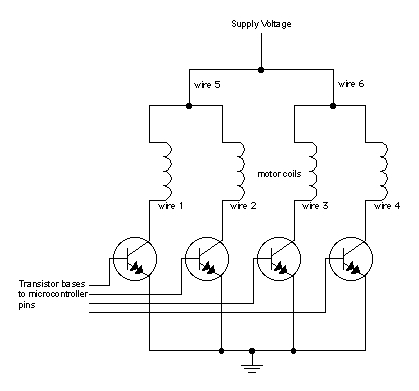
When moving objects with microcontrollers, three types of motors are particularly useful: DC motors, servomotors, and stepper motors. Most motors operate on the electrical principle of induction. When electric current flows through a wire, it generates a magnetic field...