
Garduino-Automated Gardening System using Arduino

The automated gardening system utilizes an Arduino microcontroller as the central processing unit, interfacing with soil moisture sensors that measure the resistivity of the soil to determine moisture levels. The system employs a simple voltage divider circuit formed by the 100 K-ohm resistor and the sensor, allowing the Arduino to read the analog voltage that corresponds to the soil moisture level. The use of a multiplexer is essential when multiple sensors are employed, as it allows for the selection of which sensor's output to read at any given time, conserving the limited number of analog input pins available on the Arduino.
The moisture sensors consist of two conductive nails placed in the soil, which act as electrodes. The resistivity of the soil changes based on the moisture content, which is measured by the voltage drop across the known resistor when current flows through the nails. The Arduino is programmed to read these values at regular intervals and determine when to activate a water pump or irrigation system based on predefined moisture thresholds.
The construction of the sensors involves careful soldering of wires to the nails, ensuring robust connections. Heating the nails before soldering helps to improve the quality of the solder joint. The acrylic casing provides protection for the sensors while allowing moisture to enter. Proper sealing with silicone glue prevents water from damaging the electronic components.
In summary, this automated gardening system not only conserves water but also promotes sustainable gardening practices by providing real-time data on soil conditions, enabling efficient resource management. The integration of sensors and microcontroller technology facilitates a hands-free gardening experience, making it suitable for urban and rural gardening applications alike.This instructable is a guide for setting up an automated gardening system using an arduino and other cheap electronic parts. It allows sustainable gardeningby using sensors to determinesoil moisture, as well as a webscraper to determinefuture weather.
It uses this information tosave water by only using the requisite amount. Requirements for this pr oject include experience soldering, some basic programming experience, and much patience for debugging. The moisture sensors rely on the resistivity of water to determine themoisture level of the soil. The sensors measure the resistance between two separate nailsby sending a current through one of them and reading a corresponding voltage drop due to a known resistor value.
The more water the lower the resistance, and using this we can determine threshold values for moisture content. While we will include a circuit board diagram, we recommend building the circuits on a breadboard first which will allow for both understanding and debugging.
Each sensor uses two nails, a 100 ohm resistor, anda 100 K-ohm resistor. We built a casing for each sensor with acrylic tubes, however this is not necessary. The first step is to find two equal length nails of any type, although we found that longer and non-galvanized nails worked best (galvanized nails do not work at all). Next, a wire needs to be soldered to each nail. It is best to use weaved wire since it is flexible and less likely to break during use. The nails act as a heat sink, and to counteract this they must be heated before soldering. A hotplate was used to get the nails very hot. The next step is to wire the nails to the arduino. Use the circuit diagram provided. The sensor works by sending a fake AC current by alternating DC current between the two nails. Theanalog voltage is then read anda moisture level can be inferred. Our code for the whole project will be available. A picture of the finishedsensor with acrylic covering is on the next page. We read an input voltage into a multiplexor from a voltage dividor created by the 100K resistor. The 100 Ohm resistor, attached to the other lead of the sensor, is used for current limiting. Current limiting imposes an upper limit on the current coming into the arduino, which protects it from short-circuiting.
Take a hollow acrylic tube and attach it to a pointed front with two holes for nails. Seal the bottom from water with silicone glue. Make sure that the nails are not touching as this will short the circuit. Use a rubber stopper to seal the top. It is important that the nails be equal distances apart on each of the moisture sensors, as any variation could affect resistivity readings from one or more of the probes. To improve performance we used three soil moisture sensors. However, there may not be enough analog pins on thearduino to accommodate all of these depending on what other attachments you are using.
We solved this problem by using a multiplexer, which allowed us to switch between and read from each of the three pairs of sensors. The circuit diagram is given below. 🔗 External reference
Related Circuits
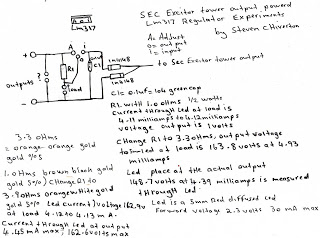
The following experiment demonstrates how Mr. Steven successfully extracted free energy from air using his home-built secondary exciter coil tower. He utilized this energy to power a small LM317 power supply unit. During the process, he hand-wound his coils...
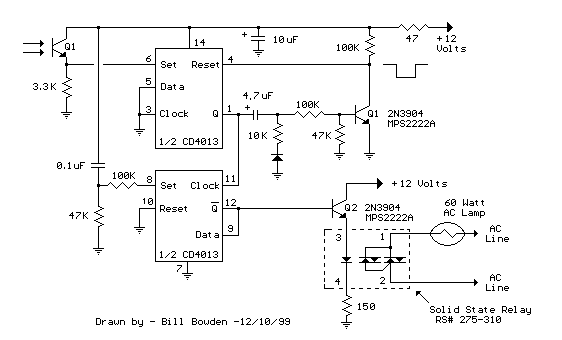
The IR photo transistor Q1 (Radio Shack 276-145A) or a similar component is connected to the set input (pin 6). It is essential to shield the photo transistor from direct light to ensure that the voltage at the set...

This design circuit is a tachometer circuit based on the LM2907 integrated circuit, which can provide zero-crossing data to a digital system. At each zero crossing of the input signal, the charge pump alters the state of capacitor C1...
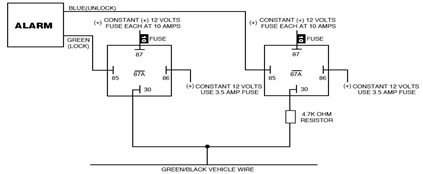
The following circuit illustrates the Ford Probe Single Wire Door Alarm System. This Single Door Locking Wire manages both LOCK and UNLOCK functions, indicating that the pulse wires must be connected to the same vehicle wire. The system primarily...
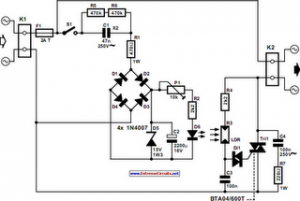
The following circuit illustrates an Automatic Light Dimmer Circuit Diagram utilizing a 1N4007 diode. Features include integration within a wall-mounted box. The Automatic Light Dimmer Circuit is designed to adjust the brightness of a light source automatically based on ambient...
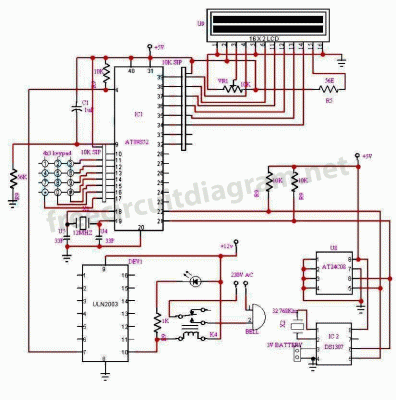
The circuit is a bell timer. This project utilizes the AT89S52 microcontroller and an I2C EEPROM for storing alarm timings. Additionally, the 7-segment display has been replaced with an LCD display. The DS1307 is employed for real-time clock functionality....
Warning: include(partials/cookie-banner.php): Failed to open stream: Permission denied in /var/www/html/nextgr/view-circuit.php on line 713
Warning: include(): Failed opening 'partials/cookie-banner.php' for inclusion (include_path='.:/usr/share/php') in /var/www/html/nextgr/view-circuit.php on line 713