
GPS RS232 Dev Board

The described circuit is a versatile solution for establishing RS232 communication between a GPS unit and a computer or microcontroller. The power supply section, featuring the LM317 voltage regulator, ensures that the circuit receives a stable 3.3V output, which is essential for the proper functioning of the GPS unit. The use of the MBRA140 diode for reverse polarity protection is a critical design choice that safeguards the circuit from potential damage due to incorrect power supply connections.
In the communication section, the MAX3232 IC serves as the bridge between the low-voltage TTL signals from the GPS unit and the higher-voltage RS232 signals required by the computer. This IC's ability to invert signal levels is particularly important for ensuring compatibility with standard RS232 protocols. The inclusion of charge pump capacitors allows the MAX3232 to operate effectively at lower voltages, making it ideal for applications where power efficiency is a concern.
The design also emphasizes modularity, as evidenced by the J2 header, which facilitates easy power sharing between multiple boards. This feature enhances the circuit's flexibility, allowing it to adapt to various project requirements without extensive rewiring.
Overall, this schematic provides a robust foundation for implementing RS232 communication in embedded systems, combining efficient power management with reliable signal conversion. The careful selection of components and their configurations demonstrates a thoughtful approach to circuit design, ensuring both functionality and durability in practical applications.Once you discover how to setup an RS232 connection, it`s really just cut-and-paste for future projects. Please note this is a relatively compact SMD version of the power supply. This can easily be obtained with through-hole components using a breadboard. Here is theschematic: The D3 large diode MBRA140 is for reverse protection. It can handle up to 1A and prevents damage to the board if a center-negative wallwart is attached. This diode will cause a ~0. 5V drop from whatever the wall-wart is outputting. U1 is the LM317 (or LM1117 in SMD form) adjustable voltage regulator. It will take in some larger voltage and output a set voltage. The output voltage is set with two external resistors. R1 is historically 240 and value for R2 is different for different required output voltages. In our case, we want 3. 3V out of the regulator, so R2 is set to 715. The LM317 is good because it is variable, the SOT-223 package is nice becuase it can take a relatively large voltage on the input (25V max I believe ) and has decent heat dissapation. J2 is just a two pin polarized header so that you can either `steal` 3. 3V from the board to power other boards, or have other boards power this board without the need for the external wall wart.
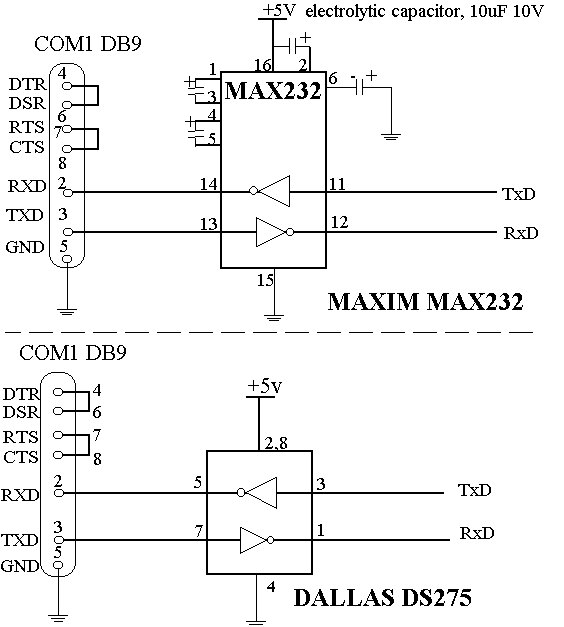
This shows the DB9 connector (also known as a D-Sub 9-pin connector), serial cable, and MAX3232 IC and charge pump caps (all SMD, again, can be done with PTH components). Here is the schematic: Now read-up on the MAX232 IC. It could be the most common IC out there, at least for the embdded world. This IC will have many different model names (ICL232 for example) but all do the same thing, and will most likely have identical pin-outs.
This IC is used to take low voltage signals from your micro or PIC or ARM or whatever, and converts those low-voltage signals to higher-voltage signals that the computer can understand. The voltage levels on TTL are also inverted for RS232 so the MAX232 takes care of that as well! The MAX232 takes in TTL signals and sends out RS232 signals. It also takes the RS232 signals from the computer and outputs TTL signals to whatever microcontroller you are using.
How does it do this magic With charge pump capacitors. You`ll notice four 0. 1uF caps attached to the MAX3232. If you`re reading closely, you`ll also notice we have a MAX3232 not the MAX232. Difference: So in this application, the GPS unit is running at 3. 3V. If we were to send 5V TTL to it, it would be damaged! So we must use the lower voltage MAX3232 part. No big deal, it`s functionally identical to the MAX232. From here on out, I will only refer to the MAX232. When you first view the MAX232 component, it can be a bit confusing. The pins label T1/T2 are the transmit channels (MAX232 has 2 TX channels and 2 RX channels). T1In/T2In will take *in* TTL and send *out* RS232 out T1Out/T2Out. So for our purposes, we need to connect the GPS unit`s serial TX pin to the T1In pin of the MAX232. So when the GPS unit outputs some 3. 3V TTL signals, these signals will be converted into RS232 and sent to the computer (TX1Out is connected to pin 2 on the DB9 connector). Finally, when the computer needs to send info to the GPS unit, it will send RS232 signals down the serial cable, on pin 3 of the serial cable/DB9 connector to R1In of the MAX232.
This RS232 signal will be converter to TTL and sent out the R1Out pin. This TTL signal is connected to the RX pin on the GPS unit. Voila. I can`t tell you how many times I`ve crossed TX and RX on different projects. Sit down, think about it, and once you`ve got it wired correctly, cut and paste into future projects. Now about the footprint for the PG31. Unless the manufacturer hands you a foorprint file or a simple, recommended FP in the datasheet, you`re going to have to go it on your own.
We took the PG31 and a pair of calipers and went at it. It can be extr 🔗 External reference
Related Circuits
A standard serial interfacing for PC, RS232C, requires negative logic, i.e., logic 1 is -3V to -12V and logic 0 is +3V to +12V. To convert a TTL logic, say, TxD and RxD pins of the uC chips, thus...
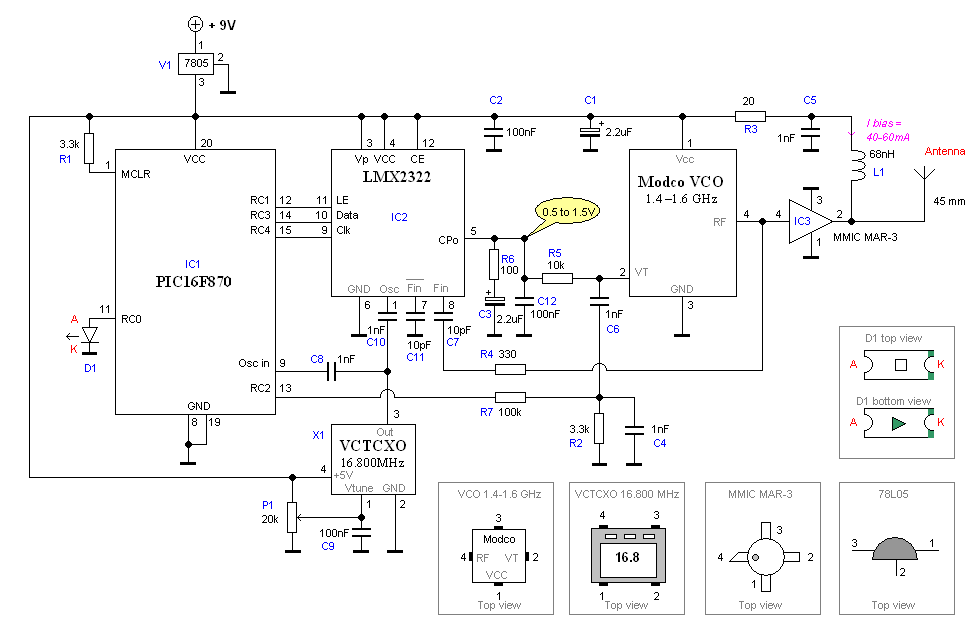
A GPS receiver costing less than a few hundred dollars can provide immediate location information, including latitude, longitude, and altitude, accurate to within a few hundred feet. The output from the Voltage-Controlled Oscillator (VCO) is directly connected to a...
CPU NatSemi Geode operating at frequencies of 200/233/266/300 MHz (with a default speed of 233 MHz on-board) or refer to the Geode link. The VGA/LCD interface is NS GX5530, featuring shared memory of 2.5MB, supporting CRT displays and 18-bit...
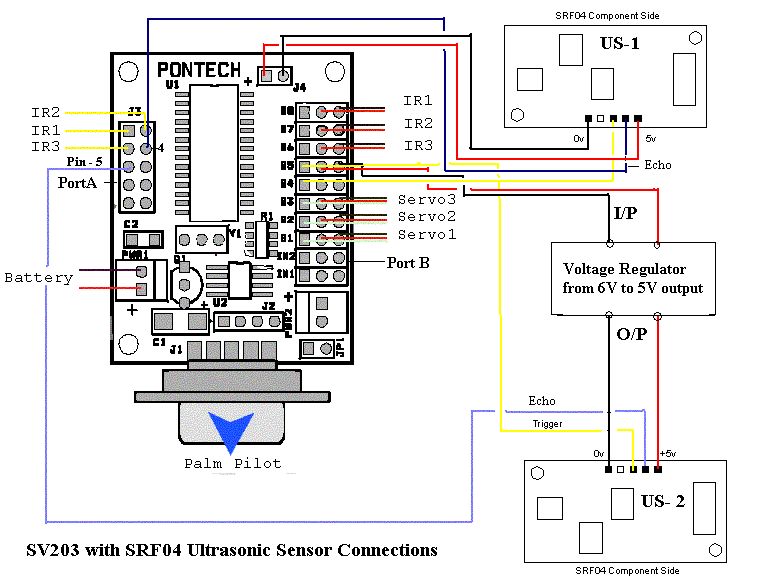
The following circuit illustrates the connection of the Devantech SRF04 Ultrasonic Sensor to the SV203 powered PPRK Circuit Diagram. This circuit is based on the Devantech SRF04 sensor and features a minimum initiation time of 10 milliseconds for the...
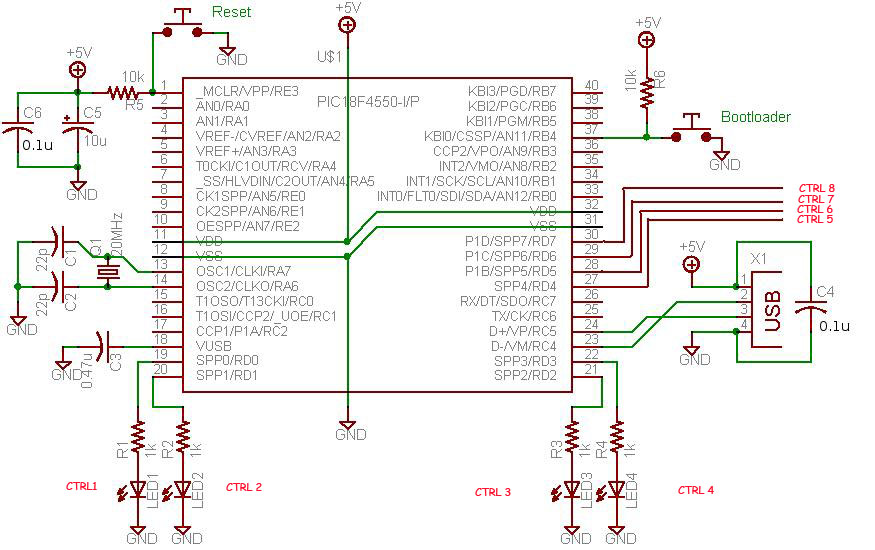
This project demonstrates a computer control interface using a USB board (USB Interface Project). This tutorial provides a straightforward method to control devices such as LEDs, motors, and other components via a computer using a USB board. Traditionally, devices...
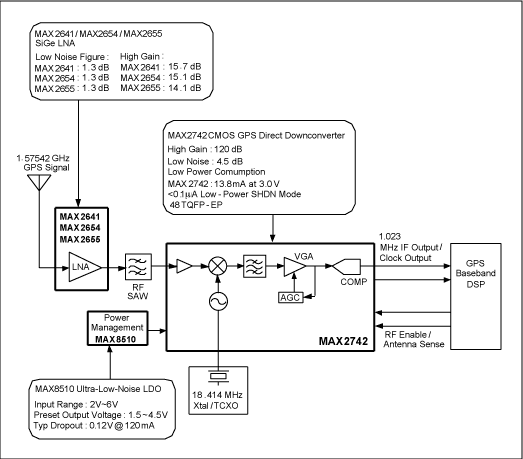
The following circuit illustrates the RF block diagram of a GPS receiver. This circuit is based on the MAX2742 integrated circuit. Features include a complete GPS receiver functionality. The GPS receiver RF block diagram utilizing the MAX2742 IC encompasses several...