
Guitar Schematics
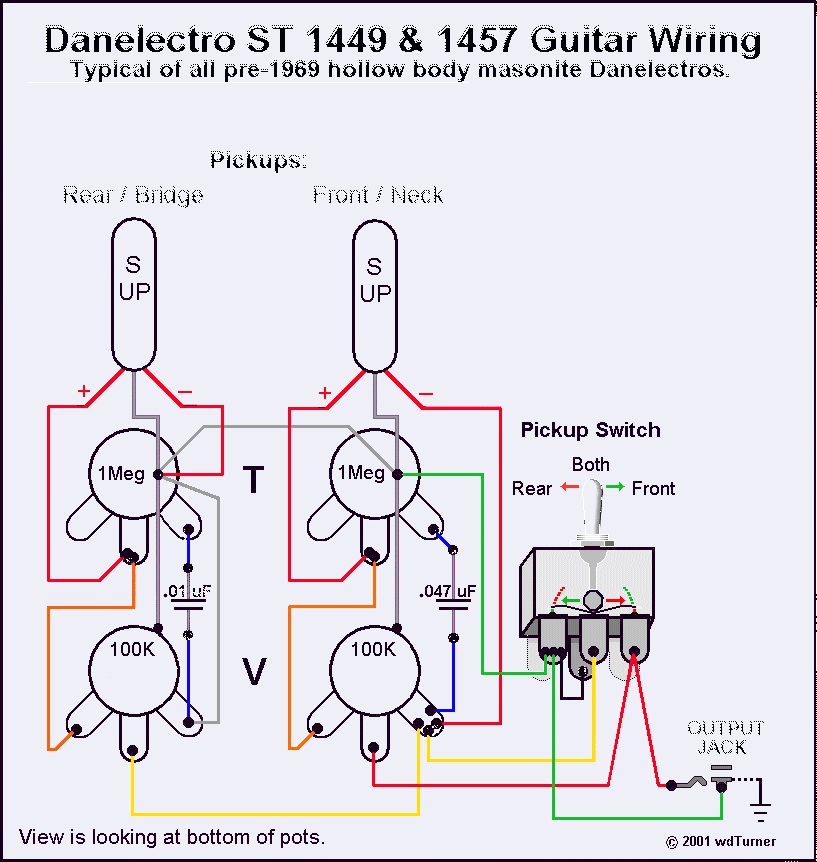
The process outlined involves a series of meticulous steps that ensure the proper functioning and alignment of guitar pickups. The correct orientation of magnetic polarity is crucial for achieving the desired tonal characteristics and phase alignment between pickups. The use of a magnetic compass is essential to ensure that the pickups are oriented correctly throughout the disassembly and reassembly process.
Marking the leads with a permanent marker allows for easy identification during reinstallation, which is critical for maintaining electrical phase integrity. The desoldering process requires careful handling to avoid damage to the components, and the workspace must be kept clean to prevent contamination of the delicate parts.
The warming of the pickup with a hairdryer not only facilitates the removal of components but also allows for the safe handling of wax potting, which can be challenging to work with at room temperature. The reassembly phase emphasizes the importance of maintaining the correct orientation of the coil and magnet bundle, as this directly impacts the magnetic field and, subsequently, the sound produced by the pickups.
Finally, the adjustment of the lead wires ensures that the pickups are correctly phased, which is vital for achieving a balanced sound when both pickups are used together. This comprehensive approach to pickup maintenance and modification is essential for guitarists seeking to customize their instruments for optimal performance.With a magnetic compass ensure that both pickups have a South polarity on the top of the pickup. Verify by reading a North polarity on the bottom of the pickup. You might rarely find both pickups with a North polarity on top. If you find one pickup with North on top while the other pickup has South on top, then there is no need to do pickup su rgery, but only need to confirm the wiring is in phase. (2) With a permanant felt tip magic marker, put an amply visible "dot" mark on the pickup lead that is connected to ground, about 1" from the end that was desoldered. This will be used to reverse the wires polarity when reassembling the operation. (3) Desolder bridge pickup leads and braided ground sleeve wire from harness and remove bridge pickup to your work bench.
Set it on a nice and clean workbench with ample room to work on safely and easily. (5) Remove the braided ground shielding sleeve wire from the pickup and lead wires. If the braided wire runs thround the wires` hole in the lipstick tube, it will not be soldered inside and can be pulled out by first loosening it`s grip around the wires by pushing it toward the pickup to loosen it`s "chinese handcuff" grip on the lead wires, and then pulling it from the liptstick hole. If the braided ground sleeve is soldered to the lipstick tube or mounting bracket, then it does not need to be desoldered, and the lead wires will pull out of the sleeve by loosening the sleeve in the same manner of loosening it`s "chinese handcuff" grip on the lead wires.
(6) Warm the bridge pickup with a hairdryer to soften any wax potting. Woring it in 110 degrees F air works well. At around 120 degrees the wax will melt. () Pull on each of the bridge pickup`s lipstick tubes, sliding them apart from and off of the internal black-tape (vintage) or heat shrink (reissues) wrapped coil & magnet bundles. Either or both of the lipstick tubes might only come off slowly due to a vacuum as they are pulled apart.
Feed the lead wires back into their lipstick tube hole as their lipstick tube is slid off of the coil / magnet bundel. IT WORKS MUCH BETTER IF YOU DON`T HAVE TO PUSH THE WIRES ALL THE WAY THROUGH THE HOLE, . BUT HAVE SOME OF BOTH WIRES REMAINING STICKING OUT OF THE HOLE (you can secure them so they won`t accidently slip through the hole by wrapping them with enough masking tape that won`t go through the hole); But if that`s not possible, then the wires can be re-run back through the holes during reassembly.
(7) With the coil / magnet bundle removed, re-read it`s magnet`s polarity orientation with the magnetic compass and with white chalk mark the EXACT TOP of the NORTH side of the coil / magnet bundle. In most cases the other pickup will be South up and North down. (8) If there is wax potting on the coil / magnet bundle or inside the lipstick tube, then reassembly will have to be done in and out of the hot air of a hair dryer that`s secured to blow DOWN onto the work without holding the hairdryer, moving the work in and out of the air to keep the wax on the work very soft.
(9) Reassemble the pickup in reverse order of disassembly; by feeding it`s leads back through their hole in the lipstick tube, . ENSURING that the coil / magnet bundle is turned / oriented to have the OPPOSITE UP magnetic polarity of the other pickup`s UP magnetic polarity, AND by the chalk mark make sure that the coil / magnet bundle is going back into the lipstick tube with it`s desired magnet pole aligned EXACTLY UP (not tilted) as it goes back into the lipstick tube.
In other words, when this operation is done, the 2 pickups should have the opposite UP magnetic polarity from each other. (10) THE PICKUP LEAD WIRES SHOULD NOW BE SWAPPED-AROUND AND SOLDERED OPPOSITE FROM THEIR ORIGINAL POSITION.
This will put the coil back in phase with the new opposite mangetic polarity. The coil DOES NOT have to be reverse wound as is commonly but mistakenly said; All it needs is to b 🔗 External reference
Related Circuits

Three schematics are available for individuals interested in constructing their own stun gun. For those familiar with reading electronic schematics, the three stun gun circuits presented on this page contain all the necessary information to build a stun gun....
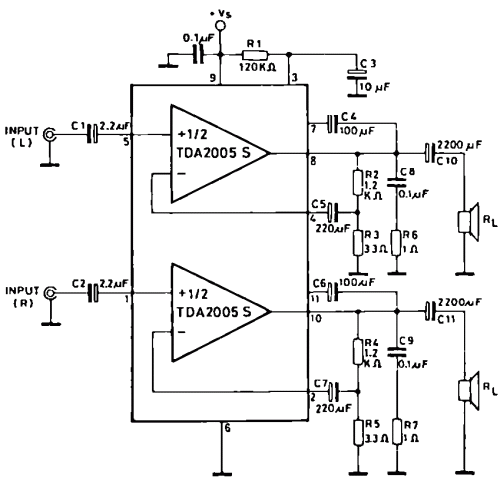
The TDA2005 integrated circuit (IC) features a high output power of 10W per channel (stereo) at a load of 2 ohms with a distortion of 10%, and 20W in bridge mode at a load of 4 ohms with a...
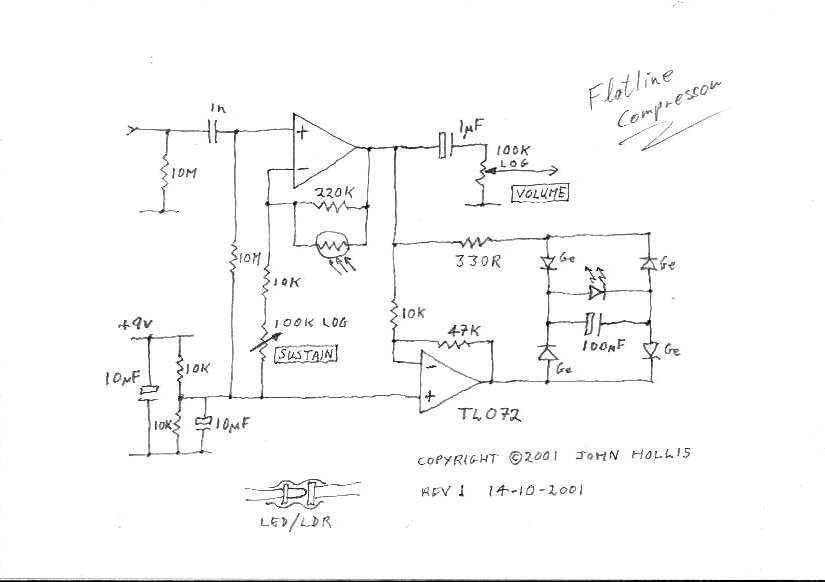
This circuit is a simple, low noise guitar compressor. The described circuit functions as a low-noise compressor specifically designed for guitar applications. It aims to reduce the dynamic range of the guitar signal, thereby allowing for a more consistent output...
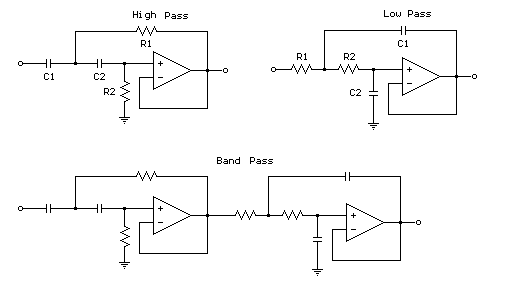
The figures below illustrate using opamps as active 2nd order filters. Three 2nd order filters are shown, low pass, high pass, and bandpass. Each of these filters will attenuate frequencies outside their passband at a rate of 12dB per...
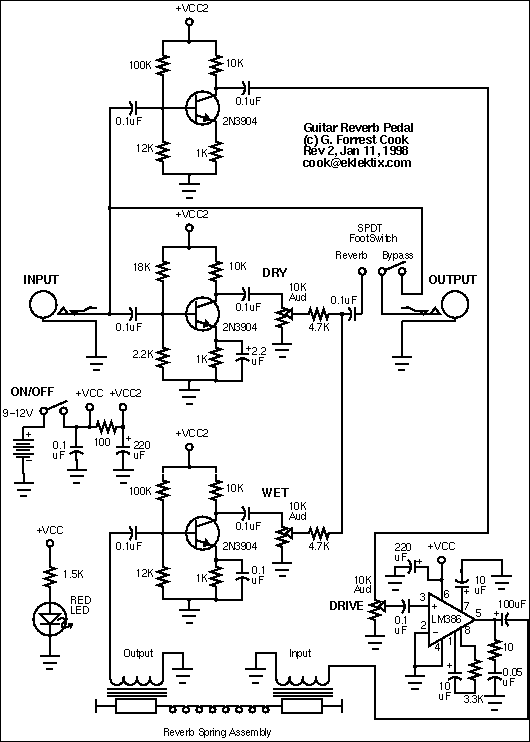
This is the second generation of a circuit for a guitar spring reverb pedal, it has dry, wet, and drive controls for a wide variety of sounds. With a decent reverb spring (tank) in overdrive, this circuit will produce...
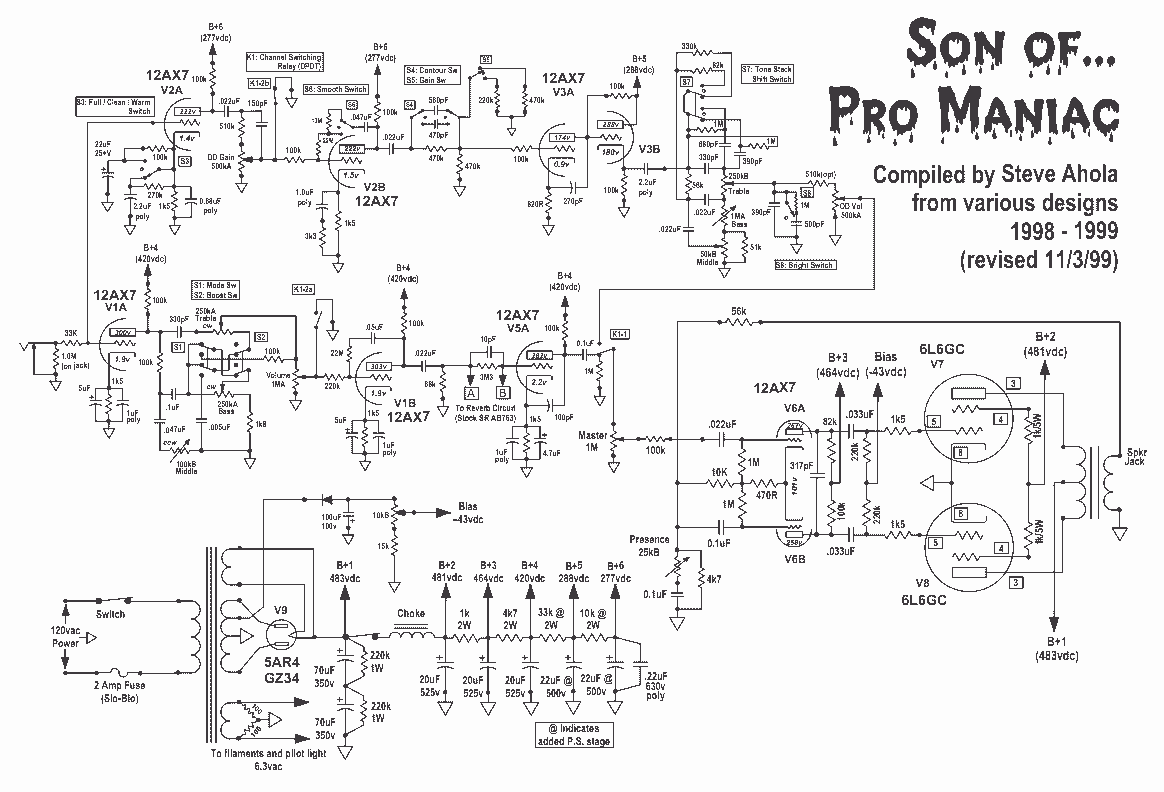
This schematic is an improved version of the Pro Maniac Guitar tube power amplifier. The improved version of the Pro Maniac Guitar tube power amplifier features several enhancements aimed at increasing performance, reliability, and sound quality. The schematic typically includes...
Warning: include(partials/cookie-banner.php): Failed to open stream: Permission denied in /var/www/html/nextgr/view-circuit.php on line 713
Warning: include(): Failed opening 'partials/cookie-banner.php' for inclusion (include_path='.:/usr/share/php') in /var/www/html/nextgr/view-circuit.php on line 713