infrared transmitters using lm3909
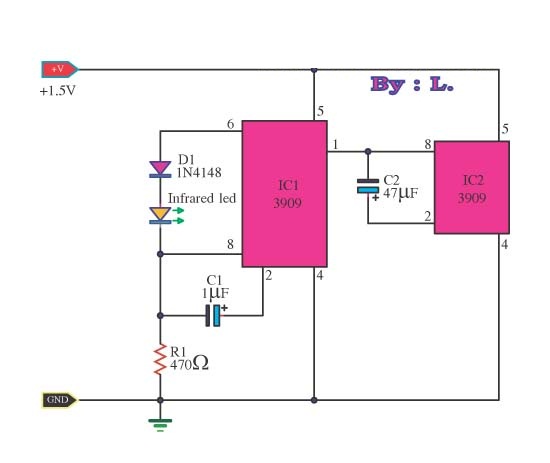
This circuit is an infrared transmitter that operates on a low power supply of 1.5 V. The main components include two LM3909 integrated circuits, which function as an oscillator and LED flasher. Typically, this circuit is utilized as a simple flashing light. The design is straightforward and requires minimal components, making it easy to implement. To achieve higher frequencies, adjustments can be made by altering the capacitor (C1) and resistor (R1) values.
The infrared transmitter circuit is designed to emit modulated infrared signals, suitable for various remote control applications. The LM3909 integrated circuit serves as the core component, generating oscillations that drive an infrared LED. The circuit operates at a low voltage of 1.5 V, which allows for battery-powered applications, enhancing portability and ease of use.
The oscillator functionality of the LM3909 is responsible for producing a square wave output that drives the infrared LED. The frequency of the oscillation can be adjusted by modifying the values of the timing capacitor (C1) and the timing resistor (R1). A smaller capacitor or resistor will result in a higher frequency output, which is critical for ensuring proper modulation of the infrared signal.
In practical applications, the infrared LED can be positioned to transmit signals over a line of sight to a compatible infrared receiver. The circuit's simplicity makes it ideal for hobbyist projects and educational purposes, where users can explore the principles of infrared communication and modulation.
Overall, this infrared transmitter circuit is a practical solution for low-power applications requiring simple signal transmission using infrared technology. Its reliance on the LM3909 IC simplifies the design while allowing for flexibility in frequency adjustments, making it a versatile choice for various electronic projects.This is an infrared transmitter circuit of the signal is small and using a power supply of 1. 5 V only. by the main electronics are the two LM3909 (oscillator IC LED Flasher) Normally, we tend to put it to work as a simple flashing light circuit. Use a source of low-power 1. 5 V, which is working now easier to use transistors. The high frequency is very simple, just change the high frequency device only. C1 and R1 is less than the highest frequency. 🔗 External reference
Warning: include(partials/cookie-banner.php): Failed to open stream: Permission denied in /var/www/html/nextgr/view-circuit.php on line 713
Warning: include(): Failed opening 'partials/cookie-banner.php' for inclusion (include_path='.:/usr/share/php') in /var/www/html/nextgr/view-circuit.php on line 713
