
interface keypad with pic16f877

The tutorial outlines the steps necessary to connect a keypad to the PIC16F877 microcontroller, which is a popular member of the PIC family known for its versatility in embedded applications. The interfacing process involves configuring the microcontroller's GPIO (General Purpose Input/Output) pins to read the key presses from the keypad matrix.
To implement this, the following components are required: the PIC16F877 microcontroller, a 4x4 or 4x3 keypad, and necessary passive components such as resistors and capacitors for debouncing and signal integrity. The keypad operates as a matrix of switches, where each key press connects a specific row and column, allowing the microcontroller to detect which key has been pressed.
The microcontroller's firmware includes routines for scanning the rows and columns of the keypad. When a key is pressed, the corresponding row and column are activated, and the microcontroller identifies the key based on the active row and column lines. This method minimizes the number of GPIO pins needed compared to a direct connection for each key.
In addition, software debouncing techniques can be implemented to ensure that false readings caused by mechanical bouncing of the keys are minimized. The code typically employs a loop that checks the state of the keypad at regular intervals and incorporates delays to allow for stable readings.
Overall, this interfacing method enhances the functionality of the PIC16F877 microcontroller, enabling user input through a compact and efficient keypad interface.This PIC microcontroller tutorial provides a simple method to interface any keypad (e-g 4x4 or 4x3 etc) with PIC16F877 microcontroller. This code is writte.. 🔗 External reference
Related Circuits
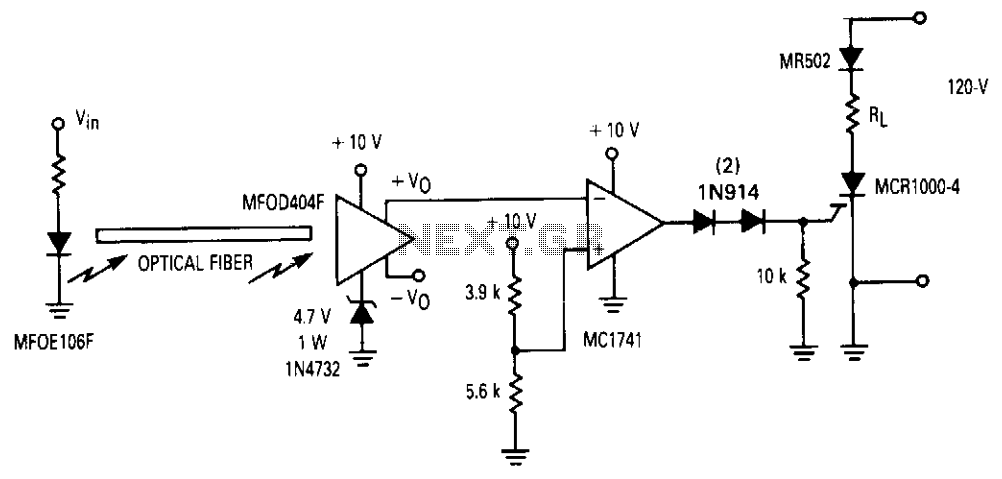
An operational amplifier (op amp) is utilized to connect a fiber optic system with a MOS SCR for multi-cycle, half-wave control of a load. This receiver features two complementary outputs: one maintains a quiescent level of approximately 0.6 V,...
Below are three examples of controlling a relay from the PC's parallel printer port (LPT1 or LPT2). Figure A shows a solid-state relay controlled by one of the parallel port data lines (D0-D7) using a 300-ohm resistor and a...
The CDCF5801 provides clock multiplication from a reference clock (REFCLK) signal with the unique capability to delay or advance the CLKOUT/CLKOUTB with steps of only 1.3 mUI through a phase aligner. For every rising edge on the DLYCTRL pin,...
The TiltStick is a small acceleration sensing device in the form of a USB stick. It's using a two-axis acceleration sensor to measure acceleration (caused e.g. by motion and tilt). The device is emulating a USB joystick and can...
If you have access to a Lowe HF-225 shortwave receiver, then you might be interested in this page. If you don't, then you'd probably be better off leaving now. What follows is a project I completed some time ago,...
This system uses a Microchip's PIC16F877A as a main controller, LM339 as sensor interface, UM3561 as a tone generator and PC2002 as a speaker driver (audio amplifier). LM7805, LM7812 and LM317 voltage regulators are used to obtain +5V, +12V...