
Interfacing LCD with 8051
The integration of an LCD display with the 8051 microcontroller involves a series of steps to ensure proper communication and functionality. The HD44780U controller serves as a bridge between the microcontroller and the LCD, allowing for the display of characters through a parallel interface. The initialization process typically consists of several key commands that set the display mode, cursor settings, and entry mode.
To begin, the LCD must be powered, and a suitable delay is required to allow the controller to stabilize. The initialization sequence usually starts with setting the data length to 8 bits, which is the most common configuration. After sending the appropriate command to set the interface, the display mode can be configured to either 1-line or 2-line operation, with the latter being preferred for most applications.
Following the display mode setup, the cursor settings can be adjusted to determine whether the cursor should be visible or blinking. This is achieved by sending specific command bytes that control the cursor's behavior. Once the display mode and cursor settings are established, the entry mode can be set, which dictates how the cursor moves when new data is written to the display.
After completing the initialization sequence, the 8051 can send data bytes to the LCD for display. Each character is sent as an ASCII value, and the LCD interprets these values to render the corresponding characters on the screen. Additionally, control commands can be sent to clear the display or return the cursor to the home position.
In summary, the successful operation of an LCD display interfaced with an 8051 microcontroller hinges on a well-defined initialization process, adherence to the HD44780U communication protocol, and the proper sequencing of command and data transmission. This foundational understanding is crucial for developers working with LCDs in embedded systems applications.An 8051 program must interact with the outside world using input and output devices that communicate directly with a human being. One of the most common devices attached to an 8051 is an LCD display. Some of the most common LCDs connected to the 8051 are 16x2 and 20x2 displays. This means 16 characters per line by 2 lines and 20 characters per line by 2 lines, respectively. Fortunately, a very popular standard exists which allows us to communicate with the vast majority of LCDs regardless of their manufacturer. The standard is referred to as HD44780U, which refers to the controller chip which receives data from an external source (in this case, the 8051) and communicates directly with the LCD.
I use a standard 16-character by 2-line LCD module, see schematic below. This is the pit fall for beginners. Proper working of LCD depend on the how the LCD is initialized. We have to send few command bytes to initialize the lcd. Simple steps to initialize the LCD 🔗 External reference
Related Circuits
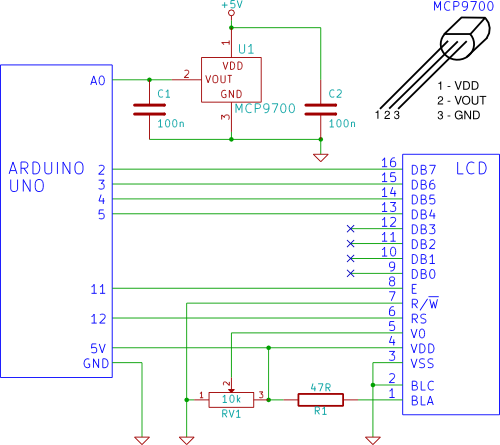
A temperature sensor (MCP9700 linear active thermistor IC) and LCD are connected to the Arduino in this tutorial. The Arduino reads the temperature from the MCP9700 on analog pin A0 and displays the temperature on the LCD. The circuit involves...
There are important considerations when using additional memory, but it is certainly feasible. The MP3 player project utilizes 32 megabytes of memory. However, using more memory necessitates careful planning. The key factor is that the 8051 processor has a...
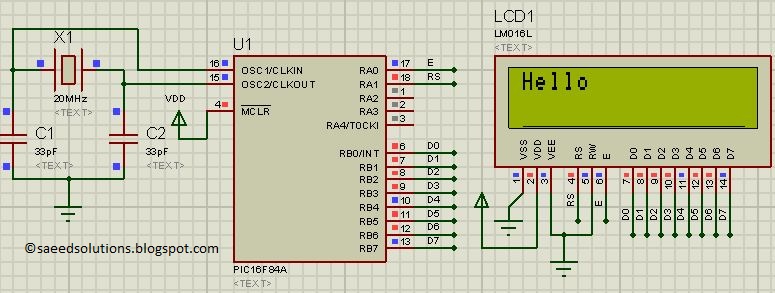
This post presents the LCD interfacing code utilizing the PIC16F84A microcontroller. The code is developed in the C programming language using MPLAB with the HI-TECH C compiler. The interfacing of an LCD (Liquid Crystal Display) with the PIC16F84A microcontroller...
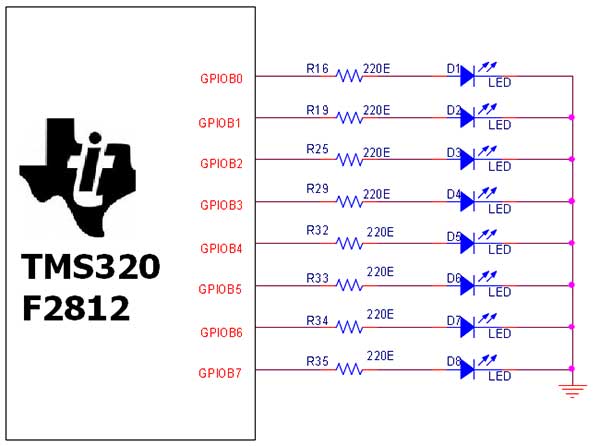
The TMS320F2812 Evaluation Board is specifically designed for developers in the digital signal processing (DSP) field, as well as for beginners. The F2812 kit is structured to allow easy access to all the features of the DSP. The TMS320F2812...
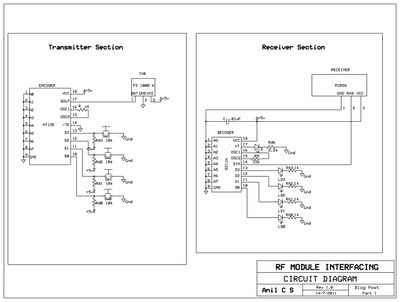
This document presents a circuit example for interfacing an RF module using the HT12E/D encoder-decoder pair. The attached circuit can be utilized for data transmission via the RF module, which is designed for single-channel operation, allowing only serial data...
You may find that there are too few, if your power is very noisy (as can happen in a car environment) it may help to place a 0.1uF and/or 10uF capacitor before and/or after the voltage regulator. At the...