
laser diy schematics

The proposed circuit utilizes a laser pointer as an optical sensor to detect sound vibrations through a window. The core components include a laser pointer that emits a coherent beam of light and a cadmium sulfide (CdS) photocell, which is sensitive to light intensity changes. The headphones serve as an output device, translating the electrical signals captured by the photocell into audible sound.
To construct the circuit, the laser pointer is mounted on a tripod, ensuring stability and precise alignment. The photocell is affixed using binder clips or duct tape, allowing for adjustable positioning to optimize the alignment with the reflected laser beam. The laser should be aimed at the window at a slight angle to facilitate reflection, ensuring that the beam strikes the photocell directly.
When sound waves from inside the room induce vibrations in the window, these vibrations alter the intensity of the reflected laser beam. The CdS photocell detects these variations in light intensity, producing a corresponding electrical signal. This signal is then transmitted through the headphone jack to the laptop or recording device, where it can be recorded and analyzed.
Processing the recorded audio may involve filtering techniques to remove extraneous noise, enhancing the clarity of the target sounds. This setup effectively turns the window into an acoustic sensor, allowing for long-distance listening capabilities. The project exemplifies the practical application of basic electronic components in a creative and unconventional manner.No DIY espionage kit is complete without a long-distance listening device, and no DIY long distance listening device is complete unless it uses a sweet laser in some form or fashion. If you agree with that statement, then you`re in luck, because the following project will show how you can use a laser pointer to hear noises from hundreds of feet away.
material : Laser pointer, Old pair of headphones, Cadmium Sulfide Photocell (available at most Radio Shacks or electronics store), Tripod, Binder clips or duct tape, Laptop or other recording device. Plug the headphone jack into your laptop or other recording device. Using binder clips or duct tape, secure the photocell to something sturdy so that it can be easily moved and aligned.
Find a room with a window you`d like to spy on, and aim the laser at the window at an angle. Determine where the laser reflects, and situate your photocell so the reflected beam hits the front of the cell. Any noise from inside the room will cause the window to vibrate, which will get picked up by the laser and photocell.
You might have to process the raw input to remove unwanted noise and isolate the voices. Check out the cool video to see it in action. 🔗 External reference
Related Circuits

The hardware consists of an Arduino board connected via USB to a laptop, which recognizes the Arduino as a serial device. Three LEDs (red, green, blue) are mounted directly on the Arduino board using a prototyping shield. The schematic...
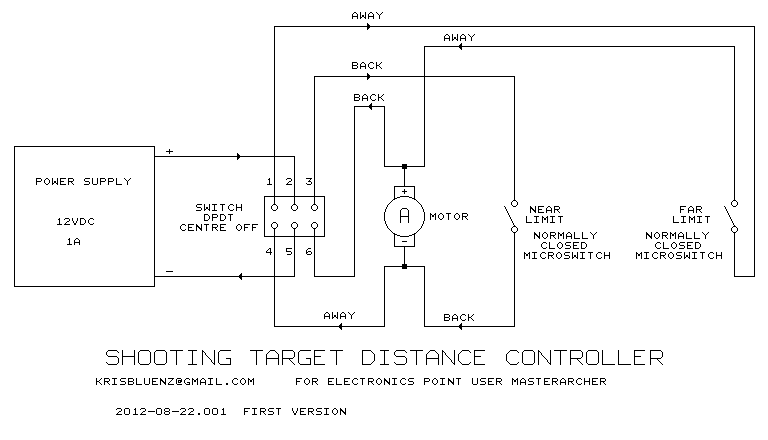
The motor is rated at 6W, which corresponds to a current of 0.5 amps at a voltage of 12V. It is recommended to use a 12V DC power supply with a rating of 1A or higher. Any type of...

Many published circuits that flash LEDs require 3 volts or more. This circuit utilizes a single inexpensive C-MOS IC and can flash an LED for an entire year on a single 1.5-volt AA alkaline battery cell. The circuit employs...
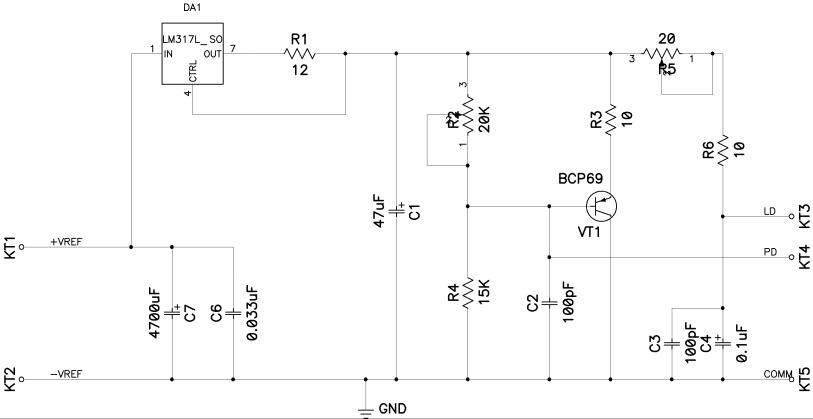
This includes immunity to power line transients as well as those that may occur during power-on and power-off cycling. The parameters of many electronic components like ICs are rarely specified during periods of changing input power. Special laser diode...
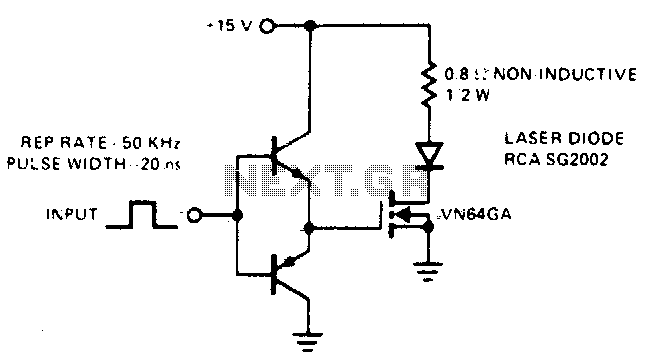
This drive is capable of supplying the laser diode with 10 ampere pulses lasting 20 ns. With a 0% duty cycle, the repetition rate is 50 kHz. A complementary emitter-follower configuration is utilized as a driver. Switching speed is...

Mark builds and tests the DIY Moving Magnet (MM) Phono Preamplifier Kit that was featured in Silicon Chip Magazine, August 2006. The kit comes complete with everything you need except for an enclosure and a power supply (AC wall...