
Plant-water monitor
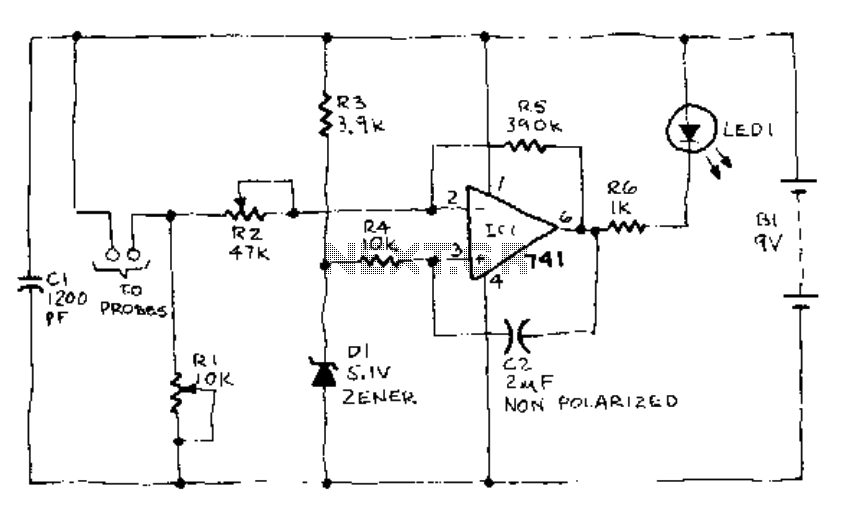
The described circuit functions as a soil moisture indicator using an LED to provide visual feedback on the moisture levels in the soil. The system employs a moisture sensor, typically consisting of two probes that can be inserted into the soil. When the soil is adequately moist, the probes allow current to flow, illuminating the LED. As moisture levels decrease, the circuit is designed to respond accordingly.
The LED remains lit while moisture is present above a predetermined threshold. Once the moisture content drops below this threshold, the LED begins to flash, indicating a warning state. If the moisture level continues to decline and falls below another critical threshold, the LED will turn off completely, signifying that the soil is too dry for optimal plant health.
Calibration of the circuit is essential for accurate operation. This is performed by connecting a battery to the circuit and inserting the moisture sensor probes into dry soil. Initially, resistor R1 should be set to its maximum resistance. This adjustment allows the user to decrease the resistance gradually until the LED begins to flash, indicating that the circuit is responsive to the moisture level.
Resistor R2 plays a crucial role in fine-tuning the sensitivity of the moisture detection. By adjusting R2, the user can set the specific moisture range over which the LED will flash before it turns off. This adjustment ensures that the circuit can be tailored to different soil types and moisture conditions, providing flexibility for various applications, such as gardening or agricultural monitoring.
Overall, this circuit provides a straightforward and effective means of monitoring soil moisture levels, with visual indicators that facilitate timely intervention to maintain optimal moisture conditions for plant growth.When the soil is moist, the LED glows. If the moisture falls below a certain predetermined level, the LED begins to flash. If there is still less moisture, the LED turns off. To calibrate, connect the battery and insert the probe into a container of dry soil. Set R1 to its maximum value then reduce that resistance until the LED begins to flash. The range over which the LED flashes before going out is adjusted using R2. 🔗 External reference
Related Circuits

The mercury-in-rubber strain gauge serves as a detector for breathing. In this model device, the strain gauge produced by Medimatic, Denmark, is utilized. The length change of the strain gauge, which is wrapped around the chest during breathing, results...
This simple amplifier is designed to add a headphone jack to equipment that does not have this feature. The Headphone Buffer circuit board is compact (1.2" x 1.4"), allowing it to fit into even the smallest spaces, and its...
IC1 is a dual operational amplifier. In this circuit, each op-amp functions as a voltage comparator. When the voltage at the positive input exceeds the voltage at the negative input, the output transitions to a high state. Conversely, when...
The mine railway connects the national railways and intermediate links of the mining area, serving as an important component of the railway transport network. Statistics indicate that the Chinese mine railway extends over 20,000 kilometers, with numerous road junctions...
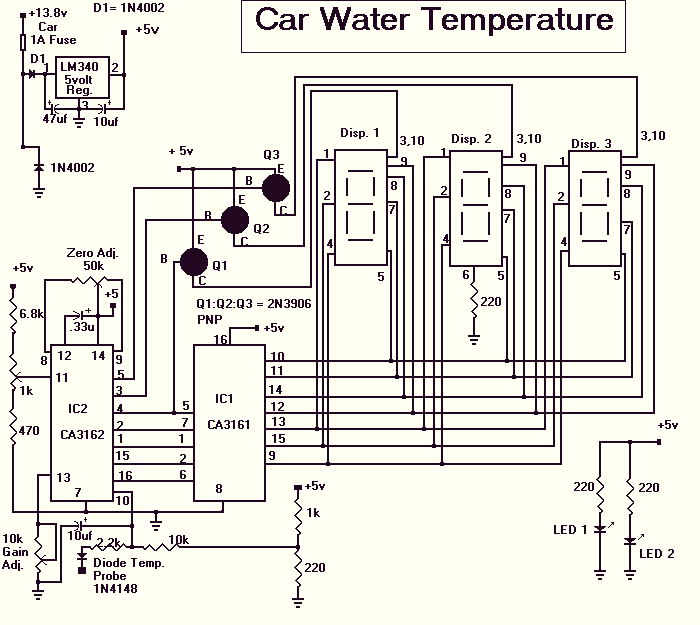
The Car Temperature Gauge is basically the same circuit as March's project with some minor changes to the input circuit. This circuit will display the water temperature to 1 degree resolution. The Car Temperature Gauge circuit is designed to measure...
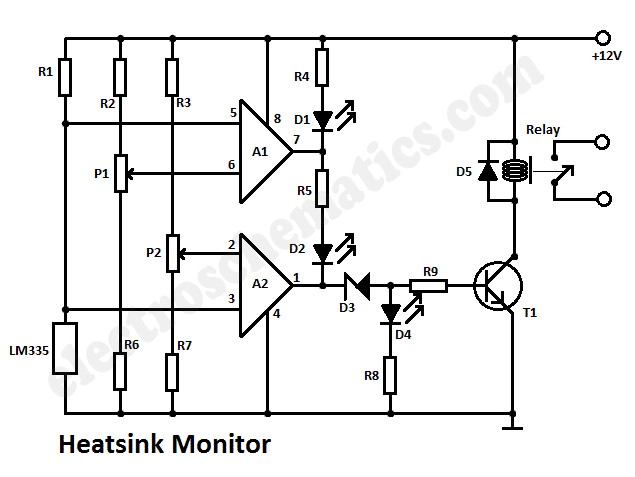
This heatsink temperature monitor circuit uses three LEDs to signal when the temperature exceeds two boundary levels. When the heatsink temperature is below 50-60°C (122-140°F), the green LED lights up. The yellow LED indicates that the temperature is between...
Warning: include(partials/cookie-banner.php): Failed to open stream: Permission denied in /var/www/html/nextgr/view-circuit.php on line 713
Warning: include(): Failed opening 'partials/cookie-banner.php' for inclusion (include_path='.:/usr/share/php') in /var/www/html/nextgr/view-circuit.php on line 713