
Powering Your Antique Battery Radio
The historical development of battery-operated radios highlights the evolution of power supply technology in the field of electronics. The early reliance on multiple battery types posed significant challenges for users, particularly in rural settings where access to electricity was limited. The introduction of rectifier tubes marked a pivotal moment in radio design, allowing for the elimination of the cumbersome C battery and simplifying the power supply requirements to just A and B batteries.
The A battery primarily serves to heat the filament of the radio tubes, enabling the emission of electrons, while the B battery is responsible for providing the high voltage necessary for the operation of the plate within the tube. This distinction is crucial, as the operational efficiency of the radio heavily relies on the correct functioning of both supplies. The varying voltage requirements for these batteries necessitate careful consideration in circuit design, particularly in ensuring that the A battery can adequately supply the lower voltage needed for filament heating, while the B battery provides the higher voltage necessary for signal amplification.
Furthermore, the transition to battery-less radios not only revolutionized radio technology but also impacted the battery manufacturing industry significantly. The development of smaller, more efficient batteries for new consumer products like flashlights demonstrated a shift in market demand, leading to innovative designs in portable radio technology. As modern collectors seek out these antique radios, understanding the intricacies of their power requirements is essential for restoration and operation.
In contemporary applications, the use of battery eliminators presents a practical solution for powering vintage radios, reducing reliance on traditional batteries while promoting sustainability. The construction of such devices requires a fundamental understanding of electronic components and safety protocols, particularly when dealing with high-voltage AC power. Proper connectors and wiring techniques are critical to prevent damage to the radio and ensure user safety during operation.
Overall, the evolution of battery technology in radios illustrates the interplay between consumer needs, technological advancements, and environmental considerations, shaping the landscape of electronic devices throughout history.Many antique radios run on batteries. These include tube portables, such as the Zenith model K-401 shown below, and "farm" radios, which were used in rural areas where there was no other source of electrical power. This article gives you some history on battery use in old radios and advice on how to power them with modern batteries.
It also give s plans for two inexpensive battery eliminators that you can build, with additional suggestions and technical data. All early radios used batteries ”as many as three batteries in the earliest sets. These batteries were known as A, B, and C. Radio engineers soon designed circuits to eliminate the C battery in a typical radio circuit. That left two battery supplies, A and B. Rechargeable nickel-cadmium battery packs didn`t exist in the "good old" days, but some owners of "farm" radios used rechargeable lead acid batteries, of the type still used in cars.
Often, the only available battery was taken from the family truck or car. When the battery ran down, the farmer could simply hook up the battery to a generator and recharge it. For the portable radio user, the price of mobility was a large, heavy, disposable zinc-carbon power pack.
Early battery sets had several drawbacks. A dead battery could leave you radio-less in the middle of a crucial broadcast. Lead acid cells could leak acid, which might drip out of the radio cabinet onto your lovely Persian rug. Worst of all, if you accidentally reversed the A and B battery connectors, you could fry your radio`s precious tubes.
Recognizing these problems, radio makers, many of which also made and sold tubes, sought to develop battery-less radio sets. Perhaps more radio tubes could do part of the job of expensive disposable batteries. Radio tubes offer two important features. A tube can act as an amplifier, taking a tiny voltage, such as an incoming radio wave, and increasing it sufficiently to be heard through a headphone or speaker.
A tube also can act as a diode, which changes alternating current (AC) into a series of half-cycle pulses that approximate the direct current (DC) that flows from a battery. Alternating current became increasingly available in homes during the 1920s, and radio engineers soon developed new radio tubes, called rectifiers, which could convert AC to DC.
Soon, the stores were filled with battery-less radio sets using rectifier tubes. Everyone loved these new radios, except the battery manufacturers. Having recently lost their bid to develop electric cars for the auto industry, battery makers now faced another blow: the loss of the radio industry. Many manufacturers closed their doors. Others developed smaller zinc-carbon batteries to replace bulky lead acid cells. Smaller batteries made possible small hand-held flashlights, which became very popular. Everyone wanted one or two or three, and these new products used lots of batteries ”flashlight batteries.
Soon, consumers were carrying flashlights to places where there was no electricity, such as a cabin in the woods or a treehouse in the backyard. When you got to such a destination, wouldn`t it be nice to have a radio to listen to Radio manufacturers seized the opportunity to offer something new.
On the technical side, new radio tubes were developed to operate on the lower voltages supplied by flashlight batteries. On the marketing side, stylists developed radios with a new appearance. Many new portables were disguised as expensive luggage. Their cabinets were made of lightweight wood covered with colorful airplane cloth (see RCA 94BP1 ), canvas, leather, or leatherette (see TransOceanics ).
Others were made of metal, Bakelite, and other early plastics (see Tube Portables ). The results were spectacular. The new portable radios sold in great numbers, and many still exist today. To use a battery radio in the 1990s, of course, you need the right batteries, or some substitute for them. Battery radios offer great bargains for modern collectors. Not everyone knows how to power them, so they often sell for less than their AC-powered counterparts.
Many of them are still in amazingly good shape. Daunted by the expense and inconvenience of using large, costly, non-reusable batteries, many owners simply stored their radios in a closet or shelf, where they remained untouched for years. Some times, you may find an original battery still inside an old radio. Although nice for display purposes, these batteries are invariably dead and cannot be recharged. This website shows a few examples of such old batteries. Battery radios that use two batteries (A and B) rather than three usually have polarized connectors, which prevented users from making wrong connections.
If you are powering such a radio with some other source, such as the battery eliminator described below, you may be fastening wires to the connector with alligator clips, or bypassing the connector entirely. To avoid costly mistakes, work slowly and carefully when you power up a battery radio. It will help to understand a little about the difference between the A and B power supplies. When you connect the A battery, the filament of the tube is heated to release negatively charged electrons.
When the B battery is connected, it puts a positive charge on the plate of the tube. Electrons travel through the partial vacuum inside the tube, flowing from the filament to the positively charged plate. Many tubes also have small structures, known as grids, between the filament and the plate. The grid regulates the number of electrons that strike the plate. Thus, every radio tube must be supplied with two different voltages (A and B), and most will need three (A, B, and C).
The A voltage heats the filament to release electrons. The B voltage gives the plate a positive charge to attract electrons from the filament. The C voltage lets the grid regulate the flow of electrons from filament to plate. As noted earlier, modern radio designs eliminate the need for a separate C battery. If your antique radio requires a C battery, check out the building plans near the end of this article. The voltage required from the B battery depends on the size of the charge needed at the tube`s plate.
Circuit designers calculate the needed charge using formulas such as Ohm`s law (V=I*R), which says that voltage pressure is equal to the product of the flow of electrons through a known amount of resistance. The plate current of a tube is very small compared to its filament current. That is why filament (A) batteries, despite their lower voltage ratings, often are much larger than plate (B) batteries, which have higher voltage ratings.
As a result, the filament batteries are exhausted more frequently than the plate batteries. If your battery portable quits working, try replacing the A battery before the B battery. Many battery-powered tube radios require only 1. 5 volts for the A supply, which you can provide with ordinary 1. 5-volt "D" cells (flashlight batteries). If more than 1. 5 volts are needed, connect additional batteries in series. Two 1. 5-volt batteries in series will provide 3 volts DC, and so on. Radio Shack and other retailers, sell inexpensive holders that simplify connecting multiple batteries. If onboard space limits the size of your A battery, consider using smaller-sized "C" cells rather than "D" cells.
"AA" cells can also be used, but you may be disappointed with their short operating life. They are too small to power a radio for more than a short test period. Although you can still buy manufactured B batteries (see our Parts page ), these large cells have several drawbacks. They are expensive, costing anywhere from $10 to $30 each, and they don`t last long. Under normal conditions, you may get no more than four or five hours of service from a standard zinc-carbon B battery.
Batteries also contain hazardous, corrosive chemicals that make safe disposal an environmental issue. If you connect a new B battery to your radio, be sure to make the right positive and negative connections, especially if the battery terminals don`t match the connectors in your radio.
A simple substitute for the traditional 90-volt B supply is to connect ten 9-volt number 216 "transistor radio" batteries in series. These batteries are small and easily obtainable. Their low-current output is quite suitable for B supply applications. If purchased in bulk quantities, their operating cost can be less than buying two 45-volt batteries or one 90-volt battery.
The first photo in the next section shows such a homebrew battery pack, with several 9-volt batteries taped together. Although simple to construct, this battery supply will not last long and you will still have the problem of disposal.
For about $10, you can build a simple circuit that converts 120-volt AC household current into the DC current needed for a battery radio`s B supply. This battery eliminator is friendlier to the environment than disposable cells and its cost of operation will be next to nothing.
It is designed by Walter Heskes, who has contributed several radio projects and restoration articles to this website (see Building ). Walter also supplied all of the technical information for this article. All needed parts are available from Antique Electronic Supply. If you order everything from AES, substitute a type 1N4005 diode for D1. AES doesn`t offer a type 1N4003, but the 1N4005 works exactly the same. Or, you can buy a pack of several type 1N4003 diodes from Radio Shack for about one dollar. The next photo shows the completed B power supply on the right and a homebrew battery pack on the left.
As you can see, the B supply takes up less space, allowing it to fit inside many portable radios. (Click the thumbnail image to see a larger view. ) Parts placement for this simple circuit is not critical. Caution: this project requires basic electronic construction skills. Any project involving 120-volt household current holds the potential for dangerous shocks. If you are not comfortable in your ability to safely build this project, find a mentor who has the necessary expertise. In addition to the parts listed in the schematic, you`ll need an AC line cord and some kind of connectors to connect the supply to your radio`s B battery terminals.
As the next photo shows, you can salvage connectors from an expired battery. (Use extreme caution if you dismantle a battery. Battery chemicals can be toxic!) If you don`t have an expired battery with the right size connectors, you`ll need to improvise some other sort of connectors, such as alligator clips. Using color-coded leads, red for positive (B+) and black for negative (B-), will help prevent confusion when connecting the supply to your radio.
🔗 External reference
Related Circuits
The operation is completely safe due to protection against DC and AC short circuits between all pins and ground, thermal over-range conditions, load dump voltage surges up to 40V, and accidental open ground situations. The circuit design incorporates multiple safety...

In various situations, it is necessary to indicate the amount of battery charge using methods such as LED dot displays or LED bar displays. This circuit utilizes the LM3914 integrated circuit to serve as a battery charge indicator with...

The LR inputs are summed, processed, and then drive a comparator. This comparator detects levels and generates transitions when audio inputs exceed or fall below predetermined thresholds. The frequency of these transitions, which correspond to rapid volume changes, is...
This is a small electronic switch that connects a battery to the equipment for a certain amount of time when a push-button is momentarily pressed. The ambient light level has also been considered; when it is dark, the display...
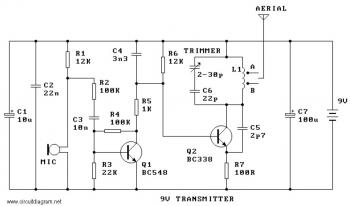
This is a simple and low-cost FM transmitter circuit. The frequency range of this FM transmitter is approximately 89 MHz to 109 MHz, with an output power of about 9 mW at 9 V. The circuit includes the following...
An automatic battery charger initiates the charging process when the battery voltage falls below a specified threshold and ceases charging once the voltage exceeds a predetermined maximum value. The setup is straightforward; simply connect two alligator clips to the...