
programming pen usb interface
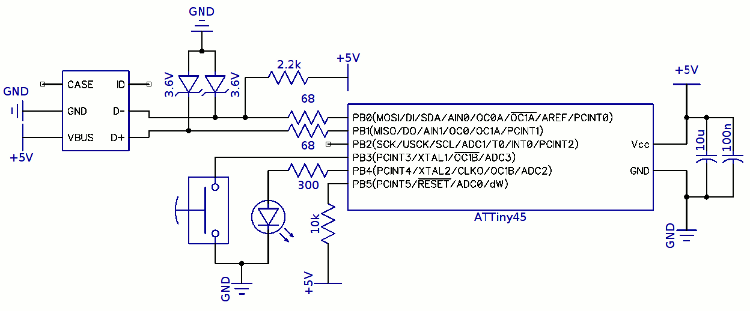
The circuit design leverages the capabilities of the ATTiny45 microcontroller, which operates as a USB HID (Human Interface Device) to emulate keyboard inputs. The integration of the V-USB library facilitates USB communication without the complexity of a hardware USB controller, making it suitable for compact applications. The pushbutton is connected to one of the microcontroller's GPIO (General Purpose Input/Output) pins, configured with an internal pull-up resistor to detect button presses. When the button is pressed, the microcontroller executes an interrupt service routine (ISR) that generates the necessary keystrokes. The keystroke sequence is carefully crafted to ensure compatibility with various programming environments, allowing users to send commands seamlessly.
The choice of using SMD components aligns with the project's space limitations, ensuring that the overall footprint remains minimal. The protoboard assembly method allows for flexibility in circuit modifications, while the use of high-quality PTFE coated wire enhances durability and reduces the risk of shorts. The meticulous soldering process, particularly for the micro USB connector, highlights the importance of precision in electronics assembly, especially when dealing with compact and intricate designs.
In summary, this project exemplifies an innovative approach to creating a versatile programming tool that simplifies the process of microcontroller programming through a user-friendly interface. The combination of a compact design, effective use of existing libraries, and careful attention to assembly details results in a functional and efficient device that meets the specified requirements.Trigger programming with its build-in pushbutton. The solution I came up with was to add a tiny USB keyboard circuit to the pen`s interface. One method to have the pushbutton trigger a programming command would have been to add a microchip to the pen`s interface and connect it to the PC using a USB to serial converter. The microcontroller could then sent some data to the PC every time the button is pushed. However, that would also required a script on the PC side to check whether the pen was sending data. What I wanted was a universal interface, which could be used to program any type of microcontroller, which wouldn`t require any scripts or drivers. What I came up with was to add an USB keyboard interface to the pen. In order to make the pen work no matter which command needs to be executed to program a chip, I decided it would send the arrow up keystroke followed by an enter.
That way, I can just type the programming command (e. g. "make flash") once in a terminal window and pressing the programming pen`s button afterwards will make the same command execute. I did not want to increase the size of the programming adapter, so my build space was extremely limited.
I found V-USB, a software USB driver for Atmel AVR chips. That website contains a lot of links to example projects, one of which is a self-calibrating ATTiny45 USB keyboard interface. The ATTiny45 is a small 8 pin chip which just fit in the space I had available on the pen`s interface.
Due to the self-calibrating code, it did not require an external crystal, which is normally needed due to frequency precision requirements of the USB interface. Basically, that project was a perfect starting poattachments_refint and someone had already done most of the work for me.
Excellent! The circuit I put together is shown in the schematic below. Since size requirements dictated it, and I prefer it anyway, only SMD components were used. I didn`t bother with a custom PCB and build it all on protoboard, using PTFE coated 30 AWG wire for the interconnections. The components are quite large (0603 resistors and capacitors, SOD-323 diodes, SOIC chip) and soldering them did not really pose a problem.
The micro USB connector on the other hand was quite a nightmare to solder. Since I was working on protoboard, I had to make connections to the USB connector using wire. However, the connector`s pins are so tiny (0. 25 mm wide, 0. 25 mm long and 1. 3 mm apart) that even under a stereo microscope, I was barely able to see them. Thus, I spend an extremely frustrating one and a half hours soldering four wires to that connector. Once all four wires were properly connected, I covered them in epoxy to make sure they wouldn`t come lose. The end result is really compact and pretty neat, as you can see in the picture below. The firmware I wrote is heavily based on the EasyLogger code from the V-USB website. All I had to do was remove some ADC related code and rewrite a few functions to generate the appropriate keystrokes when the pushbutton is pressed.
I also added an improved oscillator calibration routine that found on the Code and Life blog. The USB configuration was slightly modified as well, so that when the pen is plugged in this shows up in my linux logfiles: [anthony@desktop ~] $ dmesg | tail usb 8-2: new low speed USB device number 81 using uhci_hcd usb 8-2: New USB device found, idVendor=4242, idProduct=e131 usb 8-2: New USB device strings: Mfr=1, Product=2, SerialNumber=0 usb 8-2: Product: Programming Pen usb 8-2: usb 8-2: configuration #1 chosen from 1 choice input: Programming Pen as /devices/pci0000:00/0000:00:1d. 2/usb8/8-2/8-2:1. 0/input/input49 generic-usb 0003:424 🔗 External reference
Related Circuits
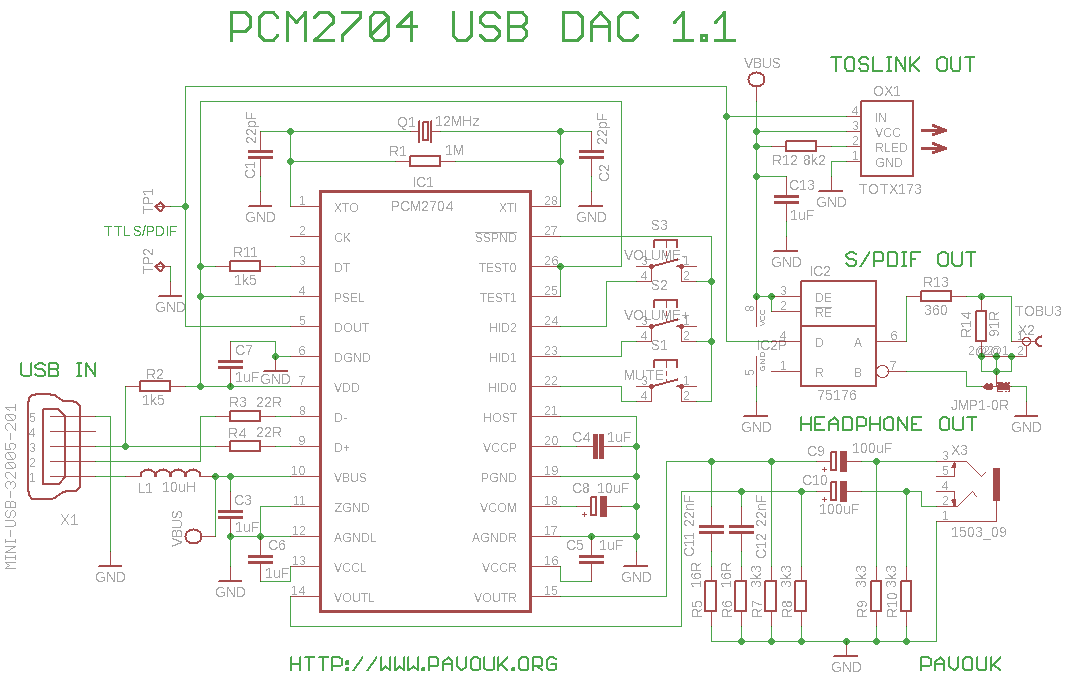
High-quality DAC converter from USB to S/PDIF. The circuit utilizes the PCM2704 chip, which was provided as a sample by Texas Instruments. It features an analog output for headphones and a digital S/PDIF output with both electrical and optical...

The circuit is a temperature-compensated power supply that generates a negative voltage to track positive voltage changes in a symmetrical voltage integrated power supply. It features a three-terminal regulator connected with two identical transistors, leveraging the temperature characteristics of...
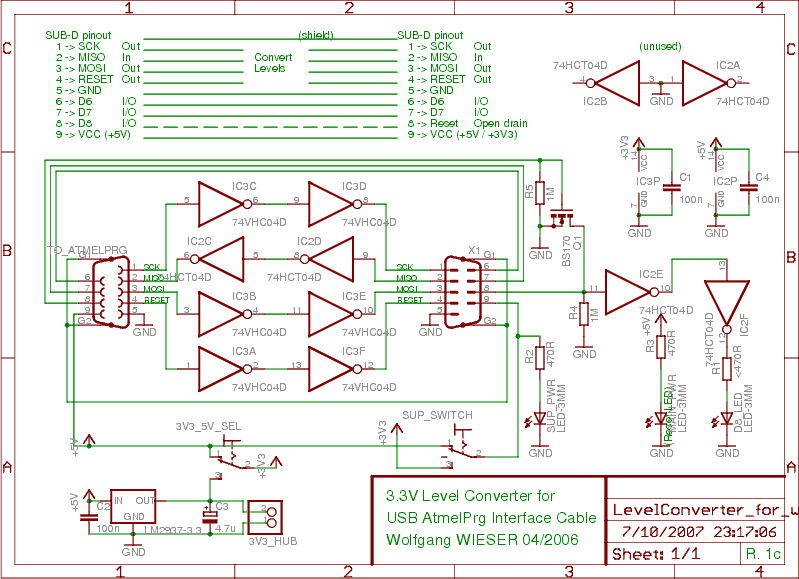
To program devices operating at 3.3V, such as SPI-based AVRs or JTAG-based CPLDs, level conversion is necessary for input and output signal levels. A 5V input may not register as HIGH at 3.3V, and a 3.3V device can be...
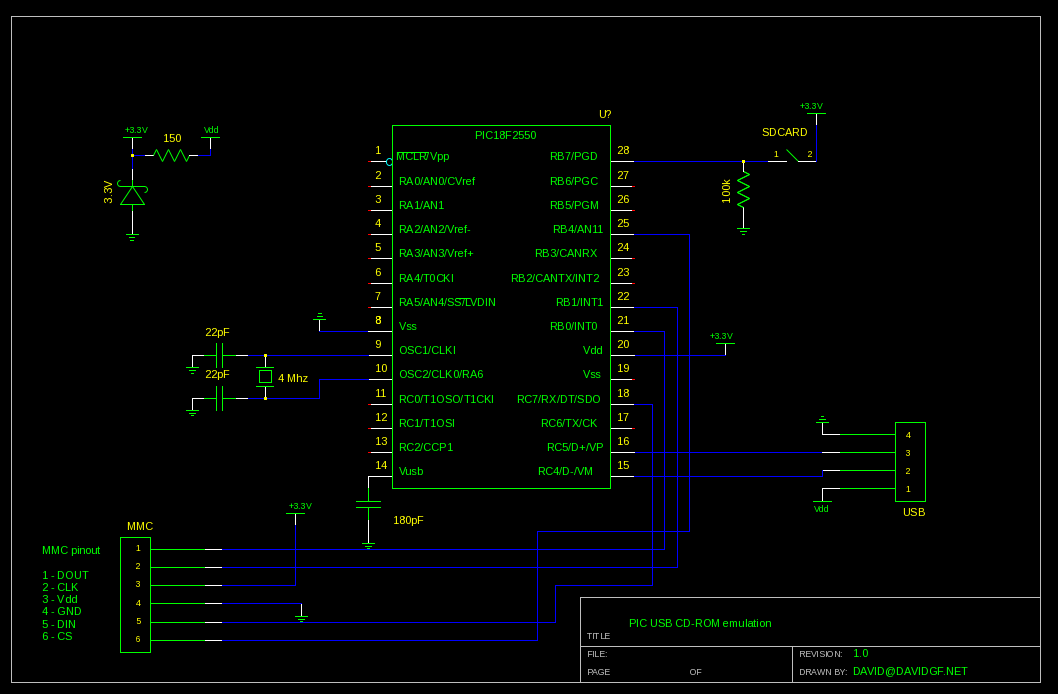
This project aims to create a USB CD-ROM device. Unlike typical devices that imitate a CD-ROM drive, this project emulates one. The concept allows users to store an ISO image or other types of CD-ROM images on an SD...

CMOS and PMOS cross interface circuit with PMOS integrated circuit providing high input impedance, allowing the input current to be negligible. The CMOS and PMOS interface circuit is illustrated in the accompanying figure. The CMOS and PMOS cross interface circuit...

This document outlines the construction of a pendulum-controlled clock designed for high accuracy. Although it has a retro appeal, it represents an intriguing project. The project requires a spare quartz clock, which must be modified by isolating two pads...