
schematic how to write data on lcd

The 16x2 LCD module is designed to display two lines of 16 characters each, making it suitable for a variety of applications where user interaction or status updates are necessary. The interfacing process typically involves connecting the data pins of the LCD to the microcontroller's output pins, while the control pins manage the operation of the LCD. The RS (Register Select) pin determines whether the data being sent is command or character data; the E (Enable) pin is used to latch the data into the LCD, and the R/W (Read/Write) pin indicates the direction of data flow.
Initialization of the LCD involves sending a series of commands that set the display mode, cursor behavior, and other operational parameters. This is often done in a specific sequence to ensure the LCD is ready to receive and display data correctly. The microcontroller must also manage the timing of these commands, adhering to the timing specifications provided by the LCD manufacturer.
To enhance functionality, a keypad can be interfaced with the microcontroller, allowing user input to be processed and displayed on the LCD. This combination is particularly useful in applications such as menu selections, data entry, and device control. The integration of a serial port connection to a PC enables real-time data updates and corrections, such as adjusting the displayed clock time, further enhancing the system's usability.
In summary, the combination of the 16x2 LCD module with a microcontroller like the AT89C51 or 8051 provides a powerful solution for displaying information in various automated systems. The ability to customize displays, interface with user inputs, and connect to external devices makes this setup versatile for numerous applications.In our project LCD data ports are connected to the port 1 of the controller & its control pins i. e. : RS, E, R/W are connected to the pin 3. 5 3. 6 & 2. 1 of the controller. We initialize the LCD and it start showing data i. e. clock. In order to do the correction of time we also provide the connection with PC using serial port of the controller. It is very important to keep a track of the working of almost all the automated and semi-automated devices, be it a washing machine, an autonomous robot or anything else. This is achieved by displaying their status on a small display module. LCD (Liquid Crystal Display) screen is such a display module and a 16x2 LCD module is very commonly used.
These modules are replacing seven segments and other multi segment LEDs for these purposes. The reasons being: LCDs are economical, easily programmable, have no limitation of displaying special & even custom characters (unlike in seven segments), animations and so on. LCD can be easily interfaced with a microcontroller to display a message or status of a device. This topic explains the basics of a 16x2 LCD and how it can be interfaced with AT89C51 to display a character.
how to interface keypad and LCD with microcontroller 8051, How to show a message over a LCD and also moving a motor using a 8051, The Web is littered with examples of how to control the standard Hitachi-44780 LCD using an 8051 micro-controller. LCD type HD44780 interfacing tutorial with microcontroller PIC, 8051 and AVR. character based LCD HD44780 CGRAM and DDRAM explaination with pinouts. 8051 microcontroller hardware interfacing tutorials LCD Display with assembly language code example. Display Data RAM (DDRAM) LCD Commands, register busy, Interface-program HD44780u based 16x2 LCD using 8051, AT89C51.
Programming code and initialization sequence, LCD cursor address, ciruit diagram and pin diagram. One of the most common devices attached to an 8051 is an LCD display. Some of the most common LCDs connected to the 8051 are 16x2 and 20x2 displays. 🔗 External reference
Related Circuits

The Wildcard requires a minimum of 8 volts on the V+Raw power rail, which must not exceed 26 volts. When using the Docking Panel or Power Dock, the V+Raw rail is automatically connected. If not using a dock, manual...
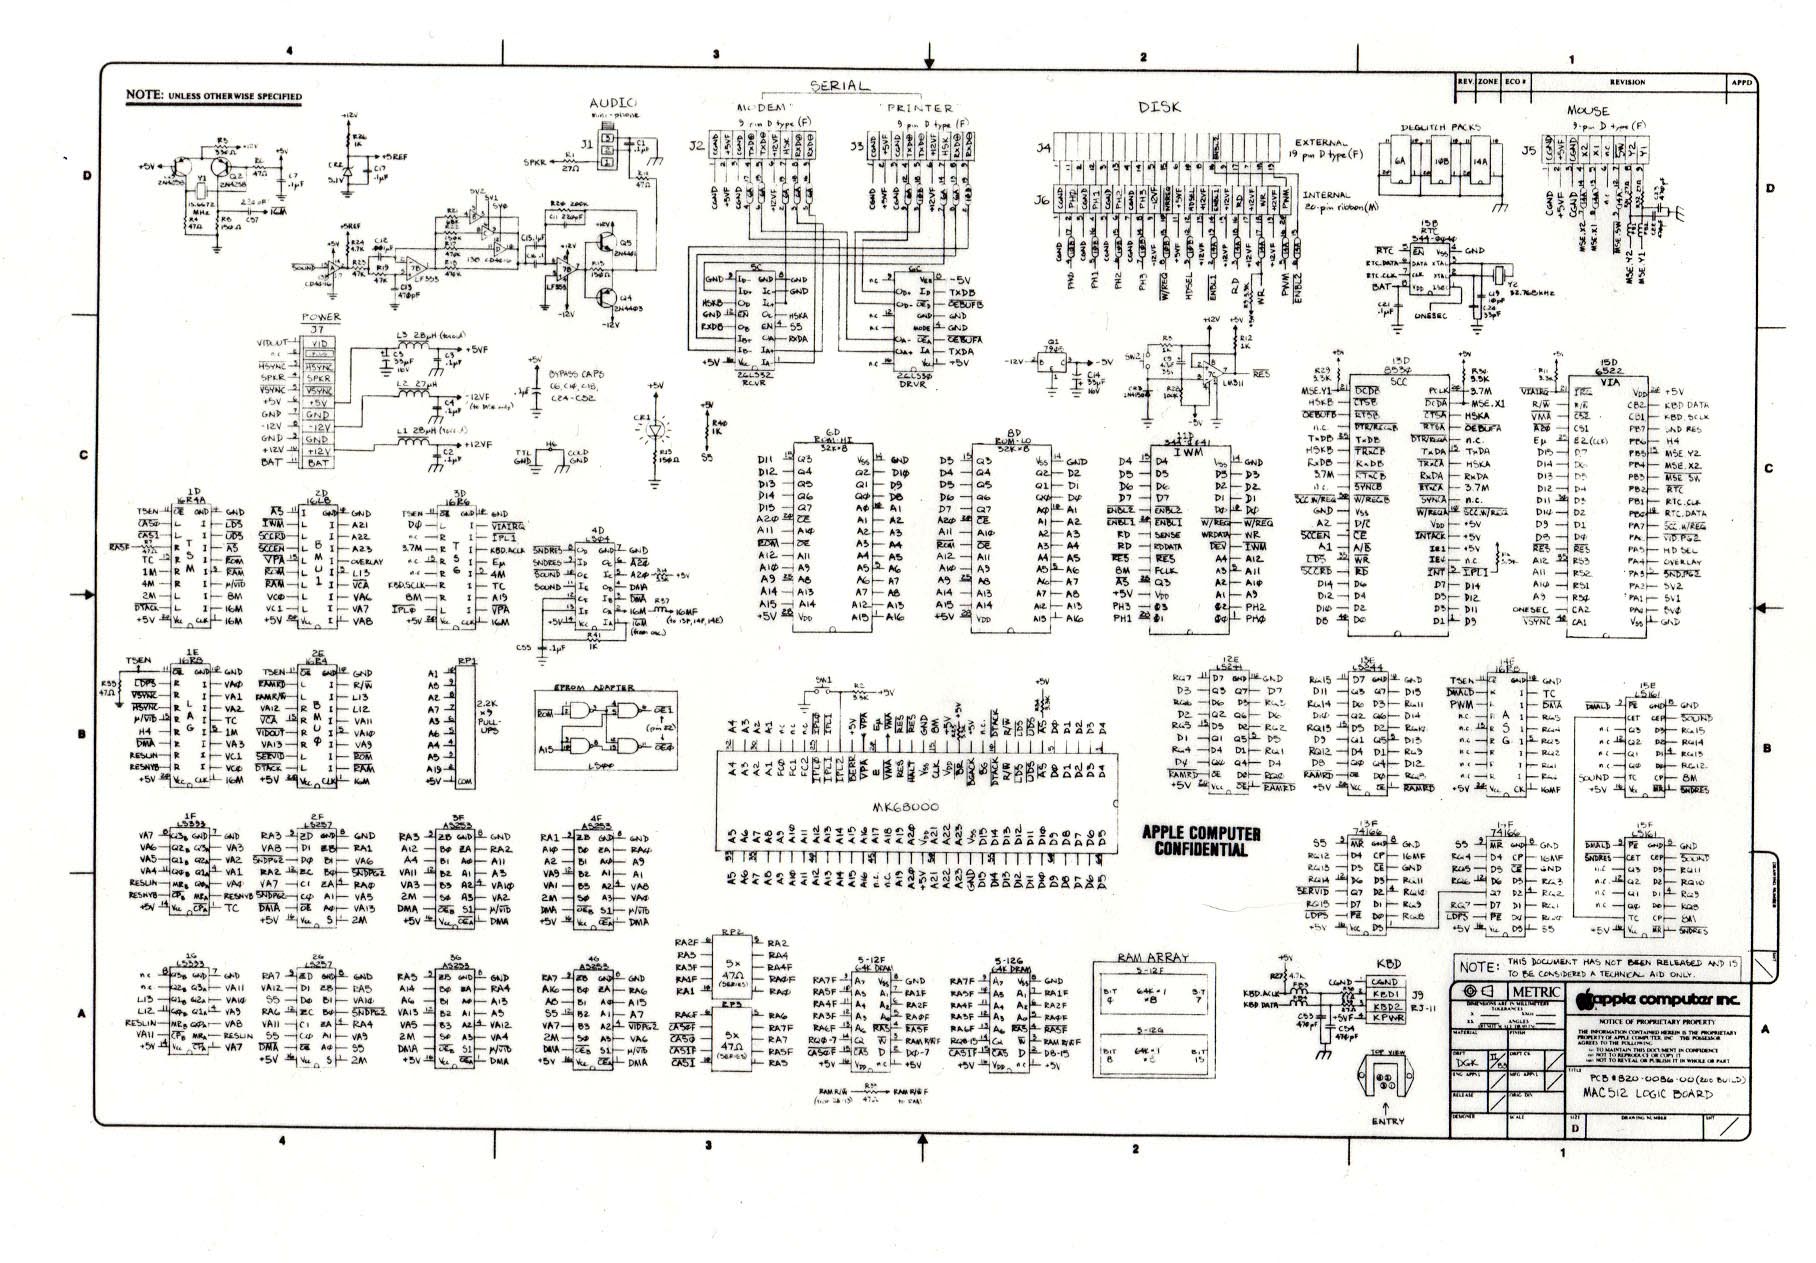
The following is one of the rare and significant documents at DigiBarn, the only known copy of the complete schematic specification for the 512K Macintosh Logic Board. Co-authored by Daniel Kottke, this design served as the foundation for the...
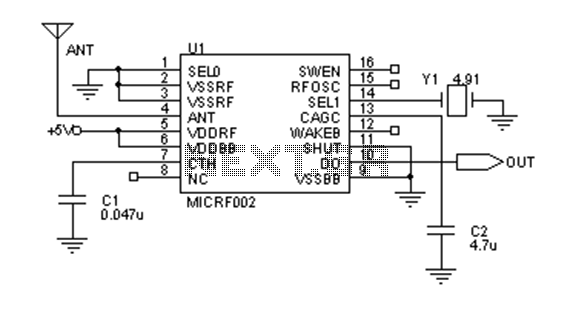
Early transmitters using LC oscillators experience significant frequency drift. The introduction of Surface Acoustic Wave (SAW) devices addresses this issue, providing substantial frequency stability comparable to crystals. These devices can achieve fundamental frequencies in the hundreds of megahertz or...
This circuit is designed to provide alerts after a predetermined time interval. It is ideal for tabletop games that necessitate a fixed duration for answering questions or moving pieces. In this context, it serves as a contemporary alternative to...
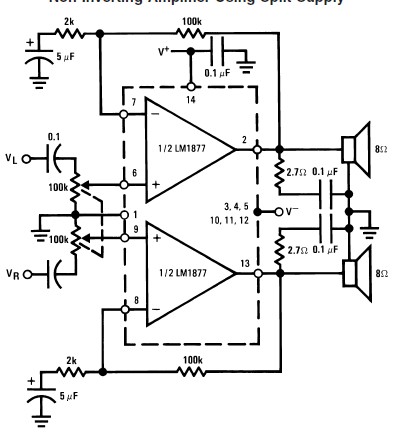
This audio amplifier circuit is designed to deliver 2W per channel continuously into 8-ohm loads. The LM1877 is engineered to function with a minimal number of external components while still offering flexibility for applications in stereo phonographs, tape recorders,...
The technology of data acquisition is an important branch of information science. It is not only employed in intelligent instruments but is also widely used in modern industrial production and military science. This technology is essential for process control,...
Warning: include(/var/www/html/nextgr/partials/cookie-banner.php): Failed to open stream: Permission denied in /var/www/html/nextgr/view-circuit.php on line 713
Warning: include(): Failed opening 'partials/cookie-banner.php' for inclusion (include_path='.:/usr/share/php') in /var/www/html/nextgr/view-circuit.php on line 713