
Serial Programmer for AVR microprocessors

The design is clever and works very well. It is an amazing demonstration of what can be done in 1K or ROM and only a 3 level deep stack. Take note that R101 does not do anything important and can be omitted. Though I have not surveyed all of the AVR devices, R103 and R106 are superfluous at least for the AT90S1200 and AT90S2313 and may be omitted. In one unit I used 39k resistors for R105, R102, and R104 to save power and they worked fine (I used a 2N2907 for Q100 and a 2N2222 for Q101). The programmer in the image on this page differs from that described in the Atmel application note in that there is an LED and series resistor connected across the power supply to indicate the presence of voltage, and an LED with series resistor connected from the +5V to the ATS90S1200 pin 16 (reset output) to indicate programmer activity. Sometimes the AVR Programming application from Atmel gets out of sync with the programmer (this does not happen with MacAVRpa). The LED on the reset line shows right away whether the hardware is really programming the chip as the software says. Build your first one as faithfully as you can according to the application note -this application note is several years old and Atmel has had adequate opportunity to receive feedback on it and make corrections, while my changes have only been applied to one programmer. Read the application note carefully and reproduce the design as faithfully as you can and you shouldn't have any trouble.
Note: you can use an AT90S2313 instead of an AT90S1200 if you add two lines to initialize the stack pointer, since the AT90S2313 is a superset of the AT90S1200, the difference being that the '1200 has a hardware stack and thus does not require pointer initialization. To use the AT90S2313 with AVR910 code, insert these two lines immediately after the reset label. The complete modified assembly code and hex files for MacAVRpa and AVR Studio are available in the assembly code section of this page.
Though several web sites mentioned the programmer, even after finding the application note, I still had questions, so I decided to put the bulk of the information here for anyone who might be starting down the same road. In addition to the electronic components, you need these things to build and use the programmer based on the AVR910 application note.
The AVR910 programmer circuit utilizes the AT90S1200 microcontroller, which is a low-cost, 8-bit AVR device with 1KB of Flash memory. The design is compact, allowing for easy assembly without a printed circuit board (PCB). It connects to the target microcontroller via a 6-pin interface, which includes connections for programming signals and power. The target microcontroller must supply its own clock and power, ensuring that the programmer operates correctly.
The programmer is designed to interface with standard RS-232 serial ports, making it widely compatible with various computer systems. The cost-effectiveness of the design, with an estimated build cost of under $10, makes it accessible for hobbyists and engineers alike. The AVR910 application note provides detailed instructions for assembly, including the necessary components and their specifications.
Key components include resistors and transistors, such as the 2N2907 and 2N2222, which are used for signal amplification and switching. The inclusion of LEDs provides visual feedback on power status and programming activity, enhancing usability. The design allows for modifications, such as the use of 39k resistors to minimize power consumption, and the option to substitute the AT90S2313 microcontroller for the AT90S1200, provided certain initialization code adjustments are made.
Overall, the AVR910 programmer is a simple yet effective tool for programming AVR microcontrollers, demonstrating the versatility and efficiency of the AVR architecture. It is recommended to adhere closely to the original design specifications outlined in the application note to ensure optimal performance and reliability.Atmel described a simple programmer based on the AT90S1200 (NOT the AT90S1200A) controller in their application note, AVR910 (a modification to use the AT90S2313 is also given below).The circuit is so small and simple, I was able to put two of them together without using a printed circuit board, taking only about an hour to assemble each one. Both worked fine without any hitches. These programmers are compatible with RS-232 ports, cost well under US$10 to build, and program AVR chips in the serial mode (and thus is not able to access programming options only available in parallel mode -read those data sheets!).
It connects to a target controller via a 6 pin cable. The target controller needs to have its own clock and power supply. The target also supplies power to the programmer. The 6 pin cable as well as the rest of the system is clearly explained in the AVR910 application note. The programmer works seamlessly with the programmer application that comes with the AVR Studio package and also seamlessly with MacAVRpa, an assembler/programmer application for the Macintosh.
The design is clever and works very well. It is an amazing demonstration of what can be done in 1K or ROM and only a 3 level deep stack. Take note that R101 does not do anything important and can be omitted. Though I have not surveyed all of the AVR devices, R103 and R106 are superfluous at least for the AT90S1200 and AT90S2313 and may be omitted. In one unit I used 39k resistors for R105, R102, and R104 to save power and they worked fine (I used a 2N2907 for Q100 and a 2N2222 for Q101).The programmer in the image on this page differs from that described in the Atmel application note in that there is an LED and series resistor connected across the power supply to indicate the presence of voltage, and an LED with series resistor connected from the +5V to the ATS90S1200 pin 16 (reset output) to indicate programmer activity.
Sometimes the AVR Programming application from Atmel gets out of sync with the programmer (this does not happen with MacAVRpa ). The LED on the reset line show right away whether the hardware is really programming the chip as the software says.
Build your fist one as faithfully as you can according to the application note -this application note is several years old and Atmel has had adequate opportunity to receive feedback on it an make corrections, while my changes have only been applied to one programmer. Read the application note carefully and reproduce the design as faithfully as you can and you shouldn't have any trouble.
Note: you can use an AT90S2313 instead of an AT90S1200 if you add two lines to initialize the stack pointer, since the AT90S2313 is a superset of the AT90S1200, the difference being that the '1200 has a hardware stack and thus does not require pointer initialization. To use the AT90S2313 with AVR910 code, insert these to lines immediately after the reset label. The complete modified assembly code and hex files for MacAVRpa and AVR Studio are available inthe assebly code section of this page.
Though several web sites mentioned the programmer, even after finding the application note, I still had questions, so I decided to put the bulk of the information here for anyone who might be starting down the same road. In addition to the electronic components, you need these things to build and use the programmer based on the AVR910 application note.
🔗 External reference
Related Circuits

This is a basic tutorial for beginners using the ATmega32 microcontroller to get started. This program can be referred to as a "Hello World" for the ATmega. The ATmega32 microcontroller is a member of the AVR family, widely utilized in...
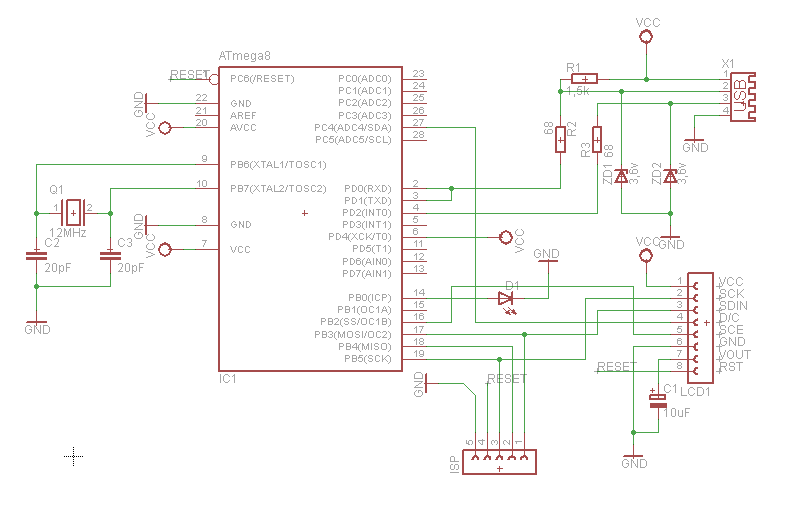
What can be done with an old phone, a microcontroller, and plenty of time? One possibility is to connect the old phone's LCD screen to a computer's USB port. Connecting an old phone's LCD screen to a computer using a...
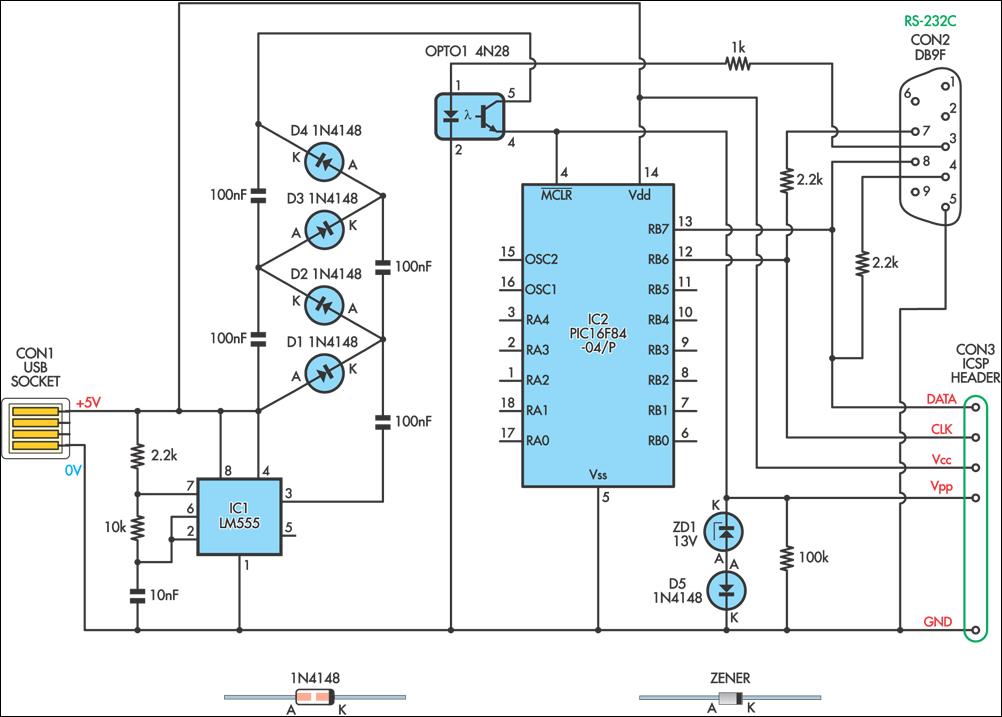
This simple circuit can be used to program the PIC16F84 and similar flash memory type components. It utilizes a 555 timer integrated circuit (IC) to generate the programming voltage from a +5V power supply, enabling operation from a computer's...
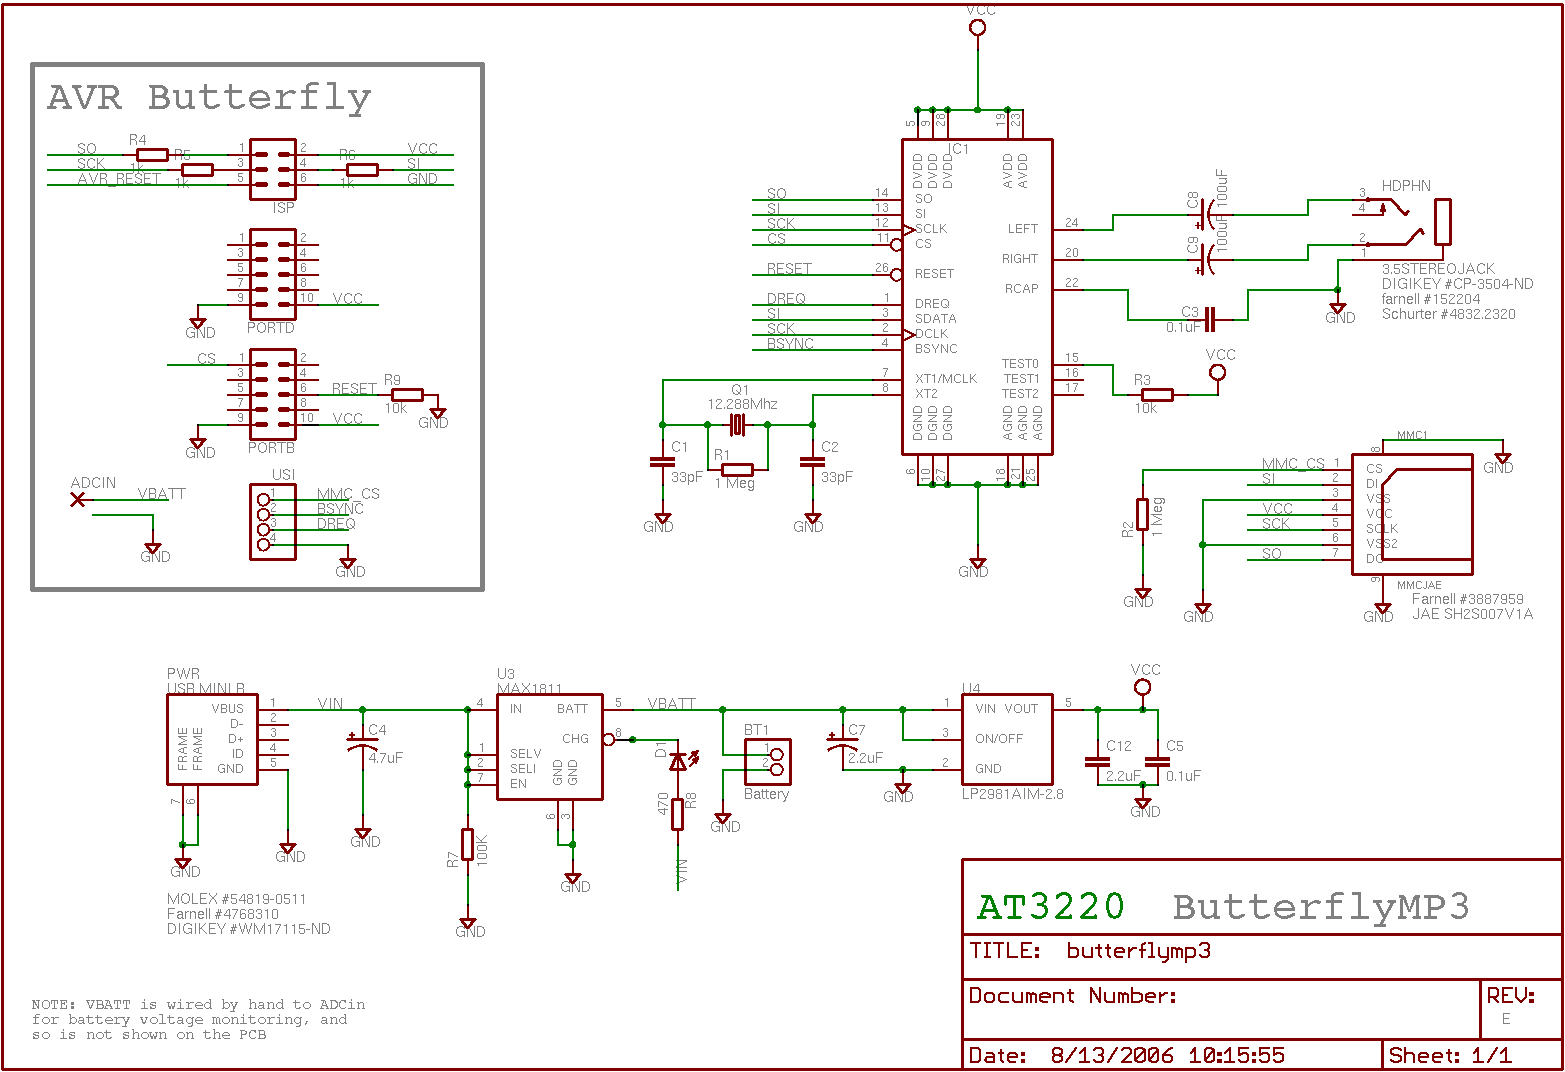
AVR ISP interface (optional but useful if the bootloader is not preferred, if budget constraints prevent the use of JTAG, or if AVR Studio has crashed and disabled on-chip debugging). The following is the updated bill of materials for...
Building a serial voltage meter to measure from 0 to 5 volts DC is straightforward. Utilizing MeLabs PicBasic and Microsoft Visual Basic Version 5 Pro is essential, as the MSComm control required for communication is not available in the Visual...

Create a rapid transmitter/receiver pair that can be found in most households. An AM or FM radio system is suitable since it is widely accessible. The design focuses on generating the required radio signal and modulating it effectively. After...