
Simple preamplifier circuits by transistors

The preamplifier circuit described is a fundamental building block in audio signal processing, designed to enhance weak audio signals for better compatibility with power amplifiers. The choice of a single transistor design simplifies the circuit while maintaining effectiveness, making it an excellent choice for beginners. The use of standard transistor models allows for easy sourcing and replacement, ensuring that the circuit can be assembled with readily available components.
The circuit's functionality is further enhanced by the careful selection of coupling capacitors, which serve to block DC components while allowing AC audio signals to pass through. This feature is critical in preventing any unwanted DC offset from affecting the performance of subsequent stages in the audio chain. The feedback mechanism implemented via capacitors and resistors ensures that the circuit maintains a stable gain across a wide frequency range, resulting in clear and distortion-free audio output.
In terms of power supply requirements, the circuit's flexibility in operating between 6 to 12 volts makes it adaptable for various applications, whether in home audio systems or portable devices. The low current consumption of 2-3 mA indicates that the circuit can be powered efficiently, making it suitable for battery-operated devices.
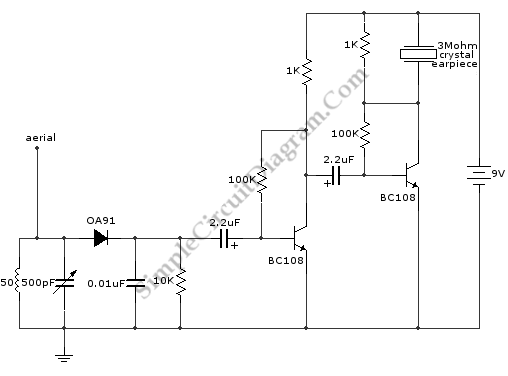
Overall, this preamplifier circuit exemplifies a robust solution for audio signal amplification, providing the necessary gain and frequency response for high-quality audio output while remaining accessible for novice engineers and hobbyists.When you want to enlarge sound signal from all source before costume amplify. Usual use Pre Amplifier or Pre Amp. Today I begs for to suggest again the one circuit. That interesting because of use Transistor just one ( the number replaces many the number such as C1815 or C945 or C828, etc. ) The circuit easily and still be usable well. convenient for a novice as an example PCB be the character Stereo. Wasp Input from the CD player and Output with the amplifier immediately. Request enjoy please yes. The preamplifier circuit is a circuit that extends the signal from the source sound to signal the strength to go into a power amplifier circuit to trigger the required sector preamplifier is also due to signal from the source voice Some levels. sounds very light, such as tape or tuner, some will have strength of signals in the heart uV is required to use the preamplifier circuit expanded signal strength to strength in the area mV to access the power amplifier for amplifier efficiency.
By entering into power supply 9volt circuit Q1 and Q2 to a direct coupling circuit to transmit better. When the signal input through the C1 coupling into the signal to Q1. Amplifier to a level of C to stand out in Q2 into the amplifier once again to provide better stability.
Then signal to leave the output pin C of Q2 through C6 coupling signal from output and the output signal a part of Q2 will feed black feedback through to the C4, C3 and R3 comes to the pin E in Q1 in order to help the range of frequency response. Pre amplifier circuit with transistors can be used to supply source from 6-12Volt the current minimum is 2-3 mA and can extend the signal strength from up to 2 Volt, which can This will signal the driver to easily power amplifier and frequency response can be frequency response from 70 Hz 45 kHz at -3 dB and distortion less than 0.
1%. By entering into power supply circuit and one audio Input. The signal is coupling through C1 to prevent DC Voltage to Harry and then audio goes into the leg B of Q1 to amplify signals to forces up to the one with the R1 and R2 is the organized bias for Q1 is Q1. and Q2 is connected to a direct coupling circuit broadcast better. Then the signal was expanded to export the C leg of Q2 and through C5 coupling signal to smooth out and send it to Su output gain of the circuit, which can be set from the R6/R5 C3 acts as a wizard.
high frequency response better. R9 is connected to the circuit when the circuit for use in the nature of the pre mic R9 acts as the power supply to the mic condenser used if the nature of the pre amp is not integrated into the R9. 🔗 External reference
Related Circuits
An AM radio receiver can be constructed using only two active components, operating in the Medium Wave (MW) band. The circuit employs a straightforward receiver configuration. The described AM radio receiver circuit leverages a minimalist approach by utilizing just two...
The divider acts as the speaker's brain and is crucial for sound quality. The music amplifier's output signal must be processed through a wave filter element to divide it into specific frequency signals for each unit. A scientifically and...
A field strength meter utilizing a biased Schottky detector employs a temperature-compensated Schottky diode within an amplified, untuned field strength indicator powered by two AA cells. This device indicates the relative field strength of RF fields ranging from a...
Note that Q3 and Q4 in the figure below are complementary, with Q3 being an NPN transistor and Q4 being a PNP transistor. This circuit is suitable for moderate power audio amplifiers. For a detailed explanation of this circuit,...
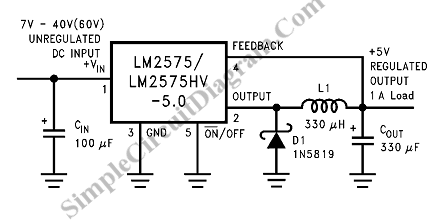
Switching Regulator for High Power Efficiency. When it is necessary to convert a high voltage to a significantly lower voltage, a switching regulator is the optimal choice. A switching regulator is an essential component in modern power management systems, particularly...
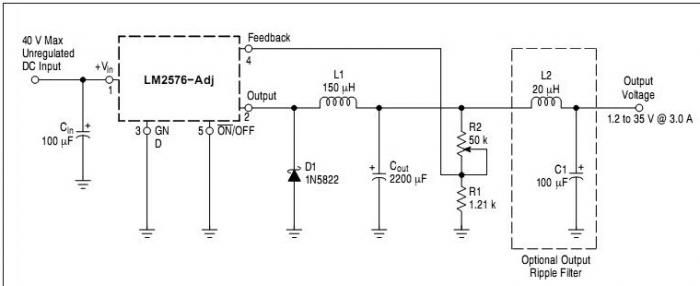
A simple lab power supply electronic project can be designed using this circuit diagram, which is based on the LM2576 monolithic integrated regulator that provides all the active functions for a step-down (buck) switching regulator. As seen in the...