
Wifi Robot

The remote control car project leverages a robust architecture combining wireless communication, embedded systems, and real-time video streaming. The Linksys WRT54GL router serves as the central control unit, running Open-WRT, which provides the necessary networking capabilities as well as the flexibility to customize the firmware for specific applications. The router is configured to manage data packets from the live-feed network camera, enabling remote viewing and control of the car.
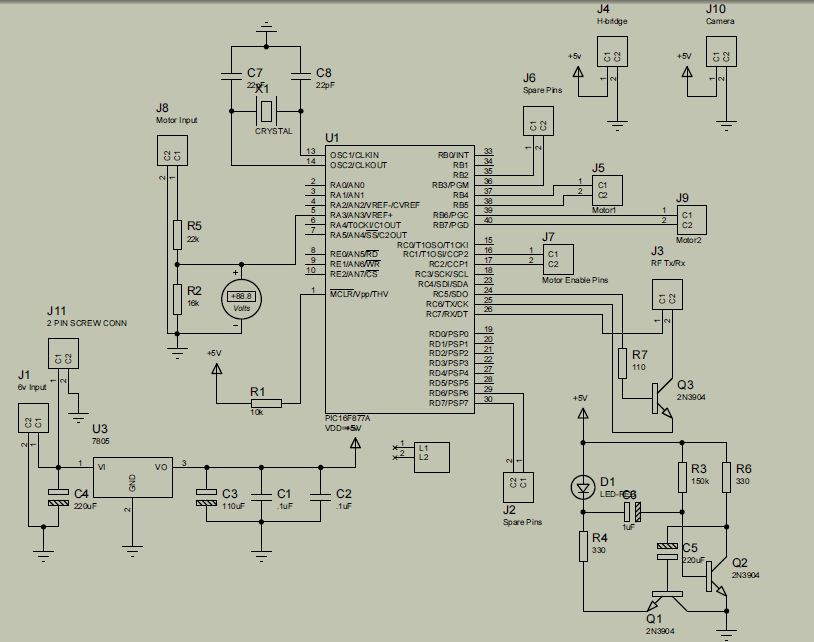
The integration of a microcontroller, such as the Arduino, allows for precise control over the car's movement. The microcontroller interfaces with the existing electronics of the RC car, utilizing the Realtek RX2/TX2 chips to control directional movement through simple GPIO (General Purpose Input/Output) connections. The design ensures minimal interference with the original circuitry, thus maintaining reliability while adding new functionalities.
Power management is an essential consideration due to the increased load from additional components like the camera and router. Therefore, larger batteries capable of sustaining longer operational times are employed, ensuring that the car can function effectively over extended distances. The choice of an RC vehicle with a size ratio of 1:10 or larger is crucial, as it provides ample space for housing the additional components without compromising the vehicle's structural integrity and performance.
The project documentation includes source code for both the PIC and Arduino platforms, allowing users to select the most suitable option based on their familiarity and comfort level. This open-source approach not only promotes community engagement but also encourages innovation as users can modify and enhance the existing codebase. The dual control board setup addresses potential hardware failures, ensuring that the system remains operational even if one of the boards encounters issues.
In conclusion, this remote control car project exemplifies the integration of networking and robotics, providing a platform for experimentation and learning in embedded systems and wireless communication. The comprehensive use of readily available hardware and open-source software makes it an accessible project for enthusiasts and engineers alike.A remote control car that can be driven over the internet or with a laptop wirelessly from up to 500m away. It has a live-feed network camera so that it can be driven without line of sight and a horn so that you can honk at people.
A while ago I discovered the Linksys WRT54GL router. It`s very hacker-friendly in that it runs Linux and some of the hardware has been reverse engineered. A bunch of alternative firmware versions have been written for this router. The version that this project uses is the customizable Linux firmware Open-WRT. Along with great software for this router, a bunch of hardware hacks are possible. With a cheap, hackable, embedded Linux system at my disposal - I knew I had to do something cool with it. So the Wifi Robot idea was born. The goal of this article is to give a high-level overview of the project and provide some implementation details of the software and electronics.
It is not meant to be a step-by-step how-to guide, but there should be enough information for someone with motivation and some background knowledge in electronics and software to be able to make their own Wifi Robot. All of the source code is being released under the terms of the GNU GPL v2, so by all means, use the code, and improve it!
Adding a network camera, router, heavier batteries, extra circuits, and a whole bunch of wires adds a lot of extra weight that the car wasn`t designed for. Because of all of the additions, you`ll need to find a pretty large RC car. Thrift stores often sell RC vehicles (without remotes!) for $3-5. I have bought a number of cars this way for taking apart. Vehicles in the 1:10 size ratio or bigger are appropriate; you probably don`t want to go any smaller.
I bought this car for $5 at Value Village. I have taken apart about 20 RC cars. Nearly every single one of them used the Realtek RX2/TX2 chips or a pin-compatible alternative. The links are for their respective datasheets. What this means is that it`s really easy to interface to the car`s existing electronics without having to put in a bunch of our own circuitry. It`s possible to hook up a microcontroller directly to these pins (Forward, Backward, Left, Right) and directly control the car.
Being able to leverage the car`s original circuitry saves a lot of time and effort. I`ve modified my WRT54GL to have 2 serial ports and a 1GB SD Card (acts like a 1GB hard drive). The SD card is not used in this project, but one of the serial ports is. One is a console port, the other is TTS/1 which we will be using. For this project I`m using Open-WRT White Russian v0. 9. There are more recent versions, but we don`t need the latest-and-greatest software features for this project. The software compilation guide (details later) uses this distribution, so that is why I chose it. The Arduino (Freeduino MaxSerial) is my second choice and I really liked how easy it was to get it up and running.
The community support is great and it`s very easy to use. I originally used the AVR Butterfly development board. It was working fine until the batteries ran low one time. There is an error in the AVR butterfly bootloader detailed here that corrupts the code and doesn`t let you reprogram it unless you load a new bootloader. To me, I just knew my car was working one day and not the next. It took quite a while to debug the problem and quite a bit of time to fix it so I scrapped that control system.
I also found the output voltages to be unpredictable because the outputs are also driving the integrated peripherals like the LCD screen. Below I have included source code for the PIC and Arduino microcontroller platforms. Both have been tested - so use whichever you feel most comfortable with. The Arduino (Freeduino MaxSerial) would be the most painless way to get running quickly. I bought this one. I`m actually using two control boards in my car. The reason for this is that I blew the original drive transistors o 🔗 External reference
Related Circuits
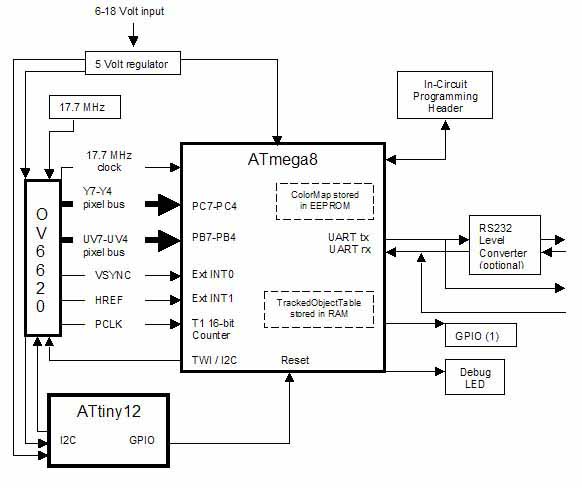
The line is intentionally not straight to test its performance with zig-zags and splits, which are common in the Chibots advanced line-following contest. The AVRcam is a compact, real-time image processing engine designed to track colorful objects. This system...
The PhytoBot is a semi-intelligent plant that reacts to external stimuli, specifically light intensity and light location, mimicking the behavior of a phototropic plant. It is designed as an interactive artwork intended for prolonged operation. The motivation behind this...

By utilizing logic chips, the behavior of a robot can be enhanced, allowing for the implementation of more complex algorithms. Logic chips, also known as logic gates or digital logic integrated circuits, are fundamental components in digital electronics that perform...
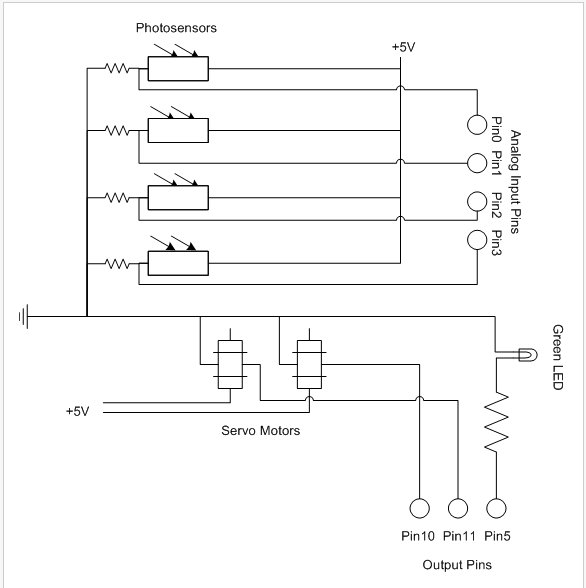
If the robot is positioned on the black line, it will continue moving forward. However, if it veers off the line and enters a white area, it will assess whether to correct its path to the left or right,...
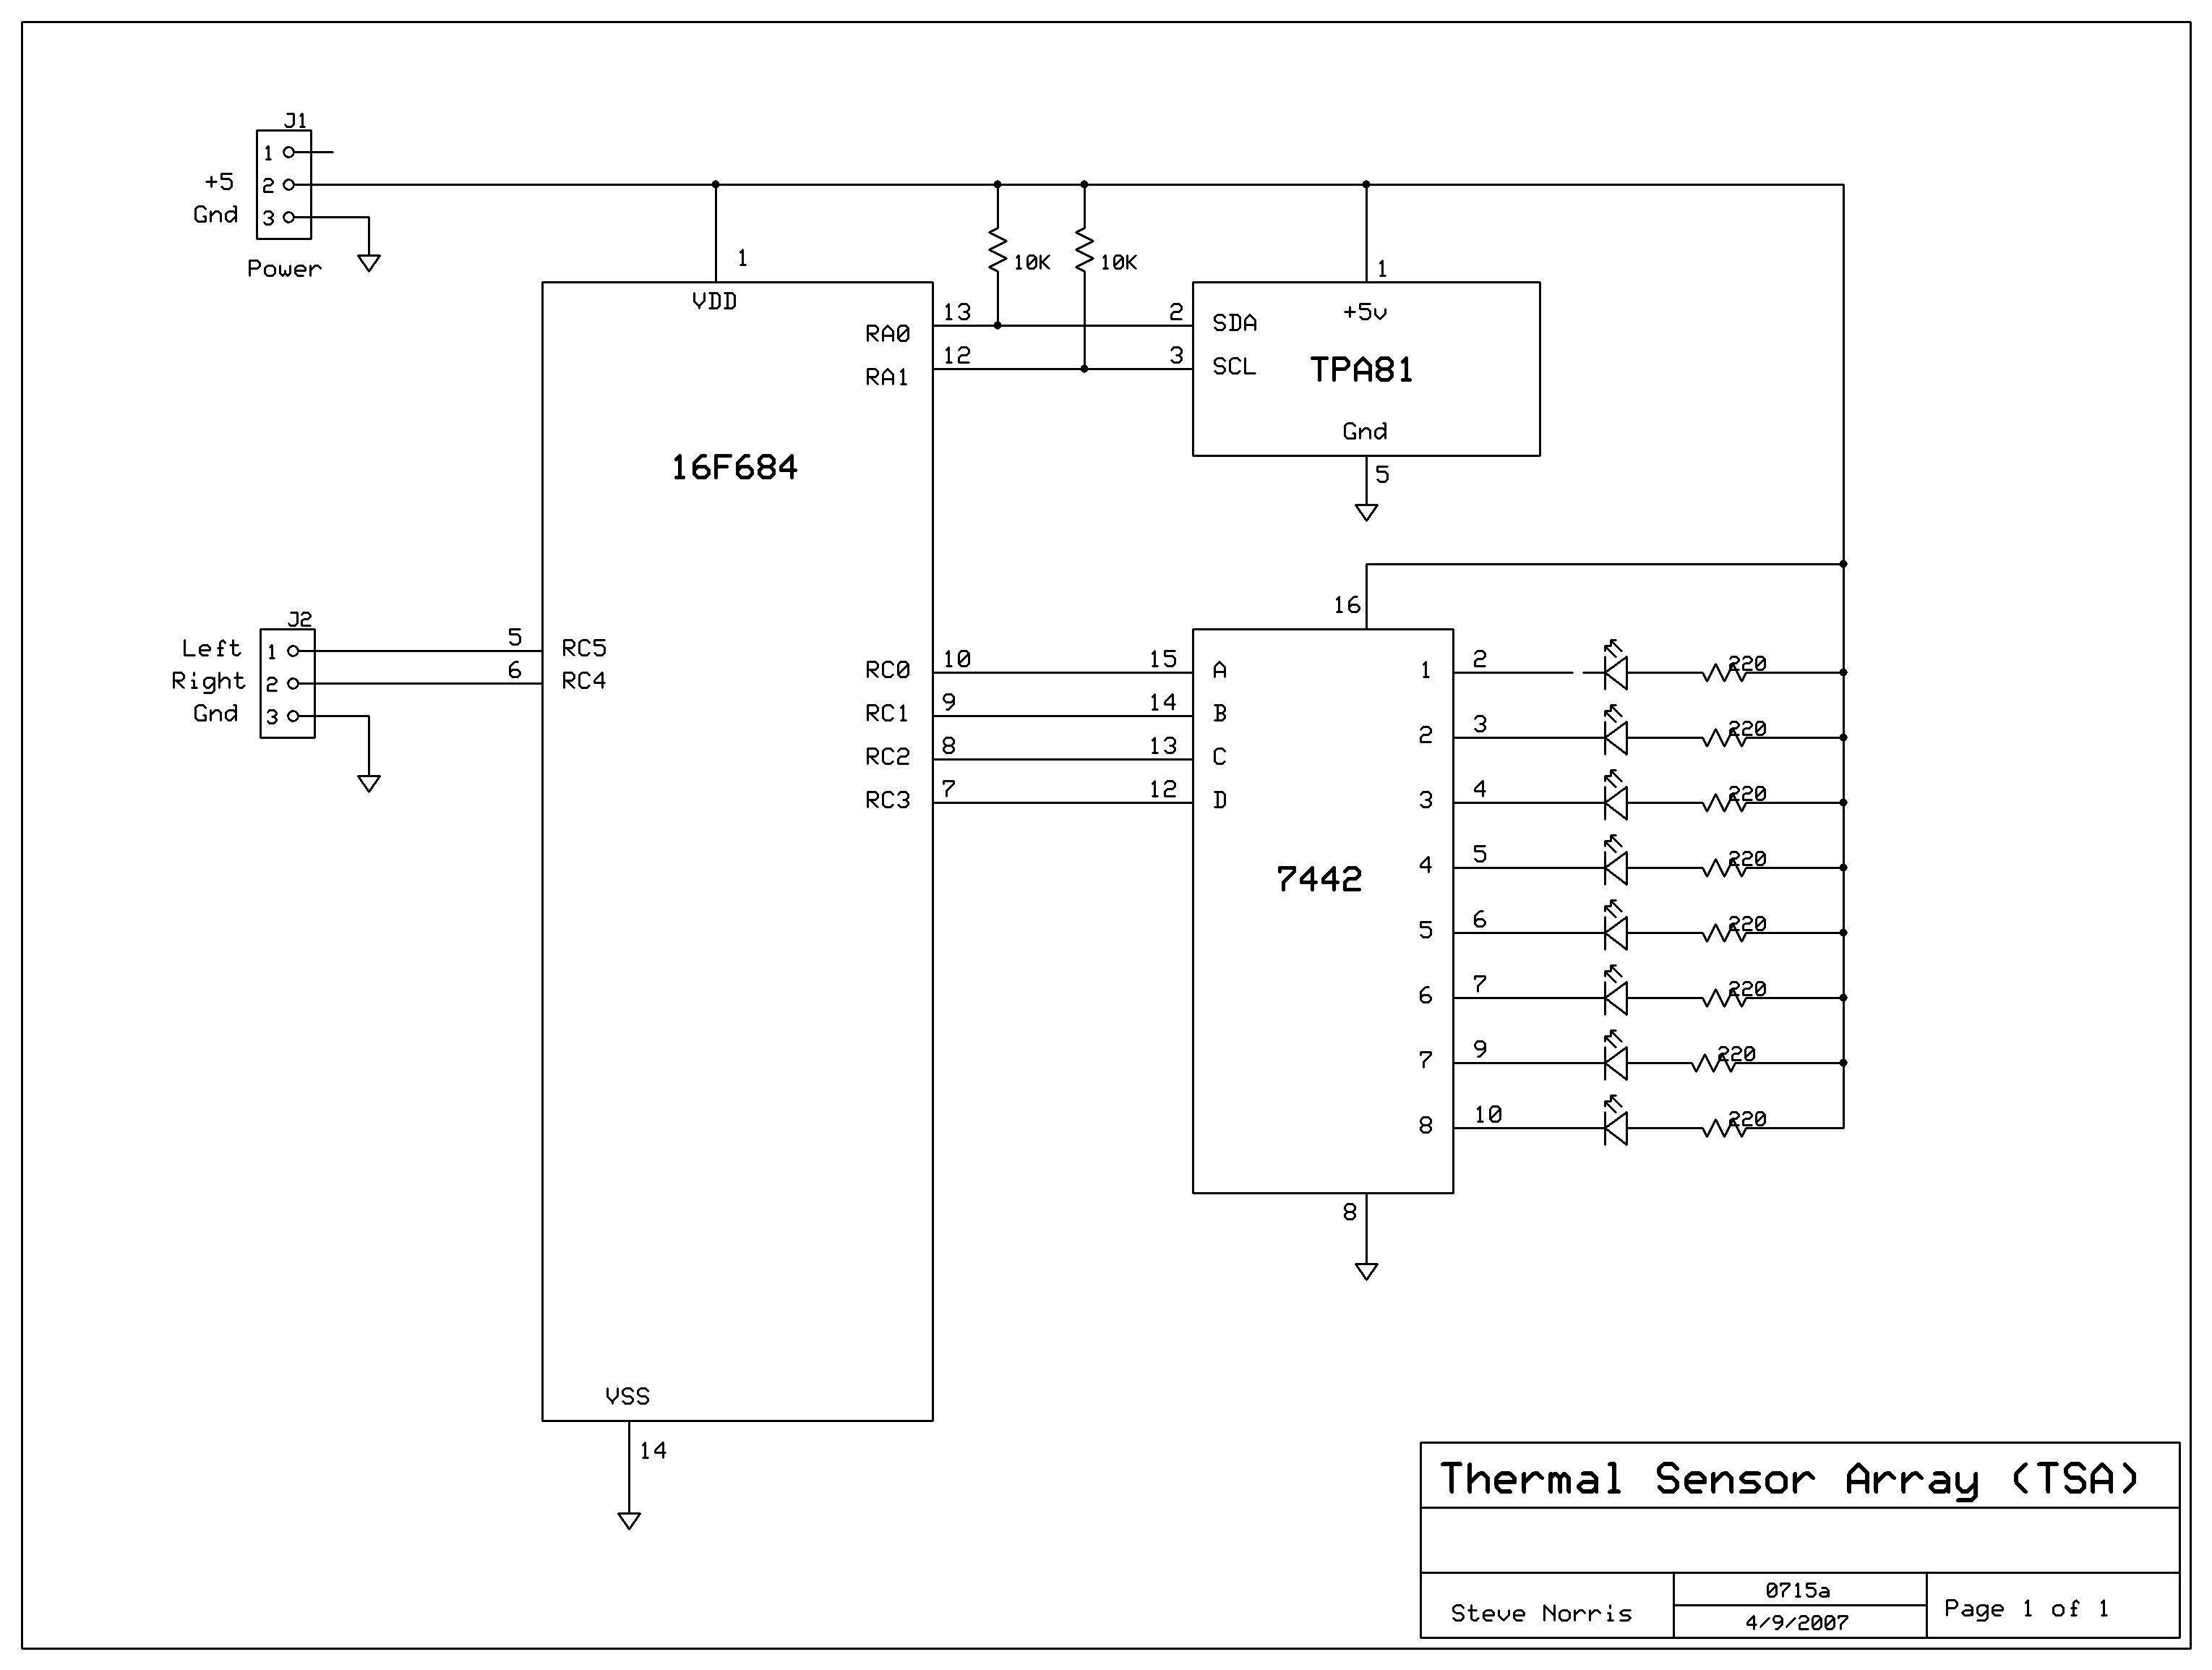
The device utilizes body heat to identify and track its human operator. Central to its heat-seeking function is the Devantech TPA81 Thermal Sensor Array, which features an array of eight horizontally mounted detectors. Each detector is capable of sensing...
The project is developed by Team Stark, with Gilbert as the leader and team members Martin and Janssen. The tasks have been divided into three parts. The first part includes camera control, login database, installer, and network setup, which...