
5x7 LED display schematic

The project utilizes a 5x7 LED matrix display composed of 35 individual LEDs, allowing for the creation of diverse visual effects and animations. The control of this matrix is achieved through a PIC16F84 microcontroller, which is programmed to manage the LED states and generate various patterns. The use of the SN74154 demultiplexer facilitates the addressing of each LED within the matrix by converting binary inputs from the microcontroller into specific outputs that activate the desired LEDs.
To enhance user interaction, an infrared (IR) remote control interface is proposed, which will simplify the process of updating the display messages without the need for direct computer connections. This feature will allow users to change scrolling messages and animations easily. The programming approach starts with basic LED control, gradually increasing in complexity to include multiple animations, thereby providing a comprehensive understanding of microcontroller programming.
The project is designed with a focus on accessibility, ensuring that even those new to microcontrollers can follow along and learn effectively. The accompanying documentation includes detailed explanations of the circuitry and programming logic, as well as troubleshooting sections to assist users in resolving any issues that arise during implementation.
In summary, this project not only serves as a practical application of microcontroller technology but also acts as an educational tool, fostering a deeper understanding of electronics and programming principles through hands-on experience. The combination of a simple yet versatile LED matrix, a robust microcontroller, and user-friendly programming methods makes this project an excellent choice for beginners and seasoned enthusiasts alike.Your 5x7 display is my favourite toy; the tunes and graphics in the elevator display always impress my mates! Since building the display I developed my own 400 dot matrix using a pic and the SN74154 [4bit binary to 1 of 16 demultiplexer\counter] - in place of the 4017.
It works well but I still have to hook it up to my computer to change the scrolling message. When I get time I will write another program that will make it easier to program the message board via an I.R. remote. You are about to take part in one of the best microcomputer (microprocessor) projects you have seen. It uses a PIC16F84 micro and you will be shown how to program the chip to create quite amazing effects. It's a simple project and you will be starting at the beginning of programming, so don't worry if you have never worked with a microprocessor before.
Then we come to the experiments. They start with a simple routine to illuminate a single LED and progress to flashing a LED, running a set of LEDs up and down the screen, and then a variety of animations. The things you can do are almost unbelievable. And it's all covered in the course. The approach we have taken is completely different to anything you have seen before. The author has seen some of the other microcontroller projects and he has been totally confused with their content and approach.
They were really impossible to understand. You needed to be an expert to start the first lesson! That's why he felt compelled to create a project that teaches in a completely different way. Once you complete this course you will be able to look at the other projects and work out what they are trying to present. I'm saying this because if you have seen the other projects and given up in frustration, the worry is over.
You can be assured, the animations you see on the screen in the "Screen Effects" page, are fully documented and you will be able to create similar (and even better) effects. This course has been written and designed by Colin Mitchell, the author of Talking electronics. Talking Electronics is Australia's most successful electronics publication and been on the market for more than 20 years.
It has been produced solely by Colin Mitchell and has stood the test of time without a single advertisement getting in the way of a good-quality construction article. Don't you hate searching through a magazine for the articles? All our books and magazines are ARTICLES ONLY and you don't finish up with 30 pages of projects out of a 150 page magazine!
Even though the projects presented by Talking Electronics have all been of a simple nature, every one has been described in detail with special sections on "How it works" and "If it doesn't work." You can take an article and expand on it and create a more-complex project. But this is only possible if you understand the fundamentals. That's what we provide. The fundamentals. To back this up, TE produces kits for each and every project and every PC board is available separately.
All the kits are sent out the same day and you don't have to wait weeks for something to arrive. We waited 3 weeks for one of the competitors PIC kits and it came with NO PC board and NO circuit diagram! With TE kits, all you have to do is ring up and order the kit over the phone and it will be sent THE SAME DAY.
For a few dollars extra it will be sent EXPRESS and you are ready to start THE NEXT DAY. We have sent out over 200,000 kits so we must be doing something right! Some readers have bought over $350 worth of kits and when we meet them at seminars and trade shows, they say they owe their advancement in electronics to Talking Electronics. Many of the projects you are thinking about will require only a few input/output lines and the PIC12C508A will be suited for the job.
For instance, if you want to design a small project and have it mass produced, the cost will have to be as low as possible. This is where the PIC12C508A comes in. It it less than half the cost of a PICF84 and enables very low-cost projects to be produced and you will be competitive with overseas imports.
It is also available in surface-mount form so very small projects can be produced. But it takes lots of steps to get from an idea to the finished design and TE has the parts, PC boards and ideas to help you. The only problem with the PIC12C508A is it is not as friendly as the PICF84 and it's only by following our course that you will be able to design economical projects with it.
The PIC12C508A course starts with Chapter 1. Go to this chapter and you are on your way. This chapter will lead you into hundreds of pages of programming, ideas, projects and theory on both the PIC12C508A and PIC16F84 and they will keep you up all night for WEEKS! This is the biggest compliment we can get and that's why we continue to provide information-basics. This is the one area that has been so neglected. And that's where we excel. The project consists of 35 LEDs arranged as a 5x7 matrix. This may not seem very impressive but you can display all sorts of effects and treat it like a "window on a large video screen." The project comes with a series of test programs to test the operation of the screen and also the surrounding components.
🔗 External reference
Related Circuits
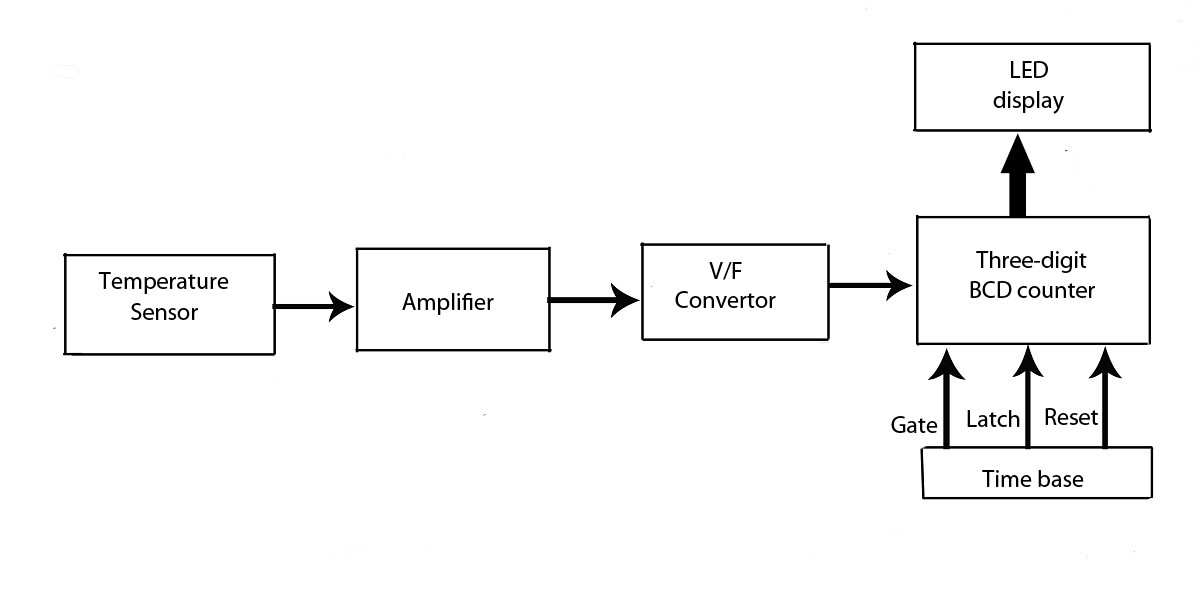
This verified project provides an idea, circuit, and operation of the LED display temperature indicator. It features a digital temperature indicator utilizing a voltage-to-frequency (V/F) converter, along with various electronic projects. The LED display temperature indicator is designed to provide a...
This project aims to develop expertise in using seven-segment displays in various applications. The system will be designed to display any integer from 0 to 9999 using four seven-segment displays. A function named Print() will be created to facilitate...
The 900 Hz tone is generated using an LC oscillator. The inductive component, "L," is provided by the inductance of the oscillator's output coupling transformer T1. This configuration is a variation of one of the two standard Hartley oscillator...
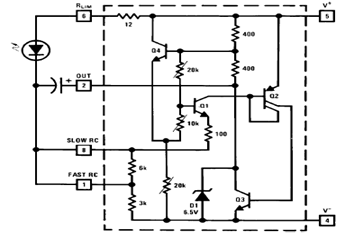
The schematic diagram below illustrates a typical 1.5V flasher circuit using the LM3909. The LM3909 is a monolithic oscillator designed specifically for flashing Light Emitting Diodes (LEDs). The LM3909 flasher circuit operates at a low voltage of 1.5V, making it...
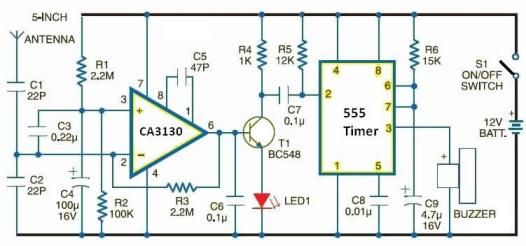
This electronic schematic allows for the design of a simple cellular phone detector circuit capable of sensing the presence of an activated mobile phone from a distance of 1.5 meters. The capacitor C3 should have lead lengths of 18...
In various industrial processes, it is essential to rotate a DC (or AC) motor both forward and reverse for a specified duration. Initially, the motor rotates forward (clockwise) for a certain period (approximately 2 to 3 minutes), then stops...