
A 16x16 LED Matrix

The described circuit features a high-density LED array comprising 256 individual light-emitting diodes (LEDs) arranged in a matrix format of 16 columns and 16 rows. The selection of 2mm x 2.5mm LEDs indicates a focus on compactness and efficient use of space, which is essential for applications requiring a large number of indicators or displays within a limited area.
To construct this LED array, a printed circuit board (PCB) is designed to accommodate the layout of the LEDs. Each LED is connected in such a way that it can be individually controlled, allowing for various display patterns or visual outputs. The arrangement of the LEDs in a matrix format facilitates multiplexing, where only a subset of the LEDs is powered at any given time, reducing the overall power consumption and heat generation.
The driving circuitry for the LED array would typically consist of microcontroller or logic circuits, which can be programmed to control the on/off states of each LED based on the desired output. Such a system may include current-limiting resistors for each LED to prevent overcurrent conditions, ensuring longevity and consistent brightness across the array.
The choice of a high-density design not only minimizes the physical footprint of the array but also enhances visual impact, making it suitable for various applications such as visual indicators, simple oscilloscopes, or decorative displays. Overall, this LED array design exemplifies a practical approach to utilizing LED technology in electronic applications, reflecting the innovative spirit of early 1980s electronics experimentation.In the early `80s, I read some articles on LED arrays. They described using arrays of 64 or more LEDs as crude oscilloscopes and other interesting things. I decided I`d make one myself - a really big array, 256 LEDs arranged as 16 columns by 16 rows. In 1983, while I was in my final semester of electronics classes at Monterey Peninsula College, I designed my array. I wanted a high-density array, in part to make the PC board smaller, but mainly to give a better appearance.
So, I used the smallest LEDs I could find, 2mm x 2.5mm. I was lucky and found that All Electronics was selling them in 200-packs for something like $20. I bought two packs - a fair sum for me at the time. 🔗 External reference
Related Circuits

This may be the simplest LED flasher circuit you can build, with the notable exclusion of LEDs with integrated flashing circuits. This might be a good replacement for the LM3909 in some applications. Take a close look. Only the...

The original FLED-based SE uses a flashing LED to drive a type 1 solar engine (you'll note that it's just like the Zener-based SE, but with a FLED in the starring role). The good news is that all the...

This stereo amplifier utilizes the NE5517/A and features an excellent tracking accuracy of 0.3 dB, which is typical. The offset can be adjusted using the potentiometer, Rp. For AC-coupled amplifiers, the potentiometer can be substituted with two 5.1 k...

RF Signal Strength Meter circuits are popular RF measurement devices. This circuit is one of the simplest but very useful circuits that satisfies your desired accuracy. The heart of measurement is high accuracy but easy to use Logarithmic Detector...
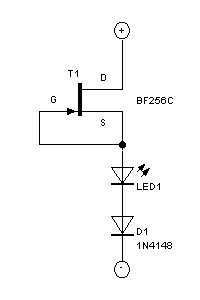
This circuit uses the effect of a FET as the power to act through the gate with the source to connect. The voltage may vary between 4V and 30V, the current through the LED should constantly be around 15mA....

This circuit utilizes a CA3130 BiMOS operational amplifier as a multivibrator and a CA3160 BiMOS operational amplifier as a comparator. The oscillator exhibits a sensitivity of 1 kHz/V, with a tracking error of approximately 0.02% and a temperature coefficient...