
Car brake Light

The circuit described involves the integration of a third brake light into an automotive lighting system, with a focus on simplifying the wiring process. The design utilizes two silicon-controlled rectifiers (SCRs), which serve as electronic switches that control the operation of the third brake light based on the signals received from the existing brake lights.
In this configuration, the SCRs are activated when the brake pedal is pressed, allowing current to flow to the third brake light. This method effectively eliminates the need to run a wire directly from the brake pedal switch, thereby reducing installation complexity and improving aesthetics by minimizing visible wiring.
The NTE5483 SCR, rated for 8A and 200V, is suitable for this application, providing adequate current handling for typical automotive brake light bulbs. It is essential to monitor the temperature of the SCRs during operation, especially under load conditions, as excessive heat can lead to failure. If the SCRs are found to be overheating, the addition of heat sinks or cool ribs is recommended to enhance thermal dissipation and ensure reliable operation.
Before final installation, it is advisable to conduct a bench test of the circuit. This involves applying power to the circuit with the brake light connected for a duration of several minutes to confirm that the SCRs are functioning correctly and that the third brake light illuminates as expected when the brake pedal is engaged. Proper testing will help identify any potential issues before the circuit is permanently installed in the vehicle.What's so special about this circuit? Well, the first third-brake light I installed I had to pull a wire from the Third Brake Light all the way underneath the carpet to the brake-pedal-switch and I thought it would be easier to pluck the signal of both brakelights via the trunk. Bench-test your circuit first and apply power to the circuit, with the brakelight connected, for at least a couple of minutes.
If the two SCR's are getting hot (depending on the type of bulb(s) in your 3rd brake light), mount coolribs on them. I used the NTE5483 which is a 8A, 200Vrm type. 🔗 External reference
Related Circuits
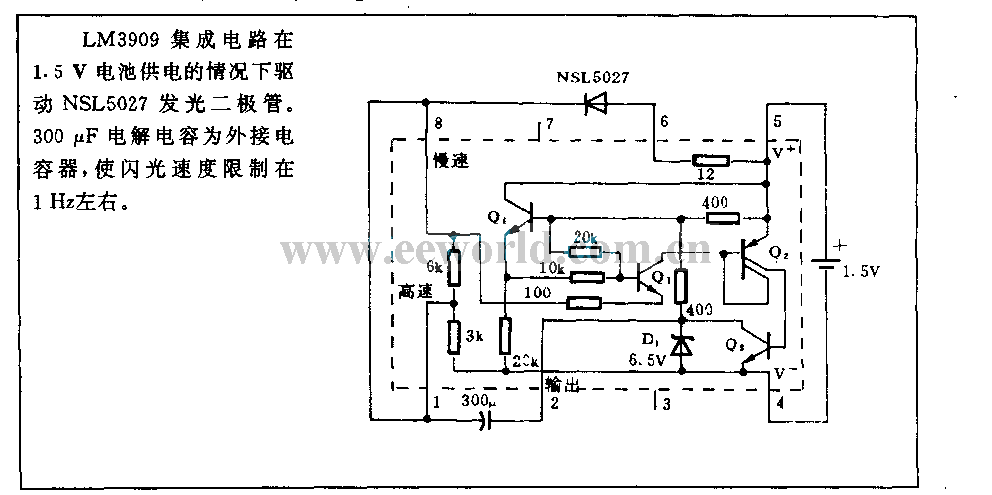
With a 1.5V battery supply, the integrated circuit LM3909 can drive the light-emitting diode NSL5027. The 300μF electrolytic capacitor acts as a timing capacitor, which limits the flash speed to approximately 1Hz. The circuit utilizes the LM3909, a popular LED...
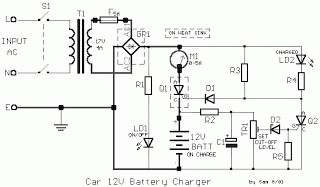
All car batteries require a 12V battery charger, which also applies to marine, RV, and power sports batteries. The high-efficiency lead-acid batteries available today necessitate more effective charging techniques. The battery charger is a crucial tool for prolonging battery...
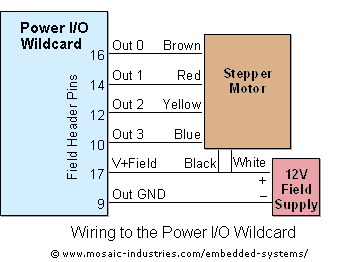
For optimal efficiency, set MAX_STEPPERS to the number of stepper motors being controlled, with a maximum limit of four. Motors are identified by indices 0, 1, 2, and 3. On the QCard, there is a trade-off between the number...
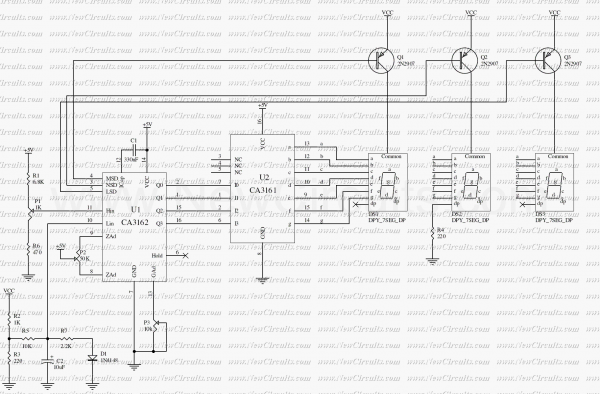
The circuit measures the car water temperature. CA3161 is a counter and 7segment driver to display amount of temperature on 7segments. The temperature sensor is a diode, 1N4148. This is set near of the Car Radiator. To obtain the...
The car power amplifier utilizes the SI1050GL integrated circuit (IC) as the primary amplification component. It delivers an output power of 50 Watts at an 8-ohm mono impedance. The amplifier operates with a DC voltage of up to 25...

There is now no need for a separate camera and recorder; for a lower cost, an integrated dash camera that records in HD can be obtained. The Techmoan blog offers reviews on these devices. This text describes the installation...