
control a hobby servo using pic18f2455 microcontroller

To implement the control of a hobby servo using a PIC microcontroller, the circuit design must include several key components: the PIC microcontroller, a power supply, the hobby servo, and necessary interfacing components such as resistors and capacitors. The PIC microcontroller will generate a PWM (Pulse Width Modulation) signal, which is essential for controlling the position of the servo.
The typical operating voltage for hobby servos is between 4.8V and 6V. Therefore, a regulated power supply capable of providing sufficient current should be used. The PIC microcontroller should be configured to operate at a compatible voltage level, generally 5V.
The connection between the PIC microcontroller and the servo involves three main wires: the power supply wire (usually red), the ground wire (usually black or brown), and the control wire (usually yellow or white). The power and ground wires should be connected directly to the servo, while the control wire should be connected to one of the GPIO (General Purpose Input/Output) pins of the PIC microcontroller.
To generate the PWM signal, the PIC microcontroller can be programmed to toggle the GPIO pin at a specific frequency, typically around 50 Hz, which is standard for hobby servos. The duty cycle of the PWM signal will determine the angle of the servo. For example, a signal with a pulse width of approximately 1 ms corresponds to 0 degrees, while a pulse width of about 2 ms corresponds to 180 degrees.
It is important to implement appropriate timing functions within the microcontroller's firmware to ensure accurate pulse widths. Additionally, decoupling capacitors may be added near the power connections to stabilize the voltage supply and reduce noise, enhancing the performance of the servo and the microcontroller.
In summary, this setup allows for precise control of hobby servos using a PIC microcontroller, enabling a wide range of applications in robotics and remote-controlled systems. Proper attention to power supply, signal generation, and circuit design will ensure reliable operation.Use a PIC Microcontroller to Control a Hobby Servo This instructable describes how to integrate hobby servos (the kind used in RC planes, cars, etc.) into.. 🔗 External reference
Related Circuits

A relatively simple circuit for controlling a stair walkway light with a delay feature. The circuit has a drawback in that the voice activation is somewhat less sensitive, making it sometimes difficult to trigger with general conversation. However, it...
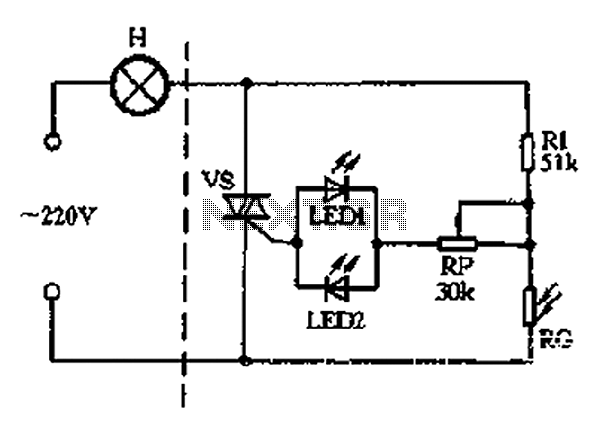
The circuit section includes a photoresistor (RG) and a fixed resistor (Rl) that form a voltage divider. Light-emitting diodes (LED1 and LED2) serve a dual purpose as power indicators and trigger rectifiers. During the positive half-cycle of the alternating...

This page presents a circuit featuring twenty open collector outputs that activate sequentially in a continuous, unidirectional loop. The circuit utilizes the 74LSxx family of TTL integrated logic devices. It is designed to drive light-emitting diodes or low current,...
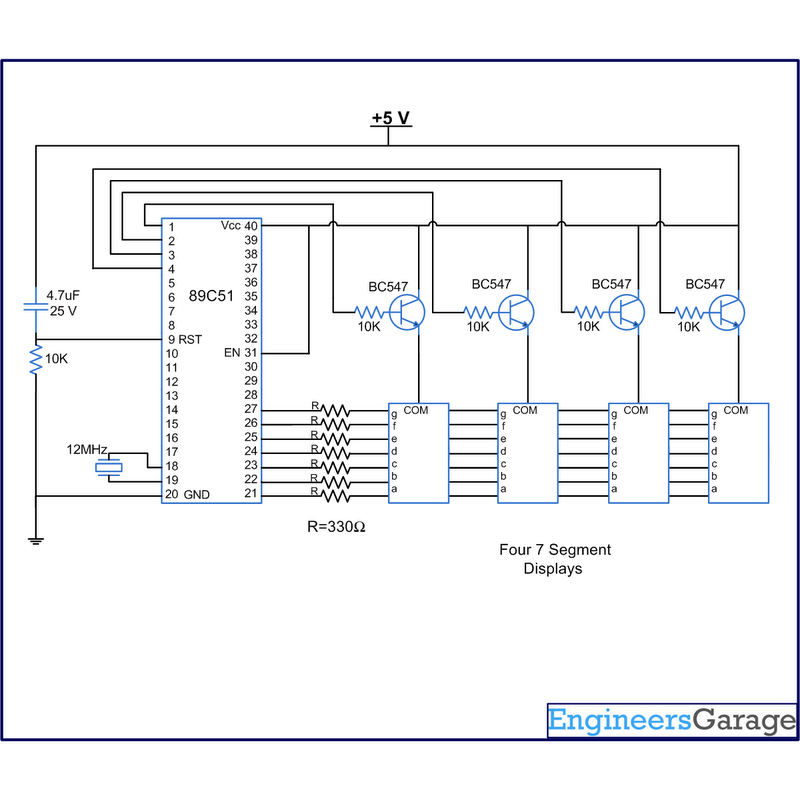
A digital clock displays time in a digital format. The circuit outlined here shows the time with double-digit minutes and two digits for seconds across four seven-segment displays. The segments of the displays are interconnected with the 8051 microcontroller...
This unit provides 2-way IR communications using a numeric keypad and an LCD display. Data is sent and received in ASCII with no regard to what the data means to any particular device. The ASCII data still needs some...
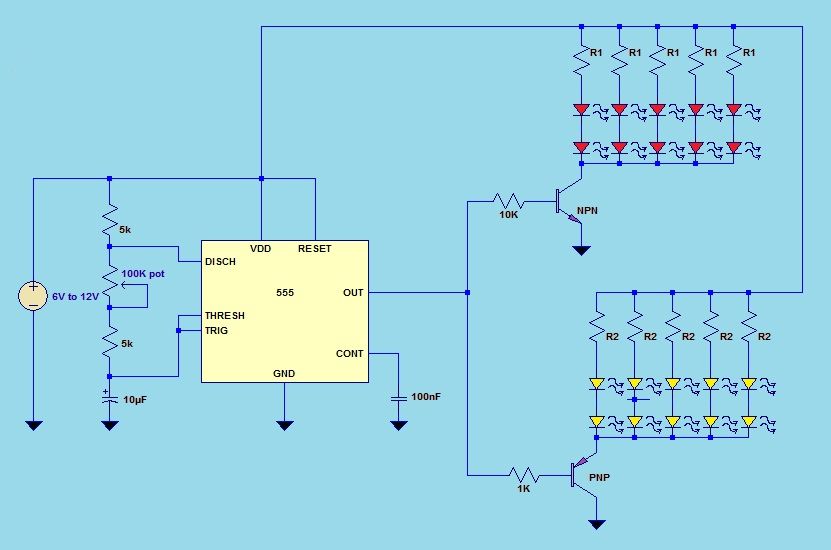
This project utilizes a 555 timer integrated circuit (IC) in an 8-pin configuration to control multiple LEDs. It is designed for quick assembly and allows for the adjustment of timing functions. The circuit employs a 555 timer in astable mode,...