
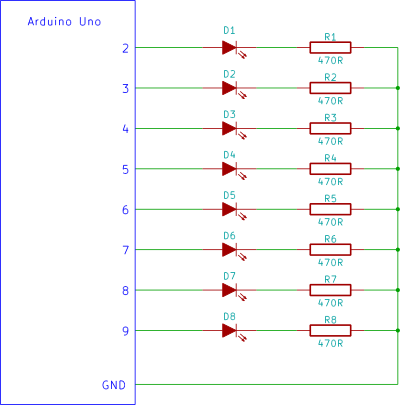
credit card sized Ethernet Arduino compatable controller board

The Arduino platform is widely recognized for its user-friendly interface and versatility, making it a popular choice among hobbyists and professionals alike. The integration of an Ethernet shield expands the capabilities of the Arduino by enabling it to connect to the internet and communicate with other devices over a network. This functionality opens up numerous possibilities for IoT (Internet of Things) applications, remote monitoring, and control systems.
The Ethernet shield typically interfaces with the Arduino through the SPI (Serial Peripheral Interface) bus, allowing for seamless communication between the microcontroller and the Ethernet module. This shield often includes an RJ45 connector for network connectivity, an onboard Ethernet controller (such as the W5100 or W5500), and additional components like status LEDs to indicate connection status.
In a typical schematic involving an Arduino and an Ethernet shield, the Arduino's digital pins are connected to the Ethernet shield's SPI pins (MOSI, MISO, SCK, and CS). The power supply pins are also connected, ensuring that the shield receives adequate voltage and current for operation. The Ethernet controller handles the TCP/IP stack, allowing the Arduino to send and receive data packets over the network.
When designing a circuit with an Arduino and an Ethernet shield, it is essential to consider power requirements, signal integrity, and network configurations. Proper grounding and decoupling capacitors may be necessary to minimize noise and ensure stable operation. Additionally, implementing software libraries such as the Ethernet library in the Arduino IDE simplifies the coding process, enabling users to establish network connections, send HTTP requests, and manage incoming data efficiently.
Overall, the combination of an Arduino and an Ethernet shield provides a robust platform for developing connected projects, facilitating the creation of innovative solutions in various fields, including home automation, environmental monitoring, and remote data logging.I love the Arduino as a simple and accessible controller platform for many varied projects. A few months ago, a purchased an Ethernet shield for my A.. 🔗 External reference
Related Circuits

A motor coil requires controllers to adjust its position and speed. A motor driver is necessary to amplify the low output current from a controller to a larger current required by the motor. The following article describes how to...
Construct a Knight Rider LED display on a breadboard using an Arduino controller. This is a straightforward circuit designed for beginners in electronics, utilizing an Arduino Uno. The Knight Rider LED display emulates the iconic light sequence from the television...
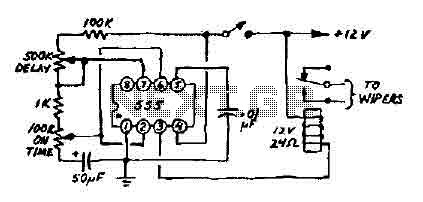
This 12V wiper speed controller circuit utilizes a 555 timer. It is a straightforward and practical circuit that can be installed in any car. The 12V wiper speed controller circuit is designed to regulate the speed of windshield wipers in...
Rsense will cause Q2 to conduct when a threshold of approximately 0.65V is reached. Rbias will determine the extent of this limitation, although this aspect remains unclear. Particularly, if Rsense is positioned on the high side, simply activating Q2...
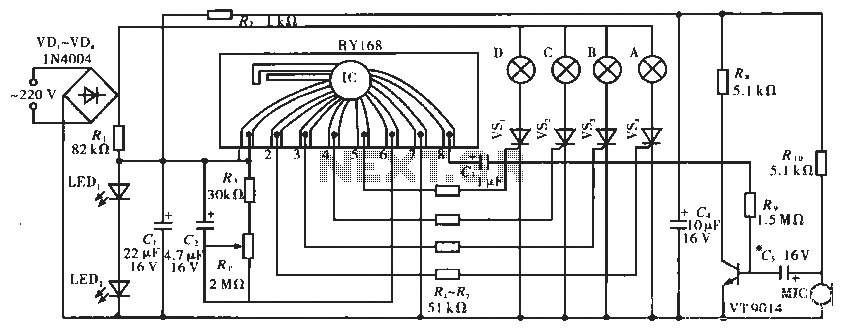
The circuit operates with a controller that includes a power supply circuit, a control circuit, and an audio amplifier, which are three distinct components. The power circuit comprises diodes VD1 to VD4, resistor R1, capacitor C1, LED1, LED2, and...
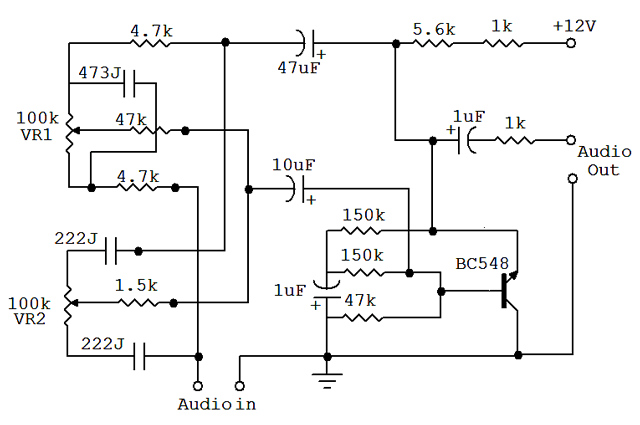
An audio equalizer circuit is utilized to modify the frequency response of an audio signal. This particular equalizer circuit is designed for adjusting the bass and treble (tone) levels of an audio amplifier. To integrate this equalizer circuit with...