
Guitar Loop with Arduino

To construct a guitar looper using an Arduino board, the project requires several key components and a systematic approach to wiring and programming. The primary components include the Arduino board (e.g., Arduino Uno), a breadboard, various guitar pedals, a power supply, and the necessary cables for connections.
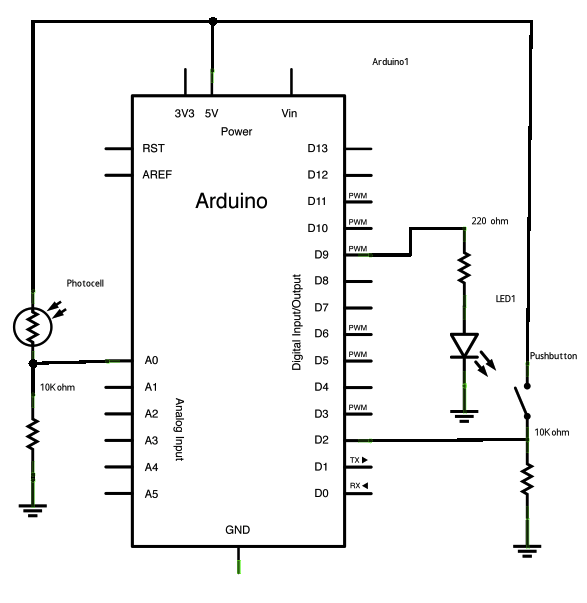
The schematic will typically involve connecting the output of the guitar to the input of the first pedal in the chain, with subsequent pedals connected in series. The output from the last pedal will then be routed to the Arduino's analog or digital input pins. The Arduino can be programmed to interpret the signals from the pedals, which can be used to control playback and recording functions in the Pure Data software.
For the control interface, the Arduino can be equipped with buttons or footswitches that correspond to various functions of the looper, such as record, play, stop, and overdub. Each of these controls can be connected to digital input pins on the Arduino, with pull-down resistors used to ensure stable readings. The Arduino code will need to implement debouncing for the buttons to avoid multiple triggers from a single press.
The communication between the Arduino and Pure Data can be established using a serial connection, allowing for real-time control of audio processing parameters based on the pedal inputs. This setup enables the creation of complex audio loops and effects, making it a versatile tool for live performances and studio work.
In summary, the guitar looper project with an Arduino board integrates hardware and software components to create an interactive and customizable audio processing system, suitable for musicians looking to enhance their performance capabilities.Build a Guitar Looper with an Arduino board. Here is how to produce pedalboard for electric guitar. The idea is to connect pedals to the Arduino, and to use them to control a software of sound processing in Pure Data. Here I show you the example of a looper, but one can be also made a rack of effects without problem. 🔗 External reference
Related Circuits
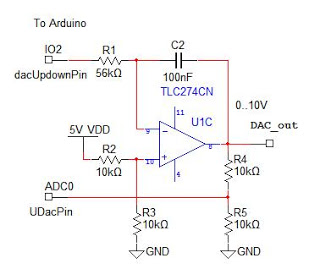
An analog output for Arduino can be achieved using a Digital-to-Analog Converter (DAC), commonly implemented with an R-2R ladder circuit. However, this DAC lacks an output buffer, which would enhance reliability and compatibility with various loads. For optimal performance,...
The Arduino GSM Shield connects an Arduino board to the internet using the GPRS wireless network. To use this module, it must be plugged onto the Arduino board, and a SIM card from a GPRS coverage provider should be...
There is a project involving an Arduino that outputs audio signals to USB speakers using 10-bit PWM. Initially, the sound quality produced via PWM was unsatisfactory due to the limited processing speed of the Arduino, which is insufficient for...

To reduce the resonant frequency and obtain useful signals, washers were placed on a bolt along with nuts for experimentation. An oscilloscope with FFT was utilized to adjust the weight at the tip of the film until frequencies around...
The schematic has been modified slightly to improve the tone control performance (04 Jan 2002). A new schematic is now on line - the differences are relatively minor, but make the component values for the tone controls a bit...
Sometimes, it is necessary for a program to halt execution while a specific condition remains true. This can be accomplished using a while loop. The following example illustrates the application of a while loop to calibrate the value of...