
making simplest room thermometer

The described circuit utilizes a simple configuration to measure temperature through a moving coil meter, which provides an analog readout of the temperature in volts. The IC serves as the core component, likely functioning as a temperature sensor or signal conditioner.
In this setup, the moving coil meter is calibrated to operate within a 0-1 V range, allowing for direct interpretation of the voltage output as a temperature reading. The potentiometer plays a crucial role in fine-tuning the sensitivity and accuracy of the circuit, enabling the user to adjust the output voltage to correspond with the specific temperature range of interest.
The connections to the IC should be made with care to ensure proper functionality. The relevant pins for the meter connection must be identified in the circuit diagram, and attention should be given to the power supply requirements of the IC. It is advisable to use decoupling capacitors near the power pins to stabilize the voltage supply and minimize noise.
For enhanced performance, consider incorporating filtering components, such as capacitors, to smooth out any fluctuations in the output voltage. This will provide a more stable and accurate reading on the moving coil meter. The overall design is suitable for applications where a simple and effective temperature measurement solution is required, such as in HVAC systems, laboratory environments, or home automation projects.The circuit diagram shown below explains it all, no need of any complicated circuitry, just connect a 0-1 V FSD moving coil meter across the relevant pins of the IC, set the pot appropriately, and you are ready with your room temperature sensor circuit. 🔗 External reference
Related Circuits
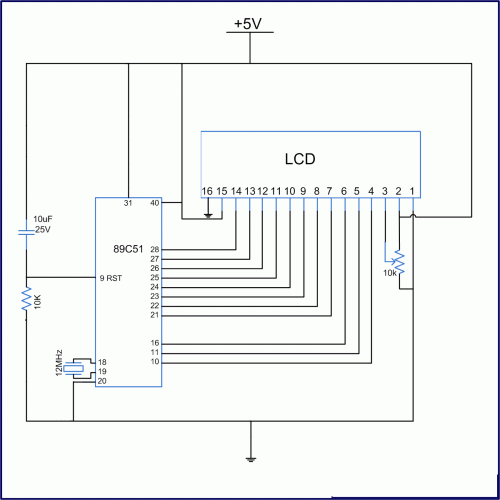
Interface the LCD with the 8051 microcontroller AT89S52. However, upon powering up the microcontroller, the LCD displays only black boxes. Multiple codes have been tried, but the output remains the same. The circuit has been simulated in Proteus, where...
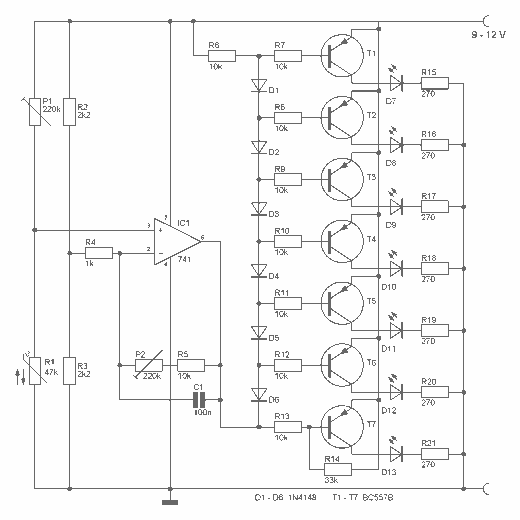
This digital thermometer indicates the temperature measured with an NTC using 7 LEDs. The circuit works using an opamp, the well-known 741, which amplifies the voltage difference between its plus and minus input. This amplification (sensitivity) can be set...

This circuit is designed to indicate when room noise exceeds a predetermined threshold, utilizing a flashing LED to signal this condition. Three fixed noise levels are selectable: 50 dB, 70 dB, and 85 dB. The circuit employs two operational...

The National LX5700 temperature transducer supplies input to a code conversion circuit that drives a 3-digit LED display. This display indicates temperatures ranging from -40°F to +100°F or -40°F to +199°F, controlled by a ganged switch. The National LX5700...

The first section of the 555 timer is configured as an astable oscillator, with R2 and C1 determining the frequency. The output is accessible at pin 5. The second section functions as a phase inverter, with its output available...

A remote sensor transmits data through the mains supply, with a temperature range of 00.0 to 99.9 °C. This circuit is designed for precise centigrade temperature measurement. The circuit employs a remote temperature sensor that communicates its readings over the...