
Outdoor surveillance with condenser microphones

The circuit design for the described microphone system incorporates essential components for optimal performance. The electret condenser microphone, known for its high sensitivity and sound fidelity, is connected to a power supply that can be powered by either an internal battery or an external source, depending on the microphone model. The pre-amplifier within the microphone converts the varying capacitance into an electrical signal, which is then transmitted through the shielded audio cable to an audio amplifier.
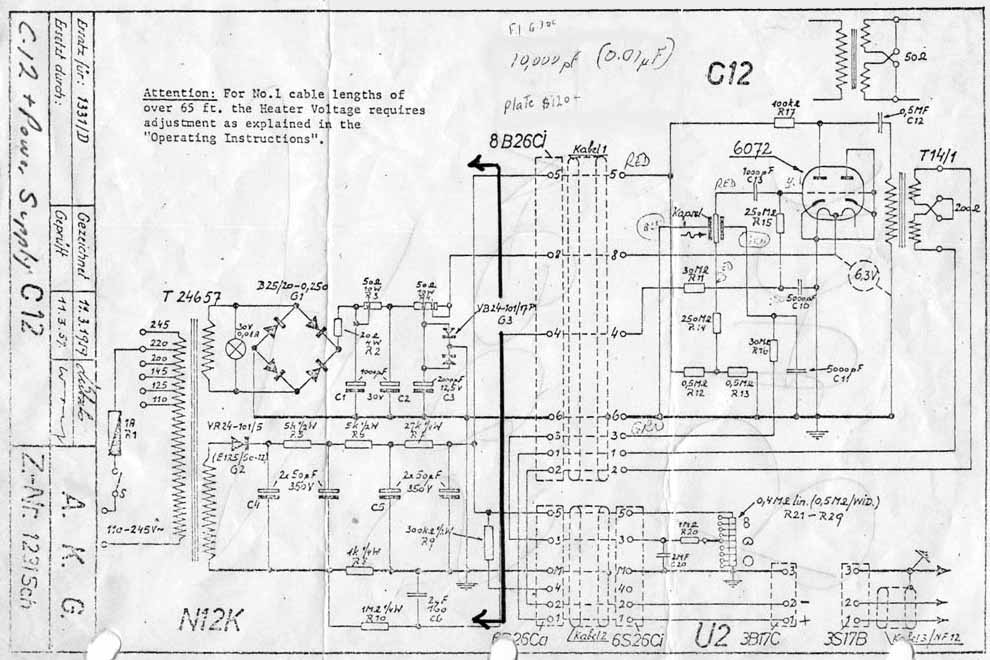
The choice of resistors is crucial; while a resistor value up to 1 kΩ is specified, using a 10 kΩ resistor has been proven to extend battery life significantly without compromising audio quality. The circuit may also include capacitors that can be varied to adjust the frequency response. Smaller capacitors, such as 0.001 μF, enhance treble frequencies, while larger values increase bass response, allowing for tailored audio characteristics based on the application's requirements.
The schematic should clearly represent the connections between the microphone, power supply, resistors, and any capacitors used for frequency tuning. This ensures that users can replicate the setup effectively, taking into account the specific electrical characteristics of their components. Additionally, consideration should be given to the physical layout of the circuit to minimize noise interference, especially in outdoor applications where environmental sounds may be captured. Overall, this microphone project exemplifies the versatility and effectiveness of condenser microphones in various audio applications.Condenser Microphones typically sound better than dynamic microphones. If you are unfamiliar with these two types of microphones you may want to read about them in this Wikipedia article. Electret condenser microphones have to little plates (capacitor), one of which vibrates in the presence of sound.
The varying capacitance is turned into an elec trical audio signal by a tiny built in pre-amplifier. So this type of microphone needs an electric current to operate. Besides sounding good, condenser microphones typically have better sensitivity. Also condenser microphone elements are typically smaller than the dynamic type and many condenser microphone elements are very inexpensive. I have an extra mic that is still in the package. On the back it has a tiny graph of the frequency response. If you go to the Shure microphone web site, you can look at the specs for there very popular SM58 microphone, The RadioShack mic`s upper frequency response actually looks flatter than the SM58 out to about 15 Khz.
It would be helpful if the Radio shack graph had more resolution so we would know exactly where the upper frequency cut off actually is. It is actually well above the 10 Khz stated in the specs on the back of the package. Don`t get me wrong. The SM58 is a great microphone for live performances where the performer is belting out a tune with the mike almost touching their face.
SM58s are really rugged. If you like to swing your microphone around by it`s mic cord and occasionally dropping it on the stage (Roger Daltrey) this is the microphone for you. I own two SM57s (same mic with a smaller wind screen). It just isn`t the right microphone for some applications such as DIY audio projects. By the way. The SM58 will set you back about $100. The Radio Shack mic is an ok vocal mic but a really good area mic. If you want to use it as a vocal mic you will need a foam wind screen. Some audio equipment provides voltage at the microphone input jack so an external power supply is not needed for a condenser mic.
Some equipment does not. Many off the shelf condenser microphones (complete microphone including and audio cable and connector or a connector that accepts a microphone cable) have a built in battery holder to power the microphone and some do not. So sometimes, depending on what condenser microphone you are using and what you are plugging into, you need a battery operated power supply or it will not work.
Here is one fun microphone project I did a long time ago which is one of the reasons why I made my first condenser microphone power supply. We used to feed our outdoor pets which were the wild birds. To add to the experience I wired up one of the radio shack mics onto a shielded audio cable and ran the other end into the house by closing the window on the cable (you can do this with a thin cable).
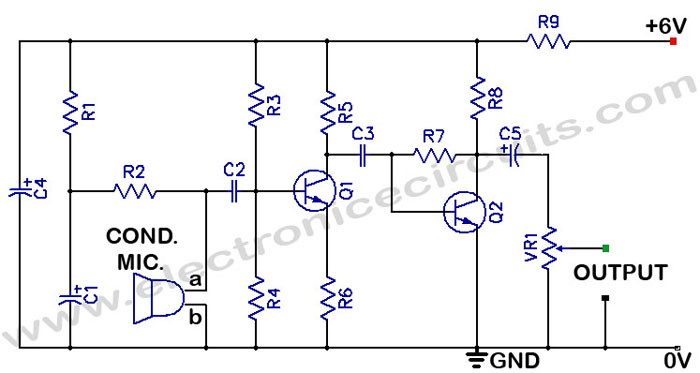
The other end of the cable plugged into the power supply. The output of the power supply plugged into a battery operated audio amplifier. The microphone was attached to the underside of the covered patio roof and the food dish was on the patio, 8 feet below. We could hear all the tweeting as if we were outside next to the dish. We could also hear their little beaks tapping the bottom of the plastic dish. From time to time we could hear possums rustling around outside after dark and of course crickets. On a good night it was like camping out under the stars in the living room. Here is the schematic diagram of the circuit. The circuit on the back of the package says to use a resistor up to 1k. I tried different resistors and decided to go with 10k. The battery last for days of continuous use. Probably 10 times longer than using a 1k and it sounds great. I will test the run time at a later date. There are a range of capacitors that will work. The smaller the capacitance the more treble you get and you get less bass. I did some testing with capacitors as small as 0. 001 uf and as large as 0 🔗 External reference
Related Circuits
An RF condenser design powered by 12V was supplied to the microphone through the microphone cable using a phantom circuit. This marks the first known application of a phantom circuit for microphone powering. Around 1970, Neumann introduced the Fet-80...

This is a simple preamplifier circuit designed for an electret condenser microphone, utilizing an LM1458 dual op-amp integrated circuit (IC). The circuit amplifies the audio signal from the condenser microphone, allowing it to be used as an input for...
Piezo Disks, Audio Schematics, and a Condenser Microphone. The schematics and diagrams provided serve as a foundation for sonic investigations utilizing piezo disks and microphones, along with connections to 2 and 3 terminal electret condenser stage buffers that address...
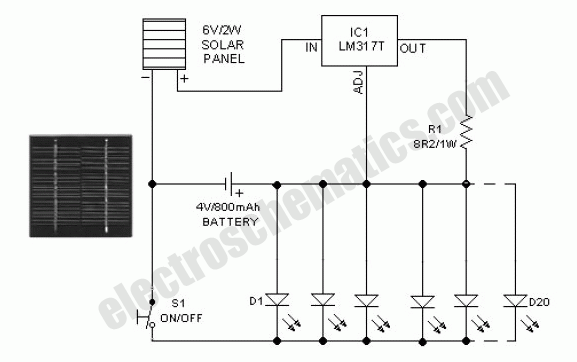
This Outdoor LED Solar Garden Lights project is a hobby circuit for an automatic garden light that utilizes a light-dependent resistor (LDR) and a 6V/5W solar panel. During daytime, the internal rechargeable 6 Volt sealed lead-acid (SLA) battery is...
RCA developed some of the first commercially available CCD (Charge-Coupled Device) chips. A CCD is a silicon-based solid-state imaging device that replaces the older vidicon tubes. CCDs consist of a two-dimensional array of photodetectors linked to an array of...
There is often a need for a sensitive sound pickup device, which can be utilized as a simple microphone or for more specialized applications such as a sound-operated alarm, a bugging device, or a sound-triggered flash for stop-action photography....