
5x7 DISPLAY

To successfully construct a 5x7 display project, a solid understanding of various electronic components is essential. This project typically involves the use of a matrix of LEDs arranged in a 5 rows and 7 columns format, allowing for the display of alphanumeric characters and simple graphics.
Key components required for this project include:
1. **Capacitors**: These components are used for filtering and stabilizing power supply fluctuations. They can help maintain a steady voltage level across the display.
2. **Diodes**: Standard diodes may be used to prevent reverse polarity connections, while Zener diodes can be employed for voltage regulation, ensuring that the display operates within its specified voltage range.
3. **Transistors**: As switches or amplifiers, transistors can control the current flowing to the LED matrix, allowing for individual or grouped LED activation based on the desired display output.
4. **Resistors**: Resistors are crucial for limiting current to the LEDs, preventing them from burning out. Proper resistor selection based on the LED specifications is vital for the longevity and reliability of the display.
5. **Microcontroller or Driver IC**: A microcontroller or a dedicated LED driver IC can be utilized to control the multiplexing of the display, enabling the illumination of specific LEDs in accordance with the input data.
The schematic for the 5x7 display will typically include connections for each LED in the matrix, along with the necessary resistors, transistors, and control signals from the microcontroller or driver. Each row and column will be connected to a control pin, allowing the microcontroller to activate specific rows and columns in sequence to create the desired display effect.
Familiarity with circuit symbols and the functionality of each component is critical for assembling the circuit correctly and troubleshooting any issues that may arise during the construction and operation of the display project.You must be able to recognise components such as capacitors, diodes, zeners, transistors and resistors to build 5x7 Display project. This information is covered in our BASIC ELECTRONICS course and a complete set of circuit symbols can be found HERE.
🔗 External reference
Related Circuits
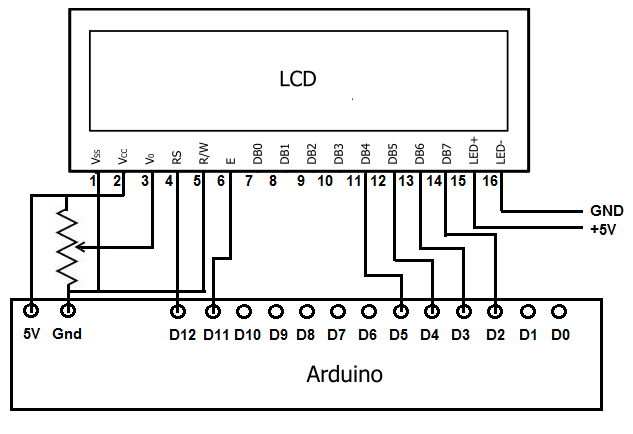
To achieve this, the first step involves establishing the necessary physical connections between the Arduino board and the LCD. Following this, code must be written to display the desired text on the LCD. LCDs have become the standard means...
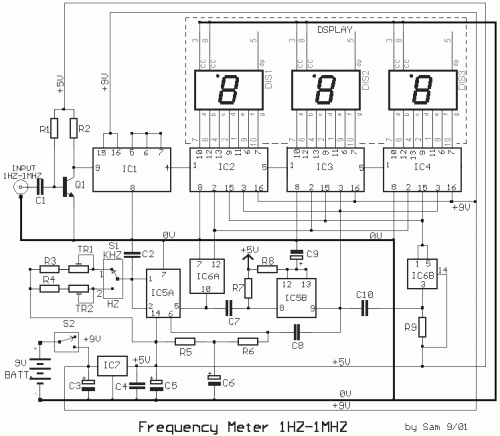
The circuit was designed to create a low-cost frequency meter that will cover the range of 1 Hz to 1 MHz with a digital indication using three 7-segment displays. The frequency meter circuit operates by measuring the frequency of an...
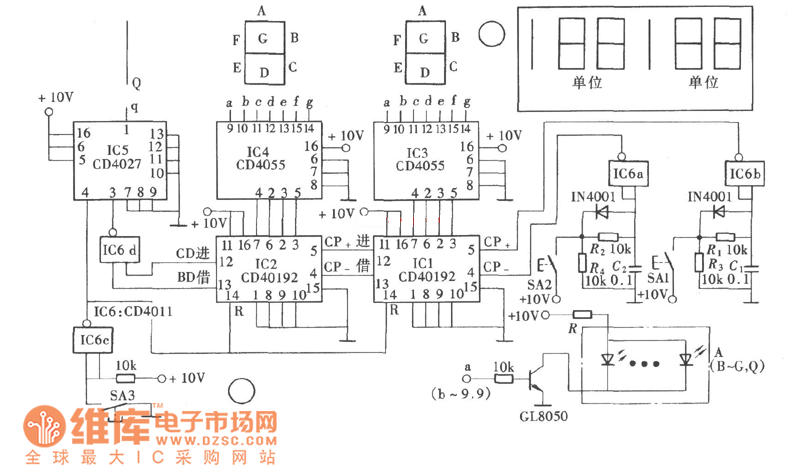
The game-scoring display screen circuit diagram is depicted in the image above. The circuit consists of an add/subtract scoring input circuit, an add/subtract scoring circuit, a counting-decoding display circuit, and a reset circuit. The game-scoring display circuit is designed to...
The LED guard-rail tube, also known as the decorative tube, is an advanced LED illumination product designed for decorative purposes. It utilizes red, green, and blue LEDs as light sources, employing microelectronics and digital technology to create color chasing...
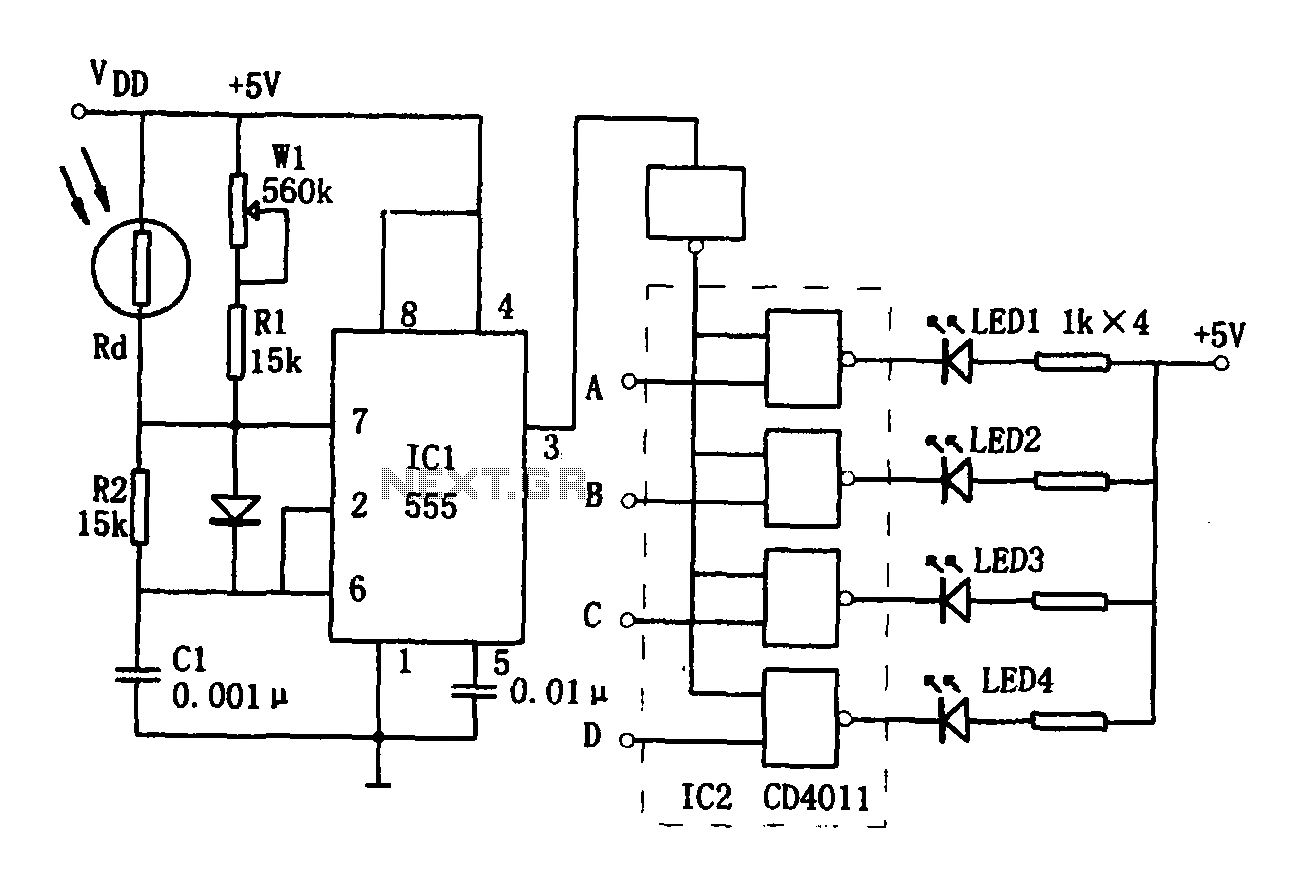
The brightness display circuit consists of a light-sensitive sensor, an oscillation circuit, and an LED display circuit. The light-sensitive sensor is a photosensitive resistor (Rd). The multivibrator is composed of Rd, R1, W1, R2, and C1, along with a...
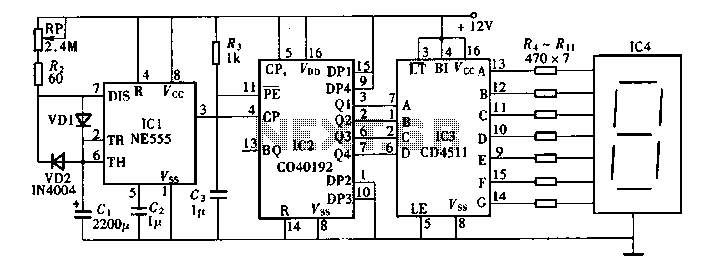
Digital timers feature a clear and precise display. They represent time intervals based on pulse signals, which are decoded by a digital device with a digital display unit. The circuit described pertains to a digital display for these timers,...