
Alternator and Racing Cycle Generator

For the construction of this pedal generator, an old racing bicycle is required, preferably one with a straight rear wheel and the highest gear ratio available. The bicycle should be stripped of unnecessary components, retaining only the handlebars for stability and a mounting point for the switch, light, and voltmeter. A stand must be fabricated to securely hold the bicycle in place, ensuring the rear wheel is elevated above the ground. The alternator selected should be a self-contained unit, ideally a K1 alternator commonly found in vehicles such as Ford Fiesta and Escort models. It is advisable to avoid older Lucas alternators due to their lower efficiency. The alternator should be mounted behind the seat, with its spindle positioned several centimeters from the wheel rim to facilitate belt connection. The required belt size can be determined by measuring the circumference and ordering an appropriate V-belt from a local supplier. A spring tensioner should be incorporated to accommodate any irregularities in the wheel and to maintain the necessary tension on the belt. Safety precautions must be taken, including the installation of guards around moving parts, especially if the generator will be used in public settings. Additionally, ensuring the wiring is designed to prevent incorrect battery connections is crucial to avoid damaging the alternator. A fuse should be included in the battery circuit to protect against overcurrent situations. The electrical connections should be straightforward, utilizing terminal blocks for simplicity, and the wiring should be adequately rated to handle the expected current flow. This comprehensive approach ensures a functional and safe pedal generator design that can be adapted and improved upon by the user.There are a lot of ways of making pedal generators; all sorts of things can be used as the generator, with either bicycle parts or exercise bicycles as the base. There are pros and cons to all the approaches, but for people who haven`t built one before and want to get a useful amount of energy out.
The alternator and racing bicycle one is best as it can be built without special tools such as lathes or welding gear. Alternator designs won`t work without a battery, but most serious applications need continuous power, and a battery allows power to be put in first and used at a different time. Also, applications such as power drills needing high power input can be run for a short time provided a longer period of pedalling puts the energy back.
Alternators and racing bicycles can both be found in rubbish or from Free Ad papers, the awkward problem of voltage regulation is automatically done by stuff in the alternator, and the electrical circuit is simple to wire up. However, if you don`t need serious continuous power but want the generator for educational projects you may be better off using a permanent magnet motor type design instead.
They`re less good for battery charging but the total collapse of power when pedalling stops makes the principle more obvious and can be better for safety. This design has been used by many people to make working generators. The idea is not so much to show a design to be followed exactly as to get you a basic working generator so you are inspired to develop and improve it yourself.
One of the things you should be aware of before you start is the energy output of an average person. Although some athletes can produce amazing power outputs for short periods, the maximum continuous output you can get from an average person is an eighth of a horsepower or a bit less than 100 Watts. (Makes you think about making a horse powered generator doesn`t it). Not only that, 100 Watts of mechanical energy translates to maybe 60 W or so of electrical by the time it`s been converted.
Almost all older car alternators work the same way, have the same connections and automatically produce the correct voltage output for charging 12 Volt lead acid batteries of either sealed or wet acid type. You should note however that unlike permanent magnet motors or stepper motors, an alternator won`t work without a battery and will be damaged if you spin it fast without one connected.
The problems a pedal generator design has to overcome are that an alternator needs to be turning at 3000 rpm or so to work effectively, and the output power of a car engine is a lot more than that of a person. The first problem is easily overcome by getting a racing bicycle with a nice large rear wheel, and then using the wheel without a tyre as a giant pulley; suitably large belts are surprisingly cheap and easy to get.
The maximum power problem is a bit more tricky - if you just copy the charging circuit from a car`s circuit diagram you are likely to find that in some conditions (a flat battery or a heavy load like a 12V PA at high volume) the thing is unpedallable. Clever ways around this would be to rewind the alternator or build an electronic control box to override the alternator`s own one at high current demands.
However, neither of these are suitable for first time home construction. Luckily, there is a simpler way out of it which is to detune the alternator a bit by deliberately putting some resistance between the output terminal and the battery. This sounds like a daft idea as it obviously wastes some of the power (generally between 6 and 10 percent) but in practice it means that if the batteries in your pedal power sound system get low, it can still be pedalled by average people instead of needing an athlete to get it going again.
Even with the resistance in line, you can still sometimes have a problem with getting it to start up on a heavy load. Because of the way the alternator`s regulator works, the faster you pedal the less force you need to use.
It`s quite an odd feeling, nothing like riding a normal bicycle. If the battery is low and the alternator cuts in and starts generating before the revs have built up, the generator can stall the cyclist which tends to be unpopular. A crude way around this one is to have a start button which the operator uses to put current into the field coil, or an electronic circuit which puts a pulse of current in at regular intervals.
There is a simpler and more elegant way around it and that is to put in a very small light bulb as the charge warning light. The current in the charge warning light also flows through the field coil, providing it with the initial magnetism needed to make it start generating.
With a suitably small bulb, for instance 24V 3W running on 12V, the alternator has to spin much faster before it can cut in, reducing the start up effort. You will need an old racing bicycle (women`s ones are better for getting on and off but harder to find with bigger wheels) with a reasonably straight back wheel and the highest gear ratio you can find; a 27" wheel and 52t front sprocket would be nice but my first one which only had a 26" wheel and a 46t sprocket worked OK.
You will only need top gear so you can get rid of the gearchange lever. Take off all the bits you don`t need; brakes, front wheel, rear tyre etc. It`s a good idea to keep the handlebars to give the cyclist something to hold on to; also you will need somewhere to mount the switch, light and voltmeter. Make a stand out of scrap bits of metal, wood or whatever to securely mount the cycle (the bi went when you got rid of the front wheel) so that the rear wheel is just clear of the ground.
If you use a K1 alternator (used on many cars such as Fords from Fiestas and Escorts to Granadas, many Vauxhall/Opels and small Volvos) it often comes with an ideal pulley with two size settings already fitted; otherwise you might have to make your own. It`s probably worth avoiding older Lucas alternators as they are not as efficient as Bosch or Motorola ones; ideally go for cars with larger engines as their alternators will be designed to work at lower revs.
The Ford/Bosch N1 found on Sierras and some bigger Volvos is quite good but a bit larger and heavier than the K1. A recent check of the car boot sales produced some eastern European clones of the K1 which run as well as the originals.
Do make sure that whatever alternator you get is a self contained one and does not require an external control box - some Japanese ones can be complicated to wire up. Also, an increasing number of modern cars use alternators with an additional input teminal so that they can be controlled by the engine management system to save energy; these are often driven by a large flat belt.
Sometimes they can be made to run by connecting the control terminal to the battery plus, but they`re best avoided in favour of the old three connection ones with `V` belts. Some alternators have a spare terminal marked `W` which is the centre connection of the three phase output coils - it should be left open circuit and NOT connected to the battery positive which will bypass the rectifiers and blow the fuse.
(You HAVE got a fuse haven`t you!) Try to get an alternator with two big tags and one small one. The two big tags are connected together internally and are the Plus connection, the small one is the charge light connector, and a good solid connection such as a 5mm earth tag bolted to the body will do for the Minus. If you haven`t seen the alternator working, it`s a good idea to do a basic test on it. You can use the small light bulb you`re going to need for a charge warning light. Alternators which pass the test aren`t absolutely guaranteed to generate, but they won`t blow the fuse and the test will pick up most common faults like worn brushes or a blown diode pack.
Once you get more experienced you can often fix alternators by swapping good control boxes or diode packs from alternators where the bearings have failed. Don`t be put off by rusty or dirty looking alternators; if they pass the tests they`re likely to be OK.
Get your alternator, clean it up, take off the cooling fan (it`s noisy and you don`t need it) and mount it on some brackets behind the seat so that its spindle is several cm out from the wheel rim, this picture is an early generator where it`s a bit far out by today`s standards. Hold it in position and use a length of string or cable to measure the circumference of the belt you need.
Suppose it is 80 inches; go to your local bearing and transmission dealer (e. g. Bearing Services Ltd. or Brammer - check your Yellow Pages) and ask for an A80 `V` belt (they come in one inch steps from stock or within a day or so and cost about 10 pounds. Belts like that are still used a lot in old agricultural machinery which presumably explains why they still go by inch sizes).
Recently we`ve been using A78`s on 26 inch wheels and A80`s for 27 inch. If you can, get a belt with a toothed type format such as Goodyear Extraflex; they bend round small pulleys easier which noticeably reduces the mechanical losses compared to a solid belt. When the alternator was on a car it had a plate with a slot for tension adjustment; replace this with some sort of spring tensioner (a piece of the inner tube you just took off ) to allow for irregularities and spoke ends in the wheel.
The belt should run quite slack to reduce friction as the torque needed is very low. Unless you`ve got the nice K1 type pulley you may have to make one - anything will do as long as it`s smooth and not at all wobbly aiming for about an inch and a half diameter and then count the alternator revolutions for one turn of the crank. Anything over about 45 is OK, 60 is ideal. If you`ve got the K1 split pulley take it apart and put the spacer in between the two dishes so the belt comes further inside it, giving the fastest speed.
Once the mechanics are finished, you should rig up some guards for all the moving parts if the generator is to be used in public places. Bear in mind that small children are fascinated by sparkly moving objects such as your wheel rim, and that the person pedalling can`t see what`s happening behind them!
Even though you don`t need the gears, don`t be tempted to remove the deraillier; apart from automatically keeping the chain adjusted, the extra slack it allows could make the difference between a bruised finger and an amputation. Although the above `upright cycle on a stand` version is probably the simplest and most obvious way, it`s actually not much more difficult to do a chair-based version.
All you need extra is a plastic stacking chair, something to extend the legs, maybe bits of an old tent frame, and two bits of large diameter tube one of which fits inside the other or possibly the height adjuster from a swivel chair. If you are cutting up office chairs, get an old type mechanical only one, NOT one with a gas spring which are really dangerous if you start cutting or drilling them!
Some people say chair based generators are easier to pedal, and they`re certainly easier to transport if you make them splittable in the middle. You can eliminate the belt tensioner spring by mounting the alternator so that its own weight tensions the belt.
The racing bicycle`s lack of flywheel effect has been criticised compared to exercise cycle designs. If this is a problem, it`s quite easy to add weights around the INSIDE of the wheel rim and preferably bolted through the rim with 4mm or so bolts. Ideally make them out of something U shaped which wraps around the rim; think very seriously about making sure there`s absolutely no way they could come off.
Don`t put too much weight on! It has been known for a lead loaded wheel rim to break up! This is the part a lot of people think is going to be difficult but the bit that controls the alternator really isn`t. It`s just two simple electric circuits which could be made up with terminal block if you don`t fancy soldering.
The voltmeter we use is just a bit cleverer, but even that only uses one electronic component. The main thing to bear in mind when designing the wiring is to find a way of making sure it`s very difficult to connect a battery the wrong way around, which would instantly destroy the alternator. (It is best to keep batteries in boxes and use polarised plugs and sockets which are wired the same way on all our pedal generators and solar panels).
Another important thing is to make sure you`ve got a fuse in the battery circuit, as close as possible to the positive battery terminal, and of the right rating so that it blows well before the wiring does. Ideally the wiring from the alternator to the battery should be something like 20 Amps rating - at least 2.
5 sq mm section and protected by a 10A fuse. 🔗 External reference
Related Circuits
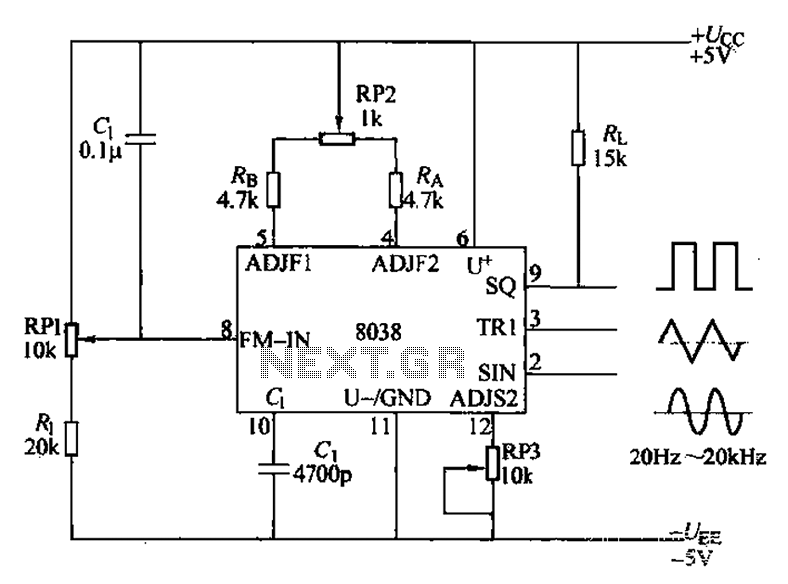
The audio function generator integrated circuit ICL8038 is capable of producing square waves, triangle waves, and sine waves. The electrical resistance and potentiometer RP1 are utilized to determine the 8-pin DC potential Ua, which is typically set to 2Ucr/3....
This circuit represents a simple yet accurate 1Hz timebase generator utilizing a standard quartz clock circuit board. The described circuit employs a quartz crystal oscillator, which is known for its precision in generating stable frequencies. The standard quartz clock circuit...
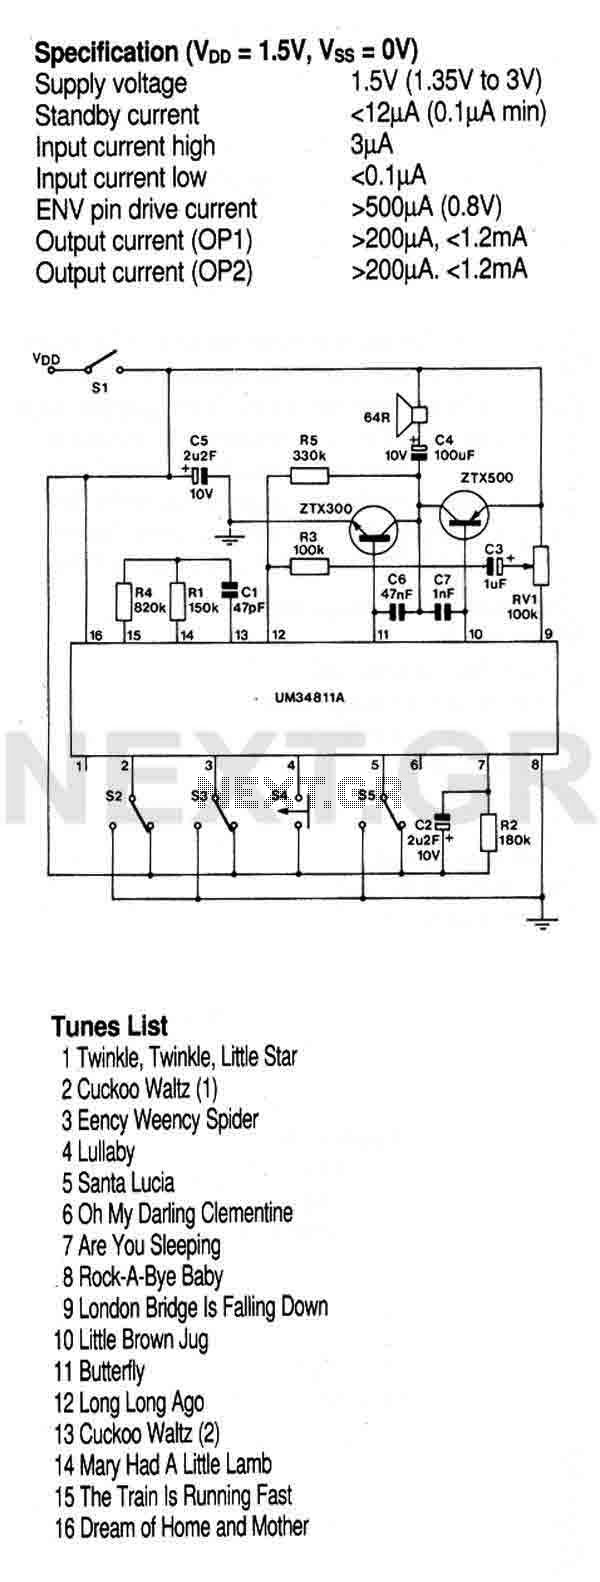
This circuit utilizes a preprogrammed multi-instrument melody generator integrated circuit (IC), which features a 512-note memory capable of producing 16 distinct tunes. The extensive control options allow for the playback of all tunes in a loop or stopping at...
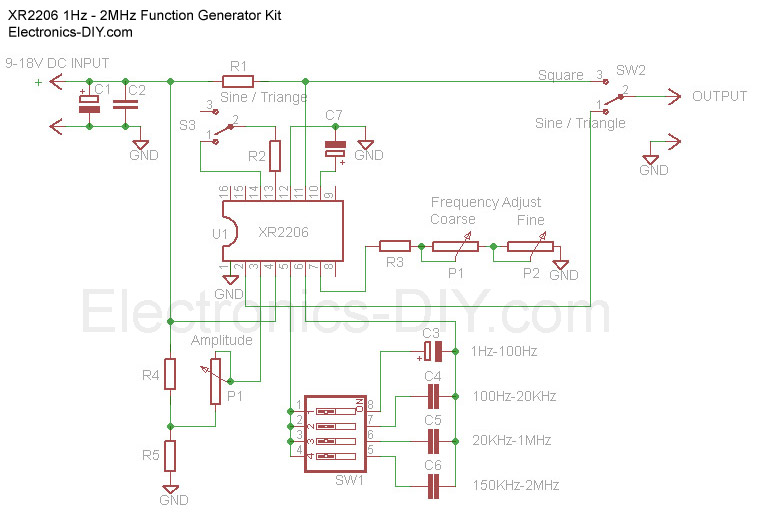
The Function Generator is essential laboratory equipment. The module described here is based on the high-quality XR2206 integrated circuit (IC). The 1Hz - 2MHz XR2206 Function Generator is capable of producing high-quality sine, square, and triangle waveforms with high...

This circuit monitors the duration of an incoming pulse. If the incoming pulse is shorter than the set value (VAR1), the output of U1B remains high. Values are provided for a 1 to 2 microsecond pulse. The described circuit functions...

The circuit described is a crystal oscillation circuit using a CM OS inverting configuration, designed to ensure accurate operation. It employs a BCD counter (IC2) capable of achieving a maximum oscillation frequency of 2 MHz, which is 100 times...