
Arduino Actuators

This project demonstrates the operation of an RGB lamp controlled via a digital LED strip. After activating the Bluetooth connection, users can access a graphical user interface (GUI) on their PC to manage the lamp. The program presents a hue palette divided into 30 segments, one for each LED on the strip, allowing users to create custom patterns by clicking and dragging the mouse cursor. Users can deactivate a color by clicking on a segment while pressing the spacebar, which turns off the selected LED. Further details about this project can be found on Miguel's blog, along with a brief operational video and the project code on GitHub. The project page on Thingiverse is also available.
Additionally, a project involving a lucky cat was rebuilt, featuring an arm that waves whenever a page on the website is loaded. A light sensor detects darkness, prompting the cat's RGB LED to change colors instead of waving its arm. Changing the LED color is possible using one of the buttons on the cat's ears, with the other functioning as a reset button. The project utilized an Arduino Ethernet, a servo, two buttons, an RGB LED, and two small yellow LEDs. A seven-segment display from an old stereo, driven by the Arduino and two shift registers, shows the number of page views on the website.
A tutorial on using an Arduino Motor Shield with the Arduino Due demonstrates controlling a DC motor to move forward and backward. The author describes a smart blinds project utilizing an Arduino board, an Ethernet shield, a motor shield, and several sensors. A simple web-based GUI allows users to manually operate the blinds or set temperature and brightness thresholds for automation. Opening and closing events can also be scheduled at specific times throughout the day.
The official Arduino Starter Kit has been launched, comprising a complete selection of 15 projects designed to help users become proficient in Arduino. Developed in collaboration with Arduino co-founder Massimo Banzi, the kit includes ten video tutorials and essential components for programming with the Arduino Uno board. It features a guidebook with 15 projects that progress users from beginner to professional levels, including motors, servomotors, and drivers, beneficial for those interested in mechatronics.
A workshop on Physical and Wearable Computing, organized by SUPSI during a summer school focused on Digital Fabrication and Interaction Design, engaged approximately 20 participants. This workshop effectively introduced future makers to digital fabrication, prototyping, and the design of interactive objects. Prototypes and artifacts created during the workshop are showcased on its homepage, including notable projects like Poetry Zoo, a set of laser-cut, RFID-equipped animals that generate poetry; The Sound of a Line, which uses a ball with conductive ink and a special glove to perform melodies; and Superfluo Shoes, which react to movement. A complete list of projects from the workshop is available on its official homepage, along with a personal reflection by Zoe Romano, who co-taught the summer school with Massimo Banzi.Agy used for the first time Lilypad Arduino and LED s on a textile project called Blinky Bike Bag, combining her expertise in fabric hacking with electronics: The bike bag is made from umbrella material to make it waterproof, and I made it with safety features using the Lilypad light sensor and LEDs. My husband always forgets his reflectors but wi th the bikebag always being on the bike, he`ll have no excuse not to be a safe cyclist! (more ) For a little over a year, I`ve been working on an open-source, DIY cellphone as part of my PhD research at the MIT Media Lab. The current version of the phone is based on the Arduino GSM shield and Arduino GSM library. It sports a deliberately low-resolution screen (8 characters, each a 5G—7 matrix of LEDs), a laser-cut wooden enclosure, flexure (living hinge) buttons, and a ~1000-line Arduino program that powers the user interface.
The phone can make and receive phone calls and text messages, includes a phone book and caller id, and keeps the time. Everything you`d expect from a 20-year old Nokia! (Except snake. ) I`ve been using various iterations of the project as my primary cellphone for the past six months or so.
The phone is open-source and the design files are available on GitHub ( hardware, software ). Assembly instructions are on my website, although I wouldn`t recommend making your own unless you have experience with soldering surface mount components. Of course, it`s not just me that`s been building these phones. I`ve run two workshops in which other people have made them for themselves. A few people have been building them on their own, including someone who posted his result on Twitter.
Here you can see some the variations on the enclosure that my friends have made. On the left is a 3d-printed case by Ben Peters, the middle is a CNC-milled purpleheart wood case by Dena Molnar, and on the right is a hand-cut cardboard case by Jeffrey Warren. The phone has undergone numerous revisions as I`ve tried to get it into a robust, useable form. Here you can see some of those variations. I started with an LCD screen like those found on old Nokia phones, but it would break after a month or so in my pocket, so I switched to the more-robust LED matrix.
The enclosure has had a few tweaks as well, primarily to find a good design for the flexure buttons. Overall, I`m pretty happy with the current incarnation. It seems to be relatively robust, simple enough to assemble by hand, and functional enough to use everyday (although a long way from a smart phone). That`s my DIY cellphone. This project shows the operation of an RGB lamp using a digital LED strip. After activating the bluetooth connection, the user can open the GUI on the PC to control the lamp. The program shows a hue palette divided into 30 rods, one for each LED of the strip. By clicking & dragging the mouse cursor it is possible to make your own patterns, . To remove a color, the user can simply click on a rod while pressing the spacebar, which switches off the selected LED.
More information on this project can be found on Miguel`s blog, while a brief video about its operation can be found here ;the code of the project can be found on Github. The project`s page on Thingiverse can be found here. Rebuilt my lucky cat: whenever a page of my website is loaded, the cat will be waving its arm. There`s a light sensor so when its dark, the cats RGB-LED is changing the color instead of waving the arm.
Changing the color of the LED is also possible with one of the buttons on the cats ears. The other one is the reset button. Used an arduino ethernet, a servo, two buttons, an RGB LED and two small yellow LEDs. The seven segment display is one that I harvested from an old stereo. It`s driven by the arduino and two shift registers. unfortunately I`ve soldered that one together for an older project, so that it doesn`t fit into the cat too. It shows the number of pageviews of the website. We are proud to show you a tutorial about using an Arduino Motor Shield with the Arduino Due. This exampleshows the simplest thing you can do: driving a DC motor forward and backwards. In this instructable, the author describes his approach to smart blinds , by using an Arduino board, an ethernet shield, a motor shield and a couple of sensors.
By means of a simple web-based GUI, the user can manually open and close the blinds, or he/she can setup both temperature and brightness thresholds in order to automate the whole process. Finally, opening and closing events can also be scheduled at pre-defined times of the day, if necessary.
We are eager to announce the launch of the official Arduino Starter Kit! We have been working hard togetherin developing a complete selection of 15 projects that will let you become a true arduino tinkerer! The new starter kit has been developed together with a series of ten video tutorials hosted by Arduino co-founder Massimo Banzi, which can be viewed at.
Ideally used in conjunction with the videos, the kit provides an open-source electronics prototyping platform based on flexible, easy-to-use hardware and software. It contains all of the essential components required to start programming with the Arduino Uno board, and a guidebook featuring 15 different projects, which are designed to evolve the user from beginner to professional level.
Comprising a motor, servomotor and driver, the kit also offers particular benefits to users wishing to apply mechatronics to their designs. Last July 23-27 2012, the workshop on Physical and WearableComputing , organized by SUPSI within the summer school in DigitalFabrication and Interaction Design , has took place involving about 20participants.
This workshop has proved to be a very good approach tointroduce future makers to the concepts of digitalfabrication, prototyping and design of interactive objects. On the workshop`s homepage, several prototypes and artifactsmanufactured during the workshop are presented.
Among them, it`s worthto mention Poetry Zoo, a set of laser-cut and RFID-equipped animalsthat generate poetries, The Sound of a Line, where simple melodies canbe performed by using a ball with conductive ink in combination with aspecial glove, and Superfluo Shoes, a pair of shoes that react basedon movement. The complete list of projects developed during the workshop can be foundon its official home page, while a personal view of this experience byZoe Romano, who has taught at the summer school together with MassimoBanzi, can be found here.
🔗 External reference
Related Circuits
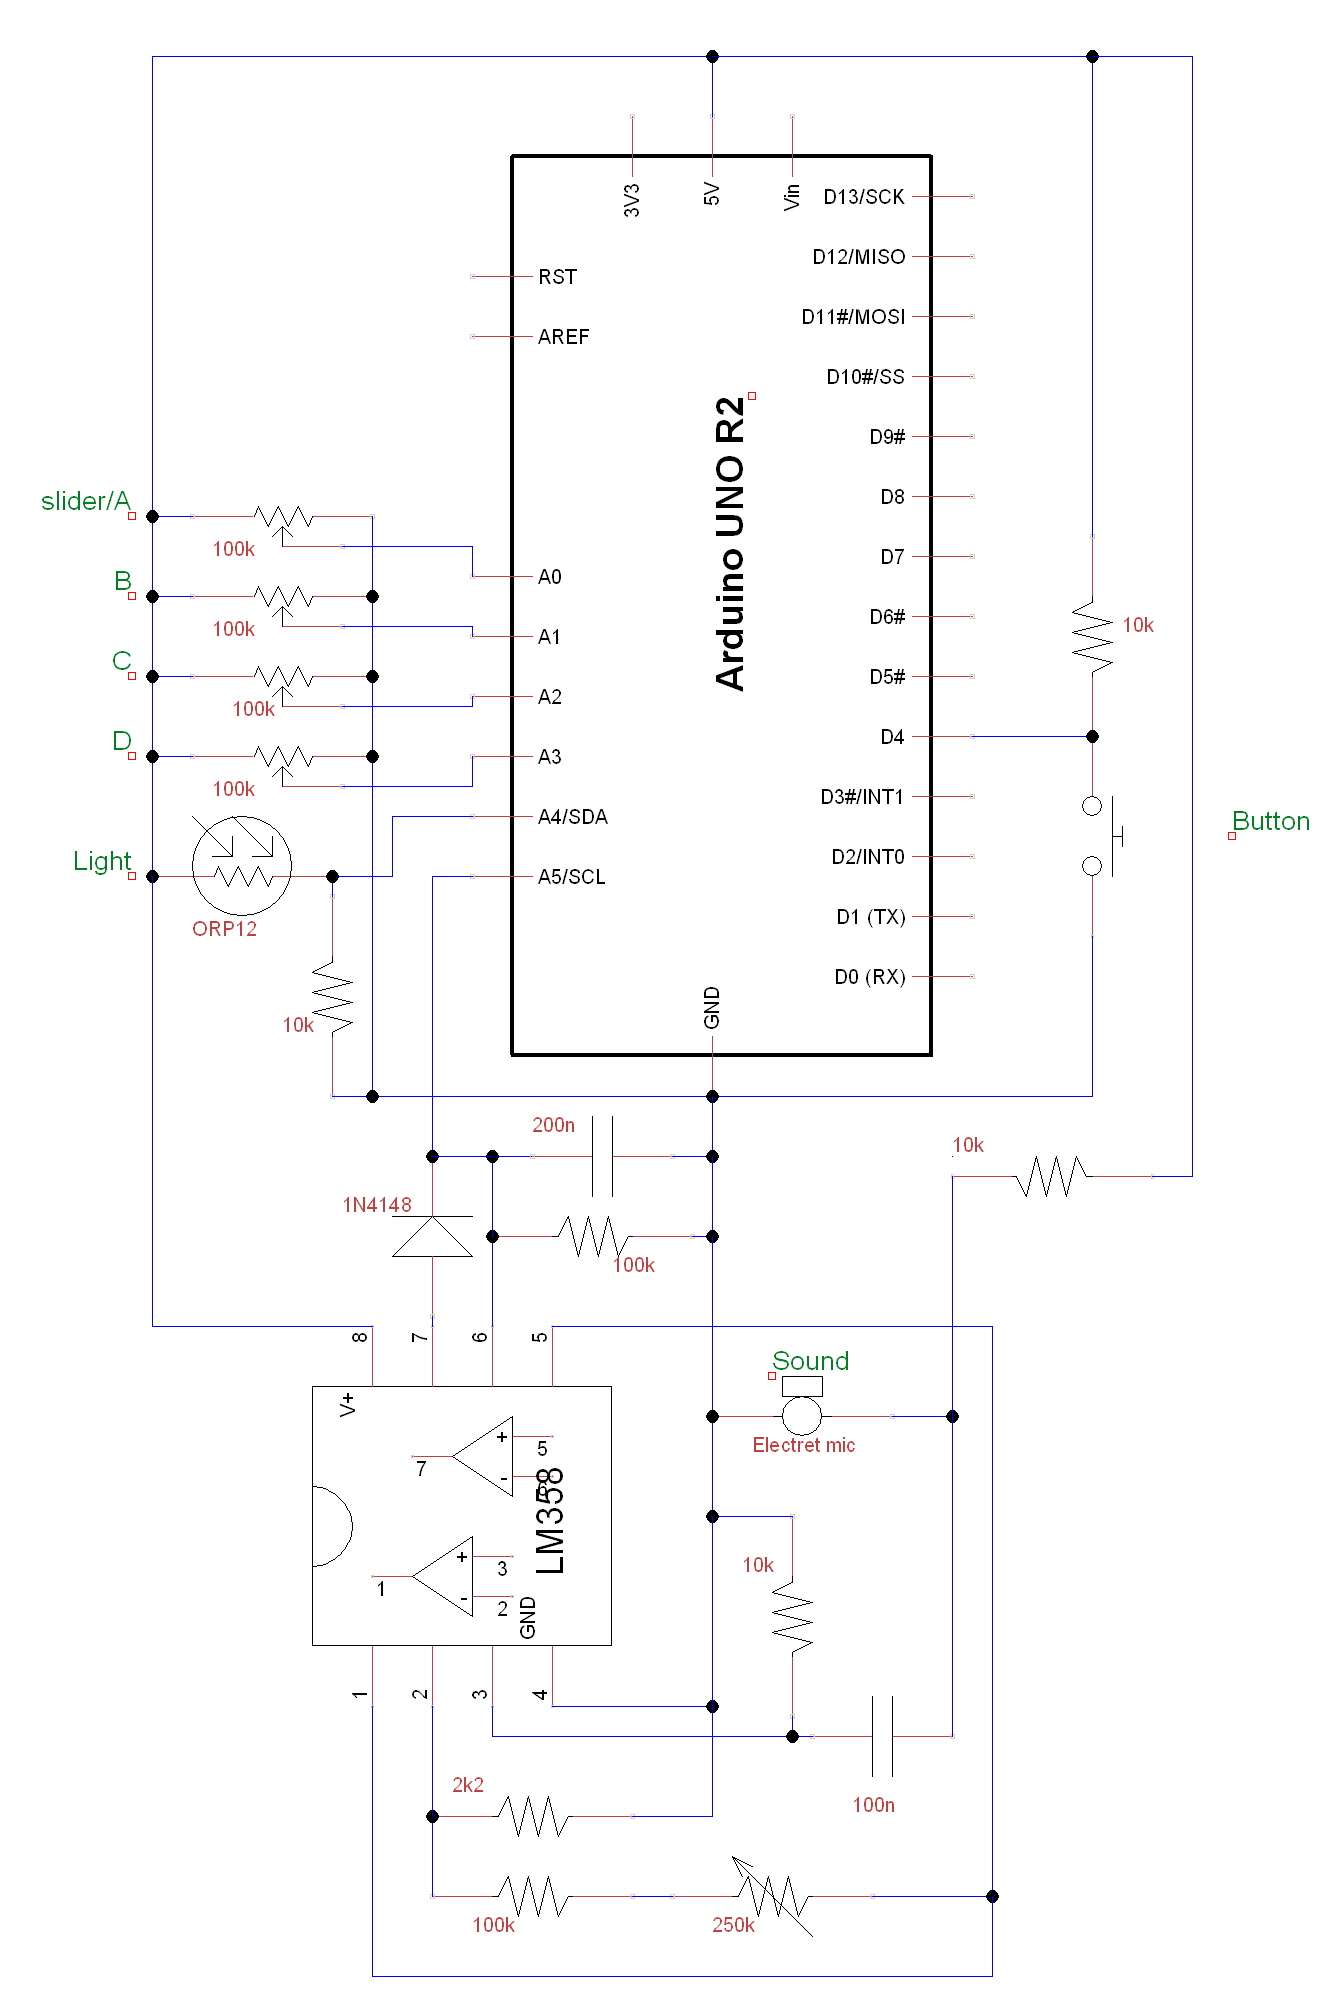
A circuit and Arduino code are designed to emulate a ScratchBoard approximately. The setup includes sound, light, a button, and four sliders, but it is not a direct replacement. It is important to change the COM ports in the...
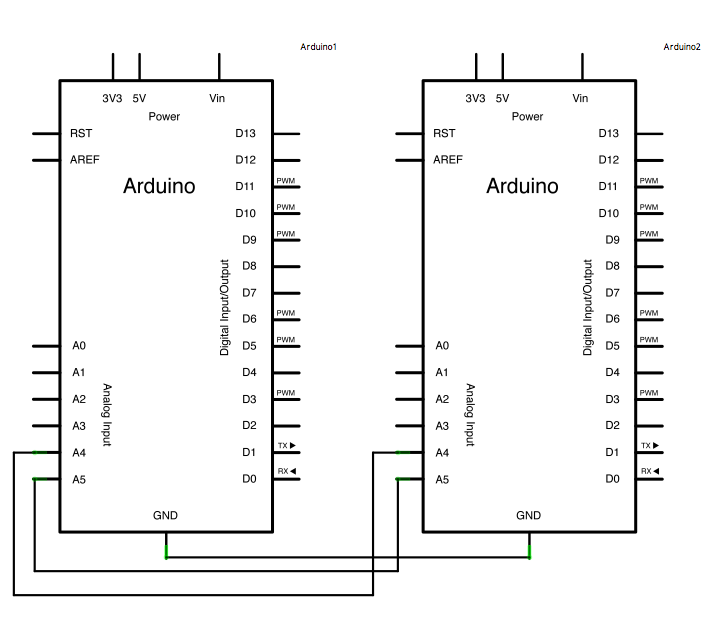
In certain scenarios, it can be beneficial to configure two or more Arduino boards to exchange information with each other. This example demonstrates a Master Reader/Slave Sender setup using the I2C synchronous serial protocol. The first Arduino, designated as...
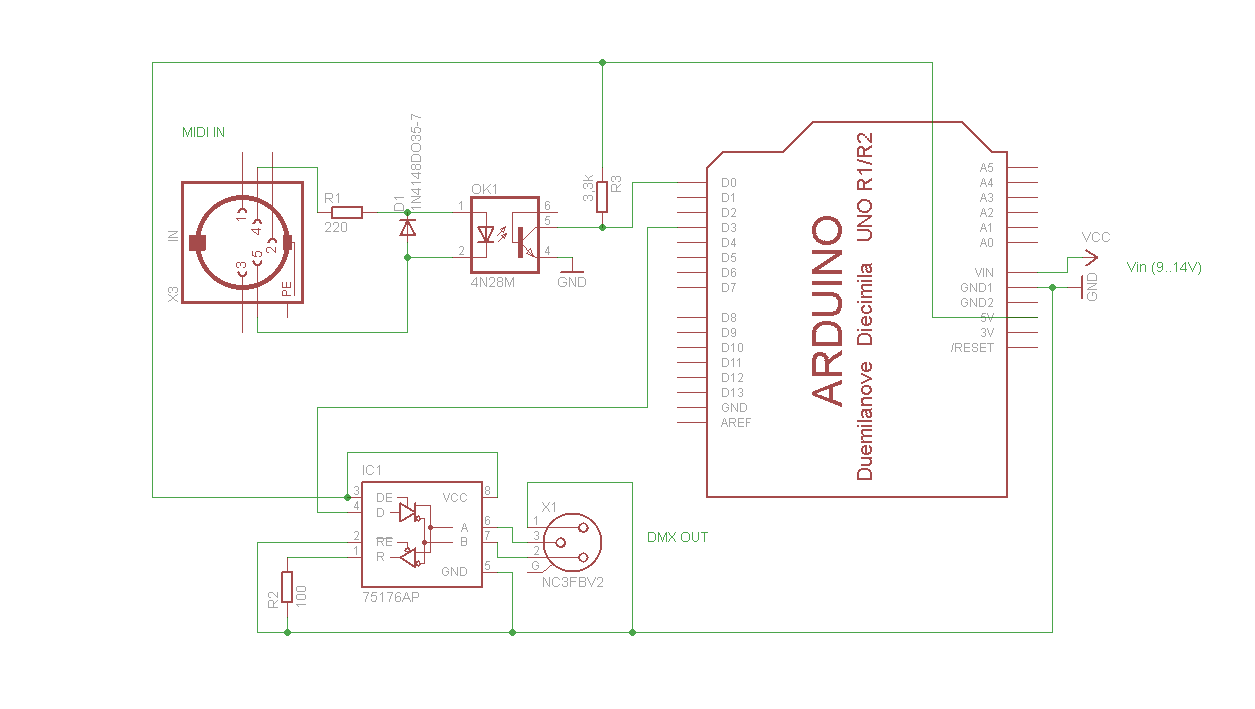
A simple Arduino MIDI-to-DMX control was created for a robot band named Science Fiction Children. The setup consists of two inexpensive LED Par56 lights from Stairville, a basic DMX dimmer pack, and Ableton Live for sound management. The objective...
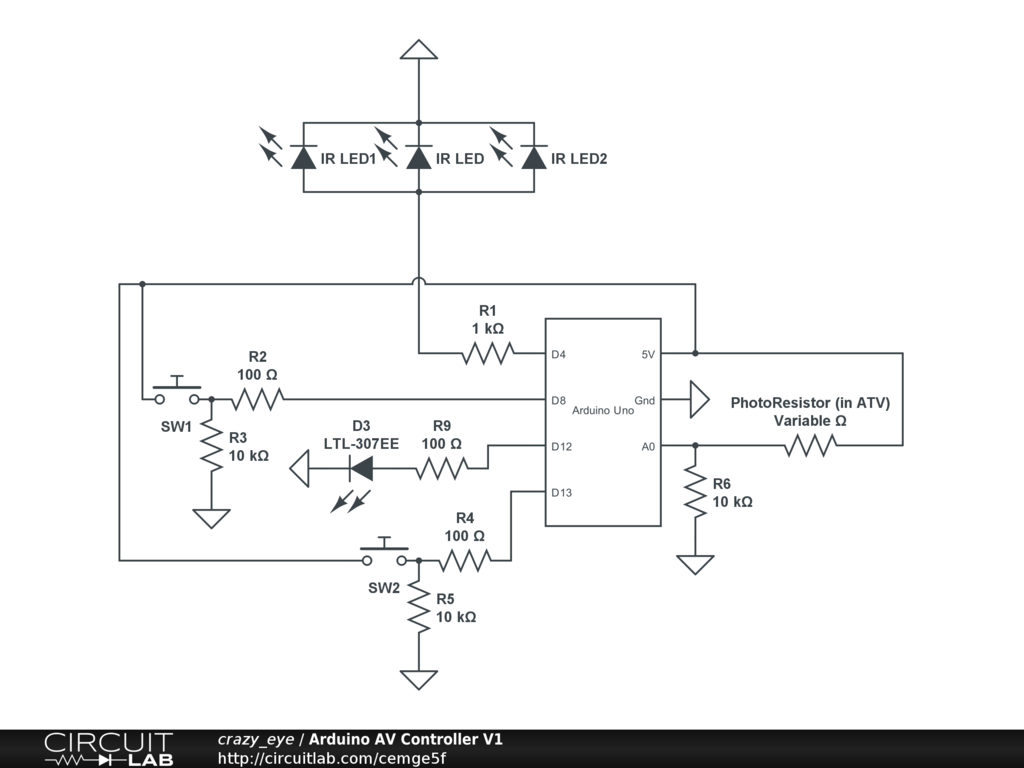
Arduino Event-Driven Universal AV Remote May 1st, 2013. Turn everything on with Airplay. The project involves the development of an Arduino-based universal remote control designed to manage various audio-visual (AV) components through an event-driven architecture. This remote utilizes Airplay...
How to connect and program the Arduino/Atmega168 microcontroller to operate a unipolar stepper motor. To connect and program the Arduino/Atmega168 microcontroller for operating a unipolar stepper motor, the following steps should be followed: 1. **Components Required**: - Arduino or...

The documentation and code cleaning for the Jaycar Thermor/BIOS branded wireless weather station receiver has been completed. The code is based on the Practical Arduino weather station receiver project. The process involved analyzing the RF signal from the weather...