
Arduino GH-2 integration for time lapse
The project involves creating a circuit that integrates an Arduino microcontroller with a GH-2 camera for automated panoramic photography. The primary goal is to rotate the camera in precise increments, allowing for seamless stitching of images to create a 360-degree panorama. The motor control mechanism will utilize a stepper motor, which provides accurate positioning and smooth rotation.
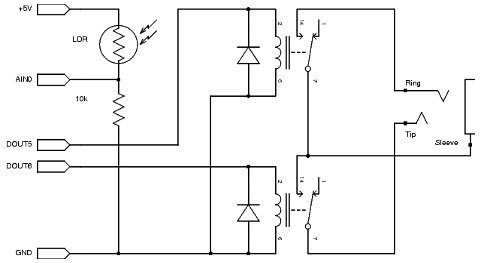
To connect the Arduino to the GH-2 shutter release, a 4-pole 2.5mm connector will be used. The wiring configuration will involve identifying the function of each pole in the connector. Typically, these poles are designated for ground, trigger, focus, and an optional function. Resistors may be required to ensure proper signaling to the GH-2 for focus and shutter trigger functions. This setup may involve using pull-up or pull-down resistors to ensure that the Arduino can correctly interpret the state of the shutter release.
The Arduino will be programmed to control the stepper motor's rotation and manage the shutter release timing. The digital output pin will be connected to the motor driver circuit, which will control the stepper motor's movements. The trigger pin will be connected to the shutter release circuit, allowing the Arduino to signal the camera when to take a photograph. An additional input pin will be utilized to start or reset the program, enabling the user to initiate the panoramic capture sequence easily.
If a prototyping shield is used, it will facilitate easier connections and provide a compact solution for integrating the Arduino with the camera's shutter release. The inclusion of an LDR in some circuit designs suggests potential light-triggered photography applications, although this may not be necessary for the basic panoramic setup.
The integration of a remote control could simplify the process of triggering the camera without direct wiring, allowing for more flexibility in positioning. The use of inexpensive components, such as the remote control, further enhances the project's accessibility, making it suitable for hobbyists and enthusiasts interested in photography and automation. Overall, this project exemplifies the intersection of electronics and photography, showcasing the capabilities of Arduino in creative applications.A simple project to use an Arduino to rotate a GH-2 on a fluid head by set degrees to take 360 panos. The control of the motor is simple. Lots of motor DIY out there. What I need help with is how to wire the Arduino to the GH-2 shutter release. I`m aware the shutter cable is a 4 pole 2. 5mm and I have one. I`m just stuck on how to connect the wires to the Arduino. And I know some resisters are needed to tell the GH-2 (Focus) or (Trigger). I have been searching. The closest I have found was the MX2 timelapse controller. But I have an arduino, GH-2 2. 5mm cable, almost there. If you aren`t using a ready-made shield for your Arduino, you`ll need to build something like this little circuit (where they`ve used a Prototyping Shield): (Arduino connections at left, mini-jack socket at right) This and others at In this one, they`ve included a Light Dependent Resistor (LDR) for some reason. (Maybe this circuit is for a particular application). Photography is one pf the most popular Arduino projects and there`s plenty of info & arduino projects around.
Update. I`m going to use a cheap Ebay remote ($3-4) and somehow tie it in with the Arduino. I already have the stepper motor and reviewed several tutorials on programing the motor. So Basically, the Arduino has two output and one input. Digital pin for Stepper. Trigger pin, and an input pin to start or reset the program. 🔗 External reference
Related Circuits
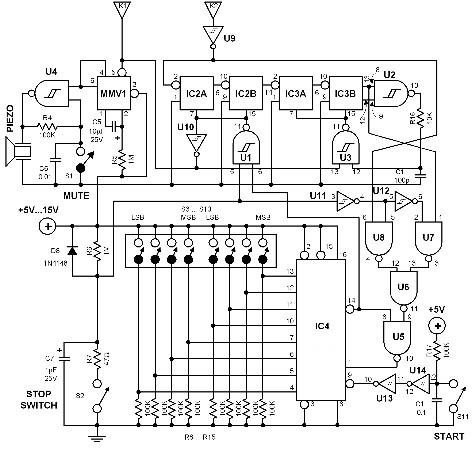
The time interval of this circuit can be varied digitally through the DIP switches. The time code must be set in BCD form. A 120 Hz signal generated by doubling the line frequency is used as the time reference....
Connecting and programming the TA8050 DC motor controller with the Arduino microcontroller. The TA8050 is a versatile DC motor controller designed for use with microcontrollers, such as the Arduino. This controller allows for precise control of DC motors, making it...

This article explains what an inverter is and how to construct a simple, low-cost 12V to 220V inverter circuit. An inverter functions as a DC to AC converter and is a valuable electronic product for compensating for emergency power...

The time delay, T, in seconds is calculated using the formula: T = 1.1 x C1 x (R1 + R2). The resistances are measured in megohms and the capacitances in microfarads. The combined resistance of R1 and R2 should...
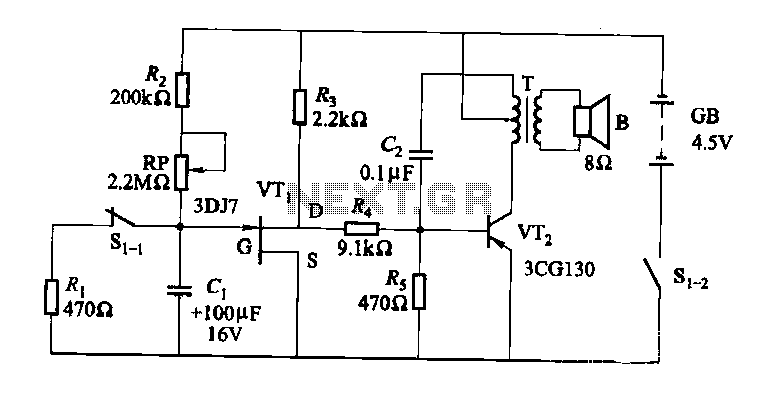
The darkroom circuit is designed for one-time exposure and emits an audible signal when the developing time is reached. This circuit can be utilized for photofinishing large timers and other applications. It comprises components such as FET VTi, resistors,...
200W Lamp Flasher is used to flash lamps, bulbs and halogen lamp to give your product that attracting look. More: Input supply - 6 ~ 12 VDC Output - upto 200 W lamp / bulb load Optically isolated Mains supply Onboard preset...