
arduino How can I display a scoreboard on stage for a play
The proposed electronic scoreboard system utilizes an Arduino microcontroller as the central processing unit, interfacing with various components to display scores and generate sound notifications. The scoreboard consists of two sets of three-digit displays, which can be constructed using a matrix of LEDs arranged in a common-anode configuration. Each digit can be controlled using shift registers to minimize the number of GPIO pins required from the Arduino. The use of transistors, specifically N-channel MOSFETs, allows for effective switching of the LED segments while maintaining low power consumption.
The Arduino will communicate with the Raspberry Pi through a serial interface, facilitated by a CD4050 level shifter, ensuring compatibility between the 5V Arduino and the 3.3V Raspberry Pi. The Raspberry Pi will handle sound playback, triggered by score changes detected by the Arduino. A small speaker will be connected to the Raspberry Pi's audio output, providing audible feedback whenever a score changes.
Powering the entire setup will involve a 5V 1.5A voltage regulator, which will supply the necessary voltage to both the Raspberry Pi and the Arduino. The use of two AA batteries for the Arduino will ensure portability, while the Raspberry Pi will maintain a stable power supply for continuous operation.
To facilitate wireless control, a Wi-Fi dongle will be attached to the Raspberry Pi, enabling remote access through SSH from an Android smartphone or a laptop. This configuration allows for seamless interaction between the control devices and the scoreboard, providing flexibility for the user to manage score updates from backstage.
In terms of component sourcing, local electronics suppliers or online marketplaces can be explored to acquire the required parts within the specified budget. It is advisable to prioritize essential components, such as the shift registers, LEDs, resistors, and MOSFETs, to ensure the project remains within financial constraints while achieving the desired functionality. Overall, this design provides a comprehensive solution for a scoreboard system that is both cost-effective and efficient, suitable for the outlined requirements.A scoreboard in the middle of the room, that one will control from backstage. The scoreboard will have two 3-digit numbers, controlled individually. Whenever the score changes, a little irritating sound should. sound. What is the easiest, more efficient and cheapest way to do this I have found how to make the scoreboard (MANY LEDs, some resistors, transistors, shift registers, an external power-source and an Arduino), but I have almost no idea about the rest. What should I do I already have the Arduino, a Basic Stamp, a Raspberry Pi (to play the sounds) and a PIC (PIC16C63, but I have no way of programming it)s and an OlinuXino (Yes I am desperate) lying around. I have 3 weeks to finish it. My budget is very low (30 euros). What is the least minimum I need Where can I buy it PS After some researching, I ended up to the following configuration: arduino with scoreboard (shift registers, transistors, LEDs, 2 AA batteries and some resistors), connected and controlled by RasPi, via serial (via UART, using a CD4050, because arduino`s USB wasn`t preferred by me :).
A wifi dongle will be connected to RasPi, which will connect to a wireless network. The raspberry pi will be powered by a 5V 1. 5A voltage regulator. A small speaker will be connected to audio jack. All this on the middle of the room. Backstage, there will be a wireless modem, used as a hotspot. Now either I from my android smartphone (connected to the hotspot) via an ssh client, or my teacher from her laptop (same configuration) will control the setup. Now I end up with a software related problem (of how to program everything Flawlessly), which I will soon ask on the correct stack-exchange.
Thank you all for your answers and your effort! Interesting problem. Pretty much any of the development boards you have, could be used to make it work. If you have physical access to run a cable from backstage to the scoreboard, then even better. Please explain what aspect of the project is your stumbling block. Perhaps if there aren`t any good answers soon, I`ll post up a block-level approach as an answer. Anindo Ghosh Apr 27 `13 at 21:25 I was not sure of how I would control the arduino scoreboard from backstage (1), how to control the RasPi to play the sound (2), what would I need to accomplish it (3) and last, where to buy from (4). If you have any suggestions, PLEASE share it. jimmis98 Apr 27 `13 at 21:30 @Andyaka In the play, every time the main actor tells a lie, the enemy team gets a point (+1) and when an actor from the enemy team does so, the main actor gets a point.
But at the same time, a sound should be heard to indicate the lie. So the maschine is a "lie-detector" jimmis98 Apr 27 `13 at 21:40 @BobbiBennett, but presumably they spec a 3-digit number because they`re going to count to at least 100. And if they increment the count once for each lie, then they need all the numbers between 1 and 100. And one set for each of the two "teams" in the play. So they need at least 200 slides. Sounds a lot easier to do in Powerpoint than with a Kodak carousel. The Photon Apr 28 `13 at 5:42 How about a power point presentation on a projector When there is enough room back stage, you can even set up the projector there and aim it at white cotton sheet.
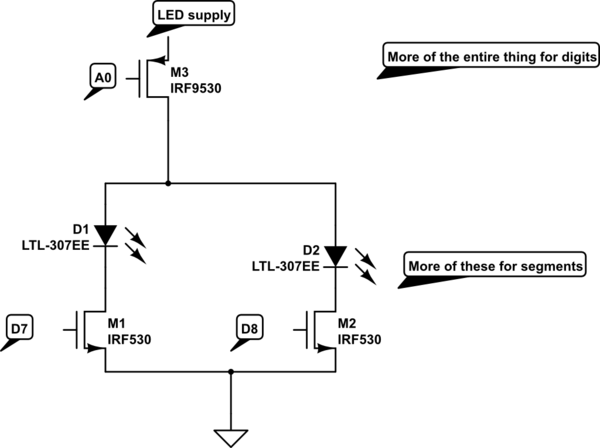
The light will easily pass a visible image. jippie Apr 28 `13 at 8:51 I find that a convenient way of getting a lot of LEDs for a little money is flexible LED strips. You can put soft diffusing plastic on top of the strips to make the light more even. You only need the Arduino for driving the score display. Build the LEDs into common-anode assemblies, one per digit, and switch the anode with a P-channel MOSFET and the cathodes with N-channel MOSFETs.
You need six P-channel MOSFETs for the top end of each digit, and seven N-channel MOSFETs for the bottom end of each 🔗 External reference
Related Circuits

Displays are always beneficial. Until now, only 7-segment displays have been demonstrated for showing numbers using minimal resources. However, for displaying text or images, a simple LCD screen is required. There are basic LED screens available that operate on...
A multiplexed display suitable for LED readouts is provided by a circuit that uses TTL counters to count a 60-Hz line. When the count reaches the hour mark, flip-flop M is set on every cycle. Gate G3 then detects...
Electronic devices require precision. When a task is performed multiple times, the outcome is consistently the same. However, there are instances where random results are desirable, such as in gaming applications. This project demonstrates how to create a lottery...
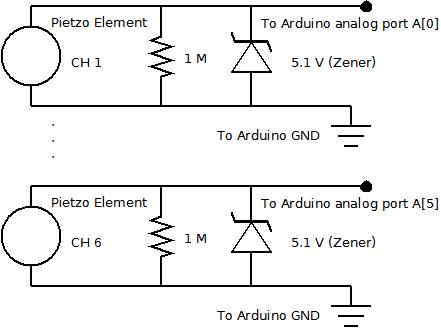
The piezo element is connected solely to Channel 1 (Arduino A[0] port). Channels 1 through 6 are linked to female mono jacks, with the ground (GND) wiring arranged in series from jacks 1, 2, and 3, continuing to the...
The crock pot is connected to a relay that can turn it on or off. The relay is controlled by a microcontroller based on readings from a temperature sensor (thermistor) located inside the crock pot. The objective is to...
A project is proposed to construct a two-phone intercom system capable of functioning over a distance of up to 1 kilometer. The system will utilize the speaker of each phone to produce a ringing sound on the other end. The...
Warning: include(partials/cookie-banner.php): Failed to open stream: Permission denied in /var/www/html/nextgr/view-circuit.php on line 713
Warning: include(): Failed opening 'partials/cookie-banner.php' for inclusion (include_path='.:/usr/share/php') in /var/www/html/nextgr/view-circuit.php on line 713