
Arduino Liquid Crystal Cursor

The Liquid Crystal Library is a crucial component for interfacing microcontrollers, such as Arduino, with LCD displays that utilize the Hitachi HD44780 driver. This driver is widely adopted in various LCD modules, making them a popular choice for embedded systems and DIY electronics projects. The standard 16-pin interface is a key feature of these displays, facilitating easy connectivity and integration.
When preparing to connect an LCD to an Arduino, it is essential to ensure a reliable physical connection. Soldering a pin header strip to the LCD's connector not only simplifies the wiring process but also enhances the durability of the connection. This step is particularly important in applications where the display may be subject to movement or vibration, as it prevents potential disconnections that could disrupt functionality.
The typical pin configuration for a 16-pin HD44780-compatible LCD includes power supply pins, ground, and control pins for enabling the display, as well as data pins for sending information. The control pins include RS (Register Select), R/W (Read/Write), and E (Enable), while the data pins (D0 to D7) carry the actual data to be displayed. Proper wiring according to the pinout specifications is crucial for the successful operation of the LCD.
In summary, the Liquid Crystal Library provides a straightforward interface for controlling HD44780-compatible LCDs, and proper preparation, including soldering pin headers, is essential for ensuring a robust and effective connection to an Arduino or similar microcontroller platform.The Liquid Crystal Library allows you to control LCD displays that are compatible with the Hitachi HD44780 driver. There are many of them out there, and you can usually tell them by the 16-pin interface. Before wiring the LCD screen to your Arduino we suggest to solder a pin header strip to the 14 (or 16) pin count connector of the LCD screen, as
you can see in the image above. 🔗 External reference
Related Circuits
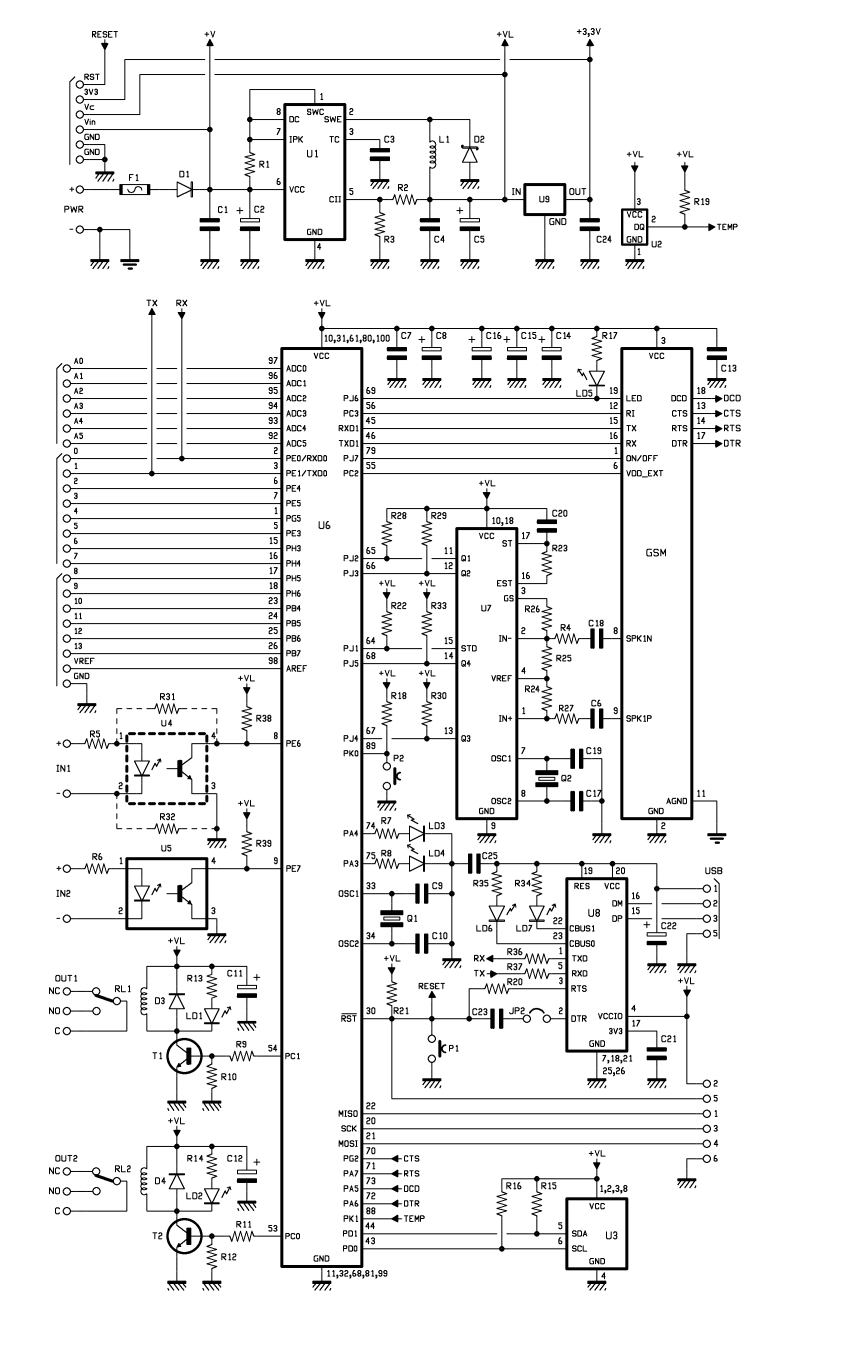
Utilizing the ATmega 2560, which serves as the core of the Arduino platform, a universal remote control with GSM capabilities has been developed. This device allows for the control of 2 inputs and 2 outputs, DTMF key functionality, gate...
For relatively small projects with fewer pins than the ATmega328, the ATtiny series, specifically the ATtiny45 or ATtiny85, is a good choice due to its compact physical size. The ATtiny series microcontrollers, particularly the ATtiny45 and ATtiny85, are designed for...
Here is a practical Arduino shield designed specifically for data logging. It has been engineered to be an affordable yet comprehensive solution. The design is user-friendly, allowing for easy assembly and customization, and it includes extensive documentation and libraries....

This weblog focuses on electronic circuit schematics, PCB design, DIY kits, and electronic project diagrams. It discusses a 32.768 kHz square wave generated by a common watch crystal. This output can be connected to a 15-stage binary counter to...
There is enthusiasm for using Arduinos in science projects. However, it is important to address several shortcomings of the Arduino before it can be utilized for more serious applications. Specifically, the addition of robust screw terminals is necessary. The Arduino...
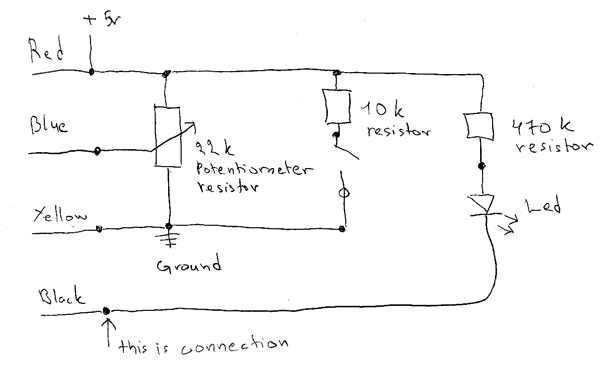
The circuit consists of a 10 kΩ resistor, a 470 kΩ resistor, a potentiometer, and an LED. This circuit is intended for learning Arduino programming in class. The circuit utilizes a combination of resistors and an LED to create...