
AVR Serial Port Programmer

The AVR programmer is designed to facilitate the programming of AVR microcontrollers efficiently. It utilizes a serial interface for communication with the host computer, allowing for straightforward integration with existing systems. The socket PCB serves as a versatile platform, accommodating various AVR microcontroller packages, with the 28-DIP configuration being the most common.
The PonyProg2000 software provides a user-friendly interface for programming tasks, featuring a comprehensive setup process that ensures compatibility with the AVR programmer. The configuration steps are critical to establish a successful connection, and the visual cues within the software guide the user through the necessary settings.
Once the programming process is initiated, the software handles the transfer of the hex file, providing real-time feedback through the status bar. This feedback is essential for monitoring the programming progress and confirming the successful transfer of data. The verification step is crucial, as it ensures that the programmed data matches the intended hex file, minimizing the risk of errors in the microcontroller's operation.
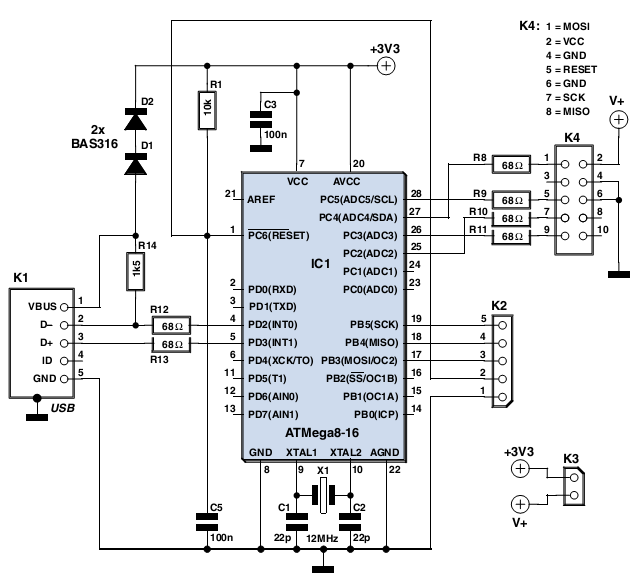
The entire process is designed for efficiency, with a typical programming time of 10 to 30 seconds, making it suitable for rapid development and testing scenarios. The final confirmation of success through the "Write successful" window reassures users that the microcontroller is ready for deployment, completing the programming cycle with reliability and ease.Entire AVR programmer has been build with using common parts and fits in the case of the serial connector. The socketpcb has been created to fit a 28-DIP AVR ATmega8 microcontroller, but you can build a socket pcb for any other AVRmicrocontroller out there.
This AVR programmer is compatible with a popular PonyProg software that shows you a statusb ar of the programming progress. To be able to send hex file from your computer to AVR microcontroller you will need to download and install PonyProg2000. After the installation, the first thing you will need to do is configure PonyProg to work with our AVRProgrammer.
To do this go to "Setup" menu and select "Interface Setup". The following window will be shown andhighlighted areas show you exactly which options should be selected. At this point PonyProg configuration is complete and we can open hex program with which AVR microcontroller will beflashed.
Go to "File" menu, select "Open Program (FLASH) File. ", and point to the hex file to open it up. You should seehex numbers as shown on the screen below. If you haven`t connected AVR Programmer dongle to your computer`s serialport yet, then now is the time. Make sure that AVR Programmer is physically connected to your AVR microcontrollerthrough Socket PCB or through ICSP 6-PIN connector.
Finally click on the highlighted icon "Write Program Memory(FLASH)", or go to "Command" menu and select "Write Program (FLASH)". Now sit tight, relax and watch the programming progress on the status bar. PonyProg will program AVR microcontrollerand verify if the hex file was transferred without any errors.
For your information this process shouldn`t really take more than 10 to 30 seconds. This depends on the size of the program that you`re trying to flash. After programming is completed "Write successful" window will be shown letting you know that AVR microcontroller hasbeen programmed, and is now ready to be used. 🔗 External reference
Related Circuits
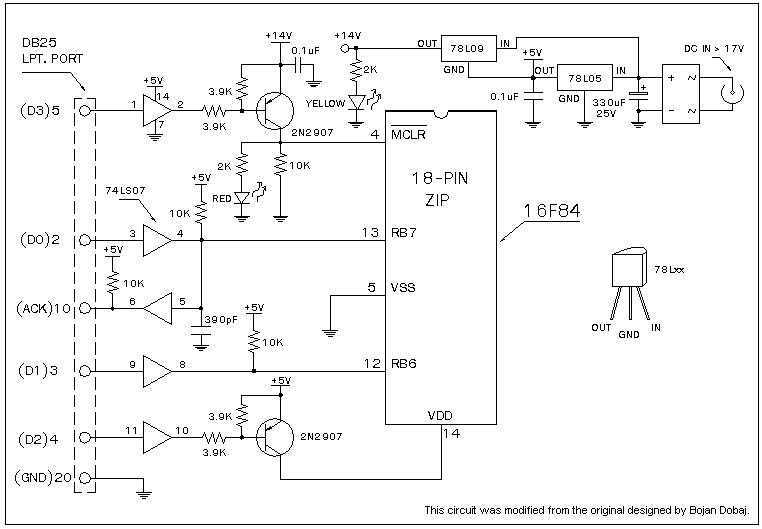
In the past, it was straightforward to utilize the parallel port of a standard PC to program various types of AVR microcontrollers. Currently, one must purchase a programmer that connects to the PC via USB, which increases the complexity...
I finally found a very nice universal window based software designed to work with any serial programmers for PIC16F84, i.e., WPicProg16 V1.20, written by Nigel Goodwin. Build this programmer before started experimenting the forthcoming many interesting F84 projects. Some...

Microchip's PIC18F14K50 is an excellent choice, offering a wide range of features in a compact package at an affordable price. While focusing on the chip's numerous capabilities, a specific requirement for its flash programming was overlooked during the design...

The LEDs operate in an active-low configuration (0), while the initial state of the switches is high (1). In other words, the PC software must send a low signal (0) to activate the LEDs, and if a low signal...
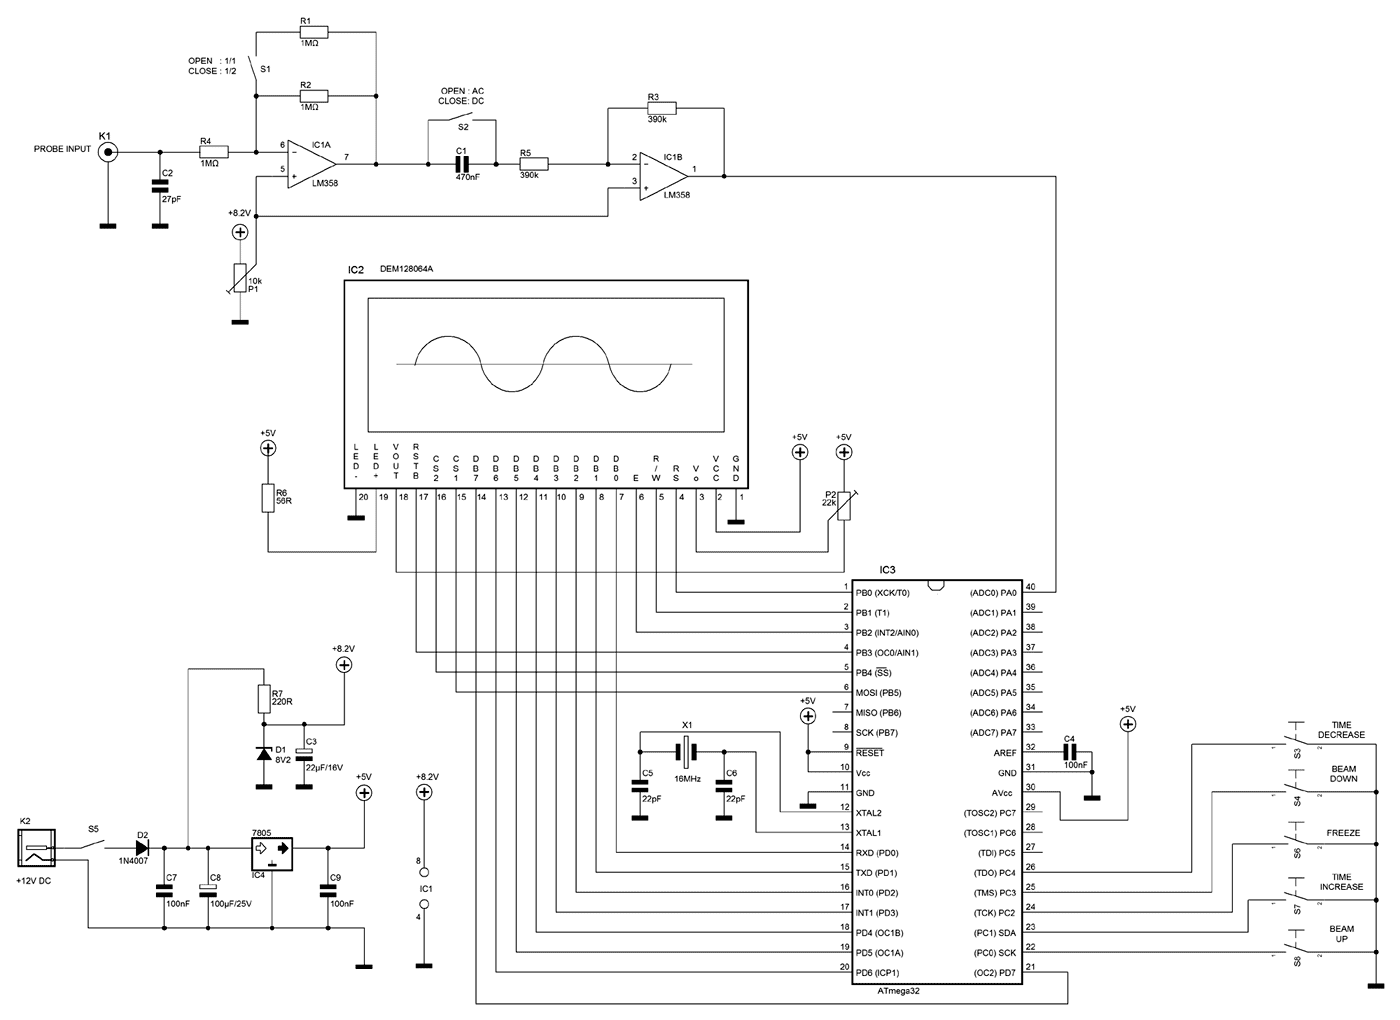
A few months ago as I was surfing on the net, I saw an oscilloscope based on PIC18F2550 microcontroller and a KS0108 controller based graphical LCD. That was Steven Cholewiak's web site. I had never seen before so amazing...

When using the internal 1.1V reference for the ADC, if the analog input exceeds 1.1V, such as 2.5V, it will not harm the microcontroller. Instead, the ADC value will clip at 0x3FF. Based on practical experience, it has been...