
Connection Tester
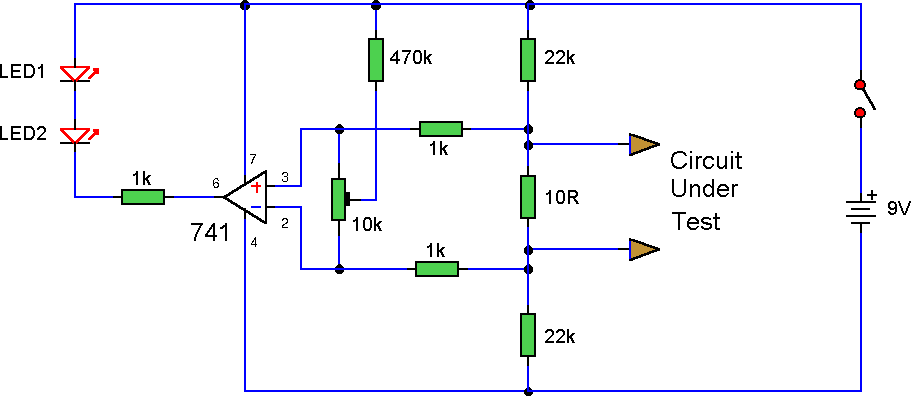
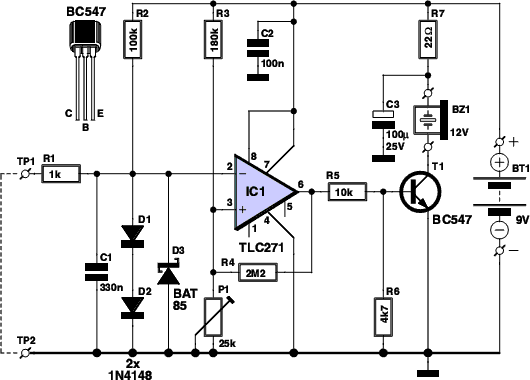
This circuit operates by leveraging the differential input characteristics of the 741 op-amp, where small voltage differences can be amplified significantly. The 470kΩ and 10kΩ resistors serve as a means to introduce a controlled offset voltage, allowing the circuit to detect minute differences in resistance. The output behavior of the op-amp is critical for the functionality of the continuity tester; when the probes detect a closed circuit (low resistance), the output voltage swings high, activating the LEDs.
The choice of resistors is essential; the selected values allow for fine-tuning the circuit's sensitivity. As the resistance measured decreases, the output voltage increases, and the LEDs illuminate brighter, indicating a good connection. Conversely, when the probes are shorted, the circuit's output should drop to zero, turning off the LEDs, which provides a clear visual indication of continuity.
In practical applications, maintaining clean probe tips is vital. Any contamination can introduce additional resistance, leading to false readings. Therefore, regular maintenance of the probes ensures reliable performance. The circuit's versatility is enhanced by its compatibility with various op-amp types, allowing users to select components based on availability or specific application requirements. Adjustments to the offset null can further refine the circuit's performance, ensuring accurate readings across a range of resistance values.This simple circuit uses a 741 op-amp in differential mode as a continuity tester. The voltage difference between the non-inverting and inverting inputs is amplified by the full open loop gain of the op-amp. Ignore the 470k and the 10k control for the moment, and look at the input of the op-amp. If the resistors were perfectly matched, then the vo ltage difference would be zero and output zero. However the use of the 470k and 10k control allows a small potential difference to be applied across the op-amp inputs and upset the balance of the circuit. This is amplified causing the op-amp output to swing to full supply voltage and light the LED`s. The probes should first be connected to a resistor of value between 0. 22 ohm and 4ohm. The control is adjusted until the LED`s just light with the resistance across the probes. The resistor should then be removed and probes short circuited, the LED`s should go out. As the low resistance value is extremely low, it is important that the probes, (whether crocodile clips or needles etc) be kept clean, otherwise dirt can increase contact resistance and cause the circuit to mis-operate.
The circuit should also work with a MOSFET type op-amp such as CA3130, CA3140, and JFET types, e. g. LF351. If the lED`s will not extinguish then a 10k preset should be wired across the offset null terminals, pins 1 and 5, the wiper of the control being connected to the negative battery terminal. 🔗 External reference
Related Circuits
Short circuits or broken PCB tracks can be easily identified using a multimeter. However, this tool may yield inaccurate results when assessing the efficiency of a transistor or diode unless the component is unsoldered and removed from the PCB....
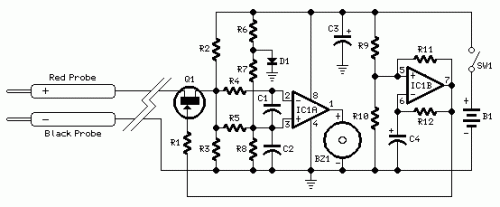
This continuity tester emits a beep sound when it detects electrical current conduction between its probes. Below is the schematic diagram of this audible device. The continuity tester is a simple yet effective tool used to check the integrity of...
To build a stepper motor tester, the circuit includes two sets of drivers that support both unipolar and bipolar stepper motors. The control circuit and driver circuit are powered by separate supplies, allowing compatibility with a wider range of...
The circuit does not guarantee the testing of all defective MOSFETs or all fault conditions in MOSFETs. If the MOSFET is functional, it will operate within the astable multivibrator circuit, resulting in the LED flashing. The described circuit employs an...
The chip tester verifies the functionality and timing of a variety of 7400 series integrated circuits. Students taking Digital Logic Design Lab use these chips often in their laboratory. The IC to be tested should be placed on the...
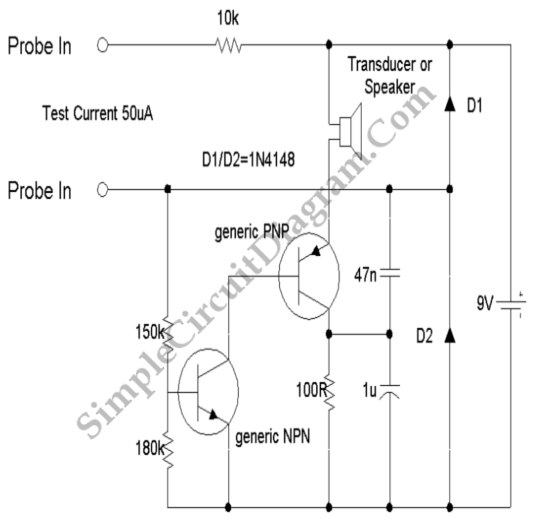
This simple circuit tests speakers, microphones, transformers, and voltage. It is essentially a very low-frequency oscillator that generates extremely short, distinctive pulses. The sound produced is easy to hear and allows for precise localization, making it ideal for checking...