
Controlling the Air Muscle actuators
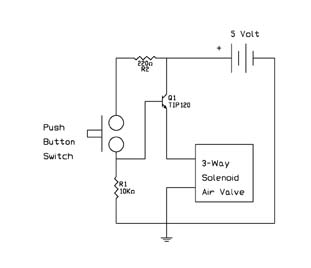
The air muscle activation system described incorporates a two-valve configuration for effective control of air pressure, enabling both contraction and relaxation of the air muscle. The use of a three-way stopcock air valve allows for manual intervention, which is beneficial during testing and setup phases. However, for automated systems, the integration of solenoid-operated valves like the Isonic valves provides a reliable electronic control mechanism.
The Isonic valve's design features a normally open vent and a normally closed air supply, which simplifies the control logic required for operating the air muscle. By utilizing a 5-volt signal, the electronic control can easily interface with microcontrollers or other logic devices, allowing for precise timing and control of the muscle's operation. The quick connect feature of the Isonic valve enhances the ease of assembly and maintenance, enabling rapid changes or repairs to the system without the need for specialized tools.
For applications requiring robust performance, it is essential to consider the pressure rating of all components used in the system. While plastic aquarium valves are suitable for low-pressure applications, they should be replaced with higher-rated components when operating near the maximum pressure of 50 psi to ensure safety and reliability. The choice of semi-rigid 4mm tubing is also critical, as it must withstand the operational pressures while maintaining flexibility for installation in various configurations.
Overall, the air muscle control system is versatile and can be adapted for various robotic and industrial applications, where precise control of pneumatic actuation is required.To activate the air muscle, valve labeled #2 is opened. This causes the air muscle to contract. Once activated the #2 valve may be closed without impacting on the state of the air muscle. The air muscle stays in a contracted state. To relax the air muscle, the air pressure must be vented by opening valve labeled #1. A three-way stopcock air valve may be purchased, see figure 14. The stopcock air valve allows you to control the air muscle manually. A three-way valve may be simulated or constructed using two one-way air valves. Small plastic aquarium valves purchased at a local pet shop have work quite well. However they are not rated for work at 50 psi and that`s a good reason to wear eye protection, just in case they pop apart from the air pressure. Using manual valves are fine for testing air muscles, to build a robot or industrial device we must provide a way for electronic control.
Fortunately this is not difficult. There are a number of solenoid air valves available. I prefer the Isonic valves from Mead Fluid Dynamics. These are 3-way air valves that are activated using 5 Volts see Figure 14. The 3-way Isonic values automatically vent the air muscle (through the back) when it is deactivated. To see how this particular valve works look back to figure 13, in the Isonic valve, the valve labeled #1 is normally open, this is the vent, through the back of the valve. The valve #2 is normally closed, this is labeled "In" on figure 14. The air stream to the air muscle is labeled "Out" in figure 14. When the electronic valve is activated valve # 2 opens allowing air pressure to the air muscle and valve #1 closes.
When deactivated each valve changes state; valve #1 opens, venting the air muscles air pressure and valve #2 closes separating the air supply from the air muscle. The front of the Isonic air valve has two quick connects-disconnects for air tubing. This particular air valve connects handles semi-ridge 4mm tubing, which is a good size for running air to the air muscle.
To use the quick connect simply push the air tubing into the hole, it will lock in. To disconnect, hold the valve flange to the valve body with your fingers and pull the tubing out. 🔗 External reference
Related Circuits
Twisted-pair wiring is a wiring technique commonly utilized for in-building data communication. Compared to conventional coaxial cable, this technique offers various advantages. Twisted-pair wiring consists of pairs of insulated copper wires that are twisted together to form a single cable. This...
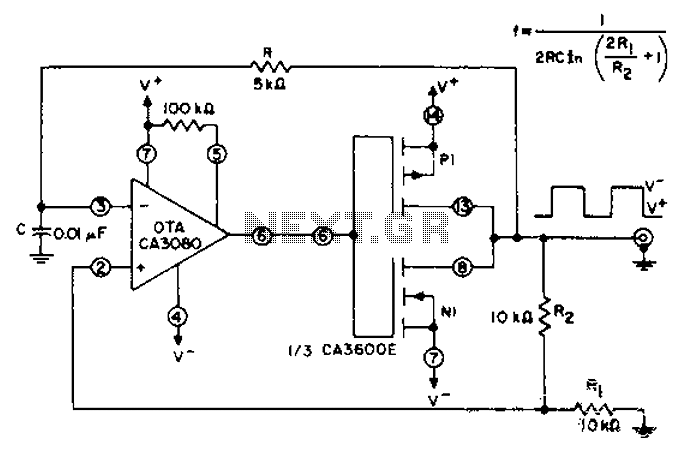
CA3600E array transistor pair and a reverse CA3080 operational amplifier are used together to provide precise timing and thresholds for the square wave. A typical static power consumption is 6mW. The CA3600E is a versatile integrated circuit that includes multiple...
A request has been made to automate certain functions within a residence, specifically to control the on and off states of CFL lamps using a triac that is coupled to a logic circuit via a zero-crossing detection mechanism. To achieve...
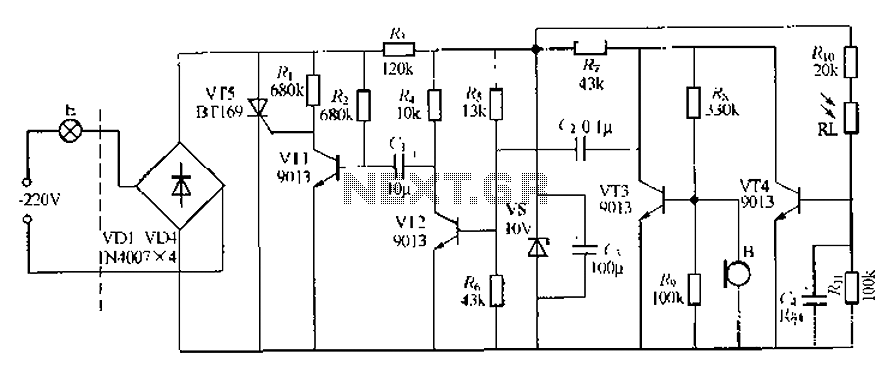
This circuit describes a sound and light control delay system for a walkway stairs light switch. It involves various components including 220V AC electric bulbs, diodes (VD1-VD4), and resistors. The circuit utilizes a rectifier regulator to stabilize the voltage...
The Air Flow Sensor Circuit describes sensing air flow using the microcontroller PIC16C781. Air flow is detected by the cooling effect of air. The Air Flow Sensor Circuit utilizes the PIC16C781 microcontroller to effectively measure air flow by leveraging the...
For optimal efficiency, set MAX_STEPPERS to the number of stepper motors being controlled, with a maximum limit of four. Motors are identified by indices 0, 1, 2, and 3. On the QCard, there is a trade-off between the number...