
Creating DeviceHive application for .NET Micro Framework

In the context of developing a DeviceHive-enabled application, the initialization of the device is a critical step that ensures proper functionality and communication within the network. The Common Equipment library serves as a pre-built framework that simplifies the integration of various hardware components, allowing developers to focus on the application logic rather than low-level device management.
To implement the hardware watchdog timer, it is essential to configure it to monitor the operational state of the device. The watchdog timer should be initialized in the Connected event handler, which signifies that the device has successfully established a network connection. This initialization can involve setting a timeout period that defines how long the device can operate without receiving a reset signal. If the device hangs or becomes unresponsive during this period, the watchdog will automatically trigger a reset, thus restoring normal operation.
In addition to the watchdog timer, the event handlers—BeforeCommand, AfterCommand, BeforeNotification, and AfterNotification—play a vital role in providing feedback about the device's network status. These handlers can be programmed to control an LED indicator, which visually represents the device's connectivity status. For instance, the LED can blink to signal that the device is actively communicating over the network, providing users with real-time feedback on the operational state of the application.
Overall, the integration of a watchdog timer and network activity indicators significantly enhances the reliability and user experience of the DeviceHive-enabled application, ensuring that the device remains responsive and provides clear communication regarding its operational status.As the Common Equipment library contains implementation of the equipment used in this sample, the only task for a developer is to properly initialize the device. After installing all the necessary SDKs and updating the device firmware to the newest version, the following steps need to be done to create a DeviceHive-enabled application.
Use the hard ware watchdog timer to reset the device in case of unexpected hang-up. The watchdog can be initialized after the network connection is established, in Connected event handler. BeforeCommand, AfterCommand, BeforeNotification and AfterNotification event handlers are good places to put indication of the device network activity, for example, a blinkikg LED.
🔗 External reference
Related Circuits
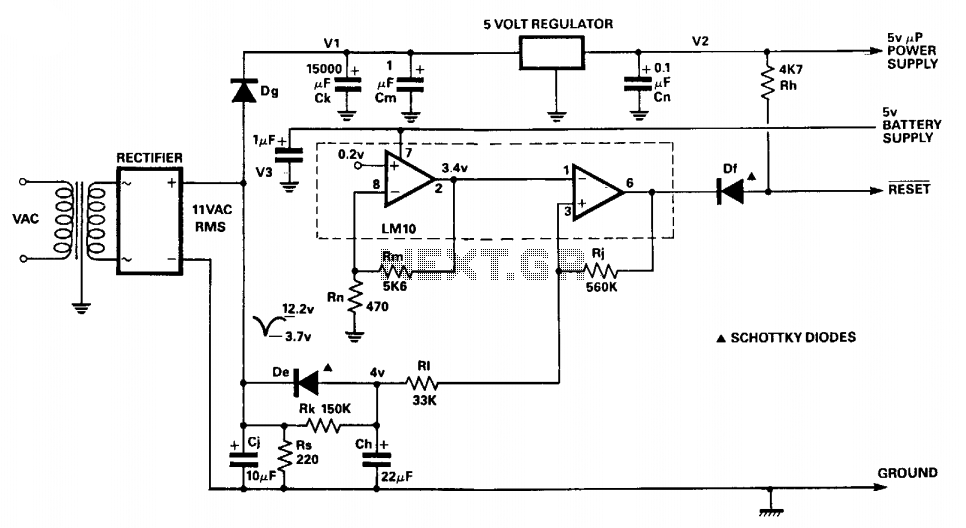
The circuit monitors the input to the microprocessor's 5 V regulated supply for voltage drops and initiates a reset sequence before supply regulation is lost. In operation, the resistor-capacitor combination Rs and Cj forms a short time constant smoothing...
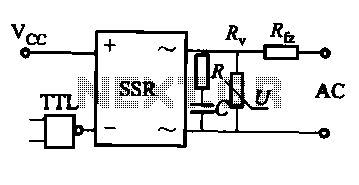
This document discusses the AC solid-state relay (AC-SSR) and presents its basic application circuit as illustrated in Figure (a). Additionally, it includes a TTL drive SSR circuit depicted in Figure (b), a CMOS driver circuit for the SSR shown...
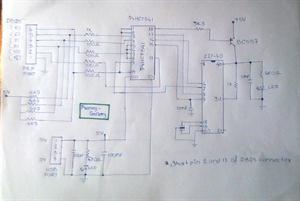
This resource contains step-by-step information for creating an AVR microcontroller programmer, complete with a suitable circuit diagram. This programmer is capable of programming 8051, AT89XX, AT90XXXX, and 8031 family microcontrollers. The AVR microcontroller programmer described is designed to facilitate the...

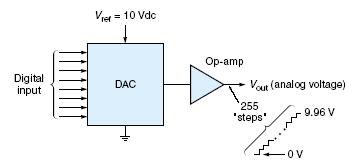
The micro ampere meter presented here functions as a DC millivolt meter. It achieves full-scale deflection with a 0.1V input. The current to be measured flows through a known resistance R, and the voltage drop across this resistance is...
The parallel interface transfers data in 8 bits (or more) simultaneously, utilizing eight separate wires. It serves as an extension of the data bus to external devices. This interface is particularly suitable for devices that operate in binary states,...

This circuit features a micro vibration sensor, a trigger delay circuit, and a control circuit, as illustrated in the accompanying figure. The micro vibration sensor comprises a vibration sensing device and a high power amplifier circuit, enabling it to...