
Digital Slave Flash Trigger PIC 12F675
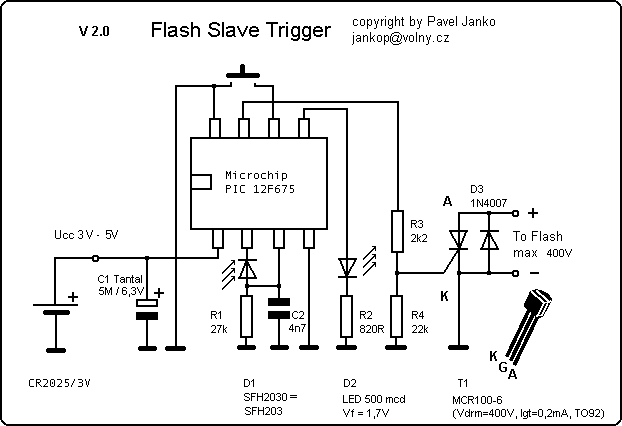
Before use, the camera settings must be adjusted if applicable. The device can enter programming mode from any state by pressing the push button for approximately three seconds, during which the indicator lamp will glow continuously for one minute. This period allows the device to receive a sequence of flashes. It is advisable to take a picture with the camera's active internal flash positioned near the Slave Flash Trigger in programming mode. Sensitivity is intentionally reduced in this mode to avoid capturing unwanted pulses, and programming is best performed using reflected light rather than direct proximity.
Once the programming sequence is captured, indicated by a three-second delay before entering the "ON" state with corresponding flickering of the indicator lamp, the device is ready for use. If no flash sequence is captured during programming, the device will turn off after one minute, retaining the previous programming. The programmed settings remain intact even if the battery is removed or switched off until the next programming session.
When changing photography modes or types of digital cameras, reprogramming is necessary due to the device's acceptance of timing variations between flashes. Significant changes include adjustments to shutter speed and internal flash synchronization. The Slave Flash Trigger may also require reprogramming when the "Red Eye Reduction" function is activated or deactivated. If a flash is not captured in programming mode but the control push button is pressed, the flash will fire, indicating the Slave Flash Trigger is in the "ON" state. This feature allows for verification of the connection and functionality with an external flash, which must be connected, powered, and charged.
To check the Slave Flash Trigger's proper function, a photograph of a prepared external flash can be taken. If the flash appears in the image, synchronization is confirmed. During operation, if the indicator lamp flickers quickly for about two seconds after a flash, it suggests that the Slave Flash Trigger may be misprogrammed, resulting in the external flash firing at the wrong time.
Before replacing the battery, it is essential to disconnect the Slave Flash Trigger from the flashgun. The battery should be removed using fingers or a non-conductive object, such as a match. After removing the battery, it is recommended to wait for one to two minutes before inserting a new one to ensure proper functionality.The Slave Flash Trigger is switched on/off by pressing the push button. When switched on, one to three flickers of the indicator lamp signalizes the programmed mode. One flicker determines that the flash will be fired at each flash. Two flickers indicate that the flash is fired at the second flash. Three flickers mean that the external flash is fi red not earlier than at the third flash. The indicator lamp, after the Slave Flash Trigger is switched on, does not glow permanently due to the maximum saving of power. Thus, the operating time of about 300 hours is achieved for one battery. The switch-off is signalled by the slow extinguishing of the indicator lamp. If the Slave Flash Trigger is not switched off by the push button manually, then it is switched off automatically in half an hour from the last captured flash.
First it is necessary to set the required parameters on the camera, if such setting exists. It is possible to put the Slave Flash Trigger into a programming mode from any position by a prolonged press of the push button for about 3 seconds. Then the indicator lamp will glow continuously for one minute. During this time the device is capable of receiving the sequence of flashes. Now one need only take one picture by a camera with the active internal flash near the Slave Flash Trigger in a programming mode.
Sensitivity is intentionally markedly reduced in the programming mode so that disturbing pulses cannot be captured. But it is not optimal to program the unit from the close proximity; the most advantageous is the reflected light of the flash.
Capturing the programming sequence (flashes of the flash unit of a camera) is signalled by a time lag of approximately 3 s by going into the "ON" state with a corresponding flickering of the indicator lamp. Then the device is immediately ready for action. If the Slave Flash Trigger in the programming mode does not capture any flash sequence, then it turns off after one minute and the preceding programming is kept.
The programmed properties are kept, even after the battery is switched off or removed, until the next programming, if any. Because the device also accepts the time between flashes in certain tolerance limits, it is necessary to make a new programming when changing the mode of photographing or the type of DC.
It is above all the essential change in the shutter speed and the type of synchronization of internal flash. It is also generally necessary to make a re-programming of the Slave Flash Trigger when activating/deactivating the function "Red Eye Reduction".
If in the programming mode the flash is not captured, but the control push button is pressed, then the flash is fired. The Slave Flash Trigger will go into the "ON" state. This is convenient for the check of the proper interconnection and the function of the Slave Flash Trigger with a flash.
The external flashgun must be, of course, connected, switched on and charged. This procedure has no effect on the preceding programming. The verification of the proper function of the Slave Flash Trigger when encountering problems can be performed simply by photographing a prepared external flash. If the flash is lighted up on the picture, then the synchronization is in order. When firing a flash through the Slave Flash Trigger, also the indicator lamp is simultaneously lighted up for a moment, thus signalling the capture of the flash.
If during a routine work the indicator lamp quickly flickers for a period of about 2 s after a flash, it means in great likelihood that the Slave Flash Trigger is misprogrammed and the external flash was fired untimely. Before changing the battery, disconnect the Slave Flash trigger from the flashgun! Then remove the battery from the holder with your fingers or slightly push it out with a nonconductive object, e.
g. a match. After the removal of the battery, wait about 1 - 2 minutes before inserting a new one!This time is needed f 🔗 External reference
Related Circuits

A Schmitt trigger provides effective squaring of the output, sometimes eliminating the need for an additional output stage. A Schmitt trigger is a type of comparator circuit that incorporates hysteresis, which allows it to provide clean, stable output transitions. This...
There is no need to resort to complex circuitry if what you are looking for is a simple power flasher. The light will flash at around 1Hz with a 100W bulb at a duty cycle of 50%. The max....
How to handle digital input/output (I/O) in AVR microcontrollers is explained using basic programs and circuits to illuminate an LED, generate a stepper motor sequence, read a push-button switch, and implement key debouncing. The handling of digital I/O in AVR...
This project uses only a few of the instructions that come with PicBasic, but serves to show how easy PicBasic really is. It also shows how PicBasic strongly resembles programming the BASIC Stamp. Here we are using the serin...
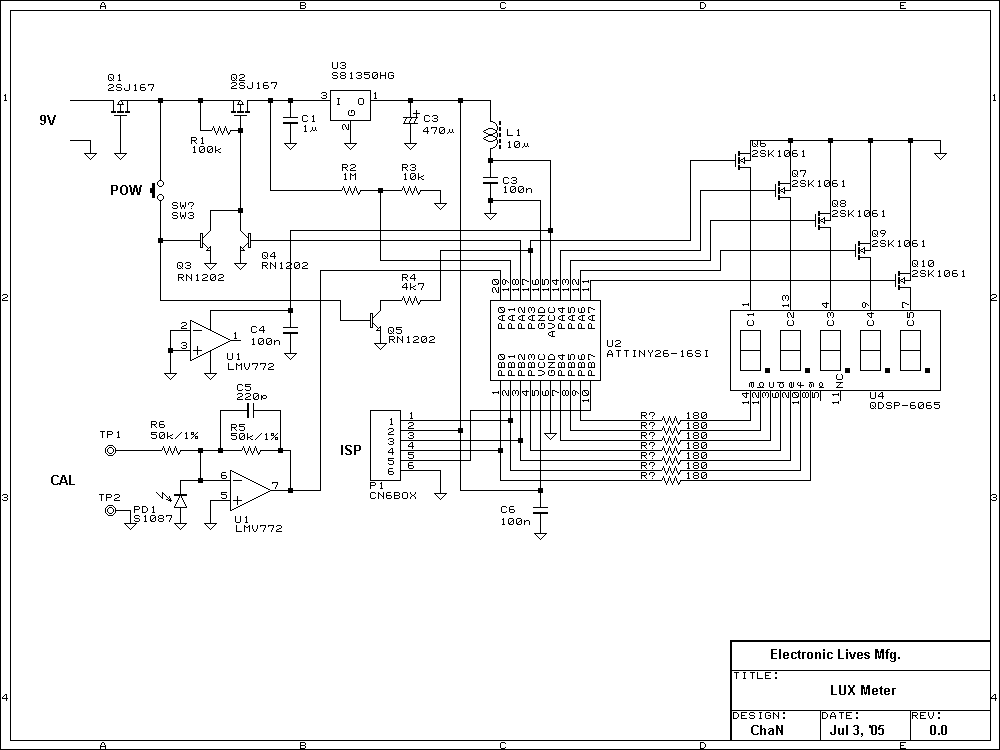
Photo diode outputs light current that is well proportional to input light power when it is used in short mode. In this lux meter, the output current is converted to voltage with an I-V converter, it is captured by...
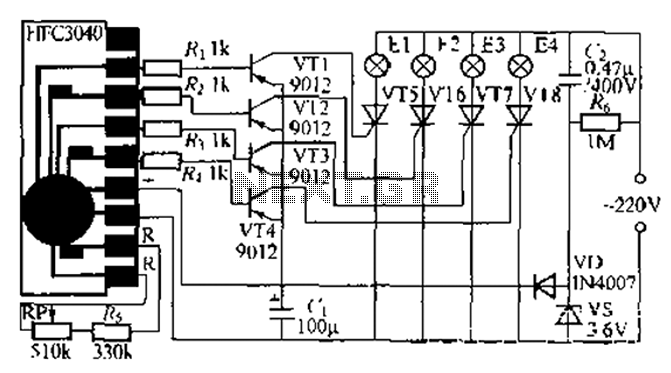
The circuit utilizes a four-way slowly dimming LED driver integrated with iU shoe production and a Qis four flashing lights string controller. The C3484 manifold is specifically designed to operate Ji lights with four lights that flash and slowly...