
doorbell wiring
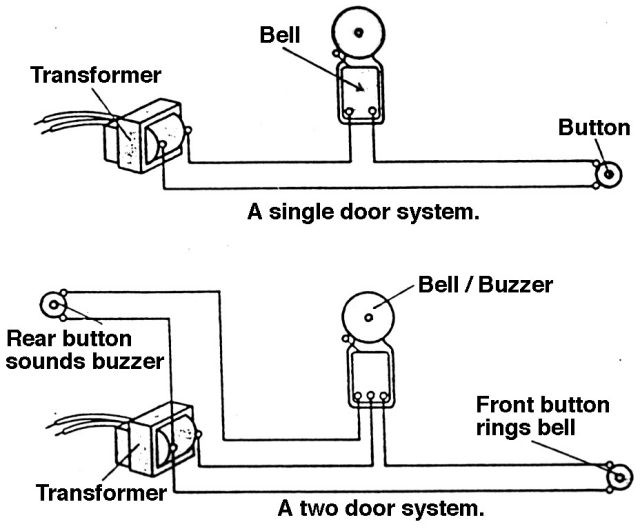
The installation of a doorbell involves several key steps to ensure proper functionality and safety. The process typically begins with selecting the appropriate doorbell type, which can be either wired or wireless. For wired doorbells, it is essential to have the necessary tools and materials, including a transformer, doorbell button, chime, and wiring.
1. **Planning the Installation**: Identify the location for the doorbell button, typically near the front door, and the chime, which can be mounted on a wall inside the home. Ensure that the selected locations have access to power if a wired system is being used.
2. **Power Supply**: For wired systems, a transformer is needed to convert the standard household voltage (120V) to a lower voltage suitable for the doorbell (usually between 8-24V). The transformer should be installed near the main electrical panel or an accessible outlet.
3. **Wiring**: Run low-voltage wires from the transformer to the doorbell button and from the button to the chime. It is important to follow the manufacturer's wiring diagram to ensure correct connections. The wires should be securely fastened and protected from physical damage.
4. **Mounting the Components**: Install the doorbell button at the chosen location, ensuring it is at a comfortable height for users. Mount the chime unit on the wall, ensuring it is securely attached and positioned for optimal sound distribution.
5. **Testing**: After all components are installed and connected, restore power to the transformer and test the doorbell system. The button should activate the chime, signaling that the installation was successful.
For wireless doorbells, the installation process is simplified as it typically requires only mounting the button and placing the chime unit within range of the button's signal. Ensure the chime unit is plugged in or has fresh batteries, and follow the manufacturer's instructions for pairing the button and chime.
Safety precautions must be followed during installation, including turning off power at the circuit breaker for wired systems and verifying that all connections are secure to prevent short circuits. Proper installation will result in a functional and reliable doorbell system that enhances home convenience and security.Instructions for wiring and installing a Doorbell in your home.. 🔗 External reference
Related Circuits
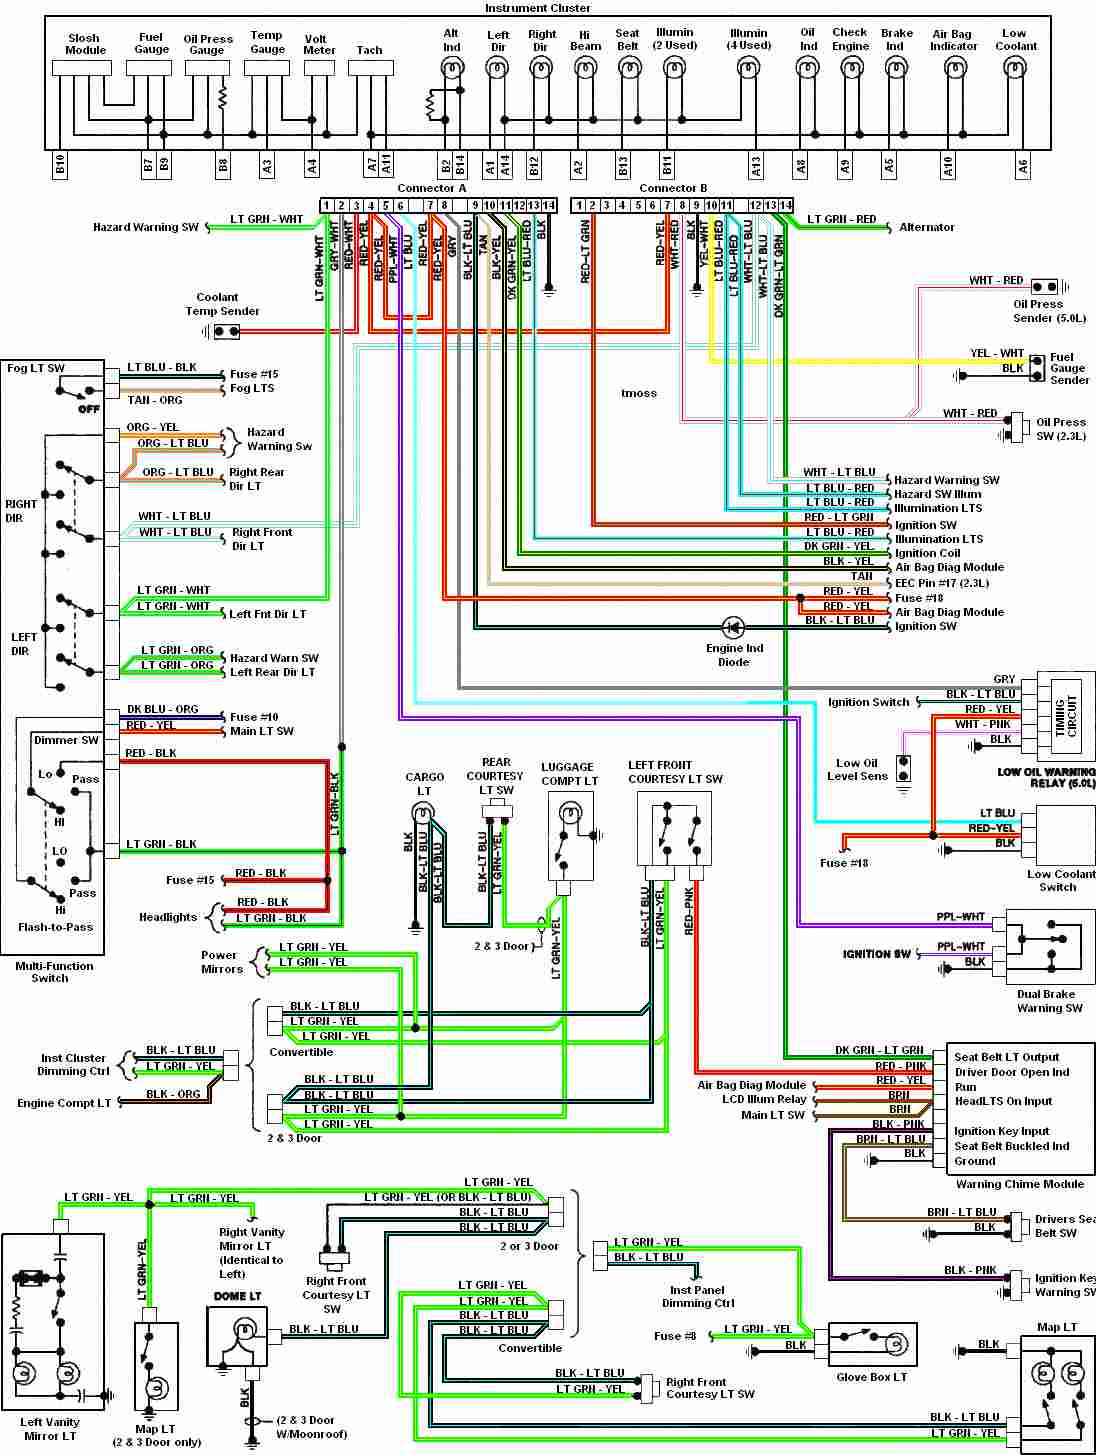
Automotive diagram for the instrument cluster of the 1987-1993 Ford Mustang (Third Generation). The instrument cluster for the 1987-1993 Ford Mustang serves as a critical interface for the driver, providing essential information about the vehicle's operational status. This cluster typically...
If there is no output at terminal 66 RED, it indicates a potential issue. The dash light dimmer may be set to the "OFF" position, or there could be significant corrosion on the wiper of the rheostat, preventing proper...
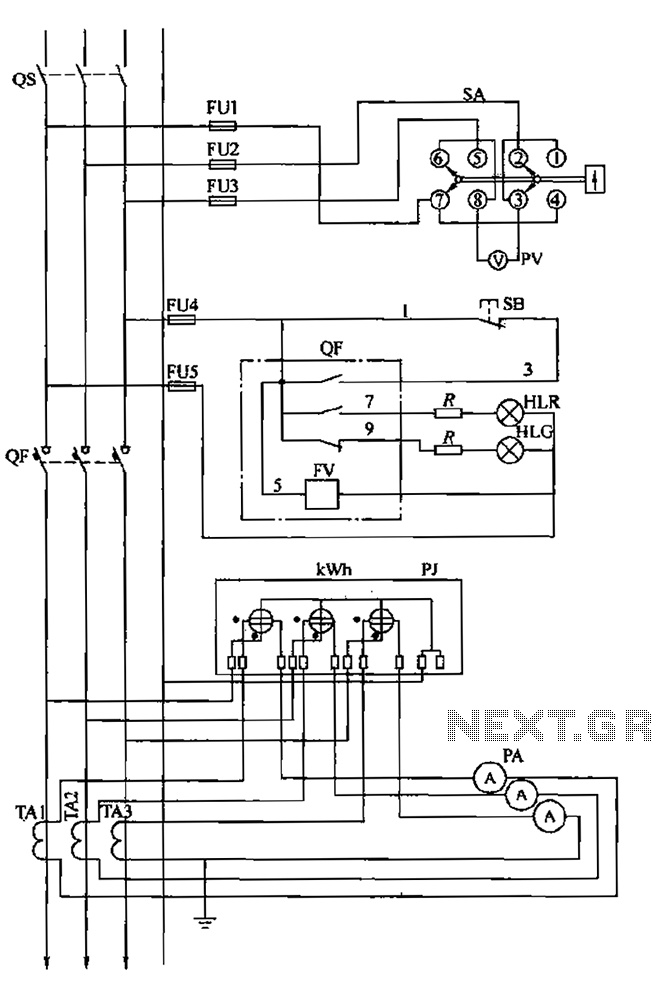
The BSL is illustrated in a low-voltage distribution panel wiring diagram. It consists of three main components: the voltage measuring circuit, secondary circuit protection, and the energy metering circuit. (1) The voltage measuring circuit includes a voltage switch (SA)...

The three-tone electronic doorbell circuit includes a coding trigger circuit, a multi-tone generator, and an audio amplifier circuit, as illustrated in Figure 3-110. The coding trigger circuit is made up of buttons S1-S6, two four-input AND gates (D1, D2)...
PDS addresses the limitations of standardized measures to achieve uniform materials, designs, routing, installation, and construction, creating a clear structure that is easy to manage and maintain centrally. In modern buildings, cabling has become a trend and is considered...

This project was designed for a boy who had a larger collection of electronic scrap, which he provided for the build. The project was completed over several evenings while balancing homework. The goal was to create a device that...