
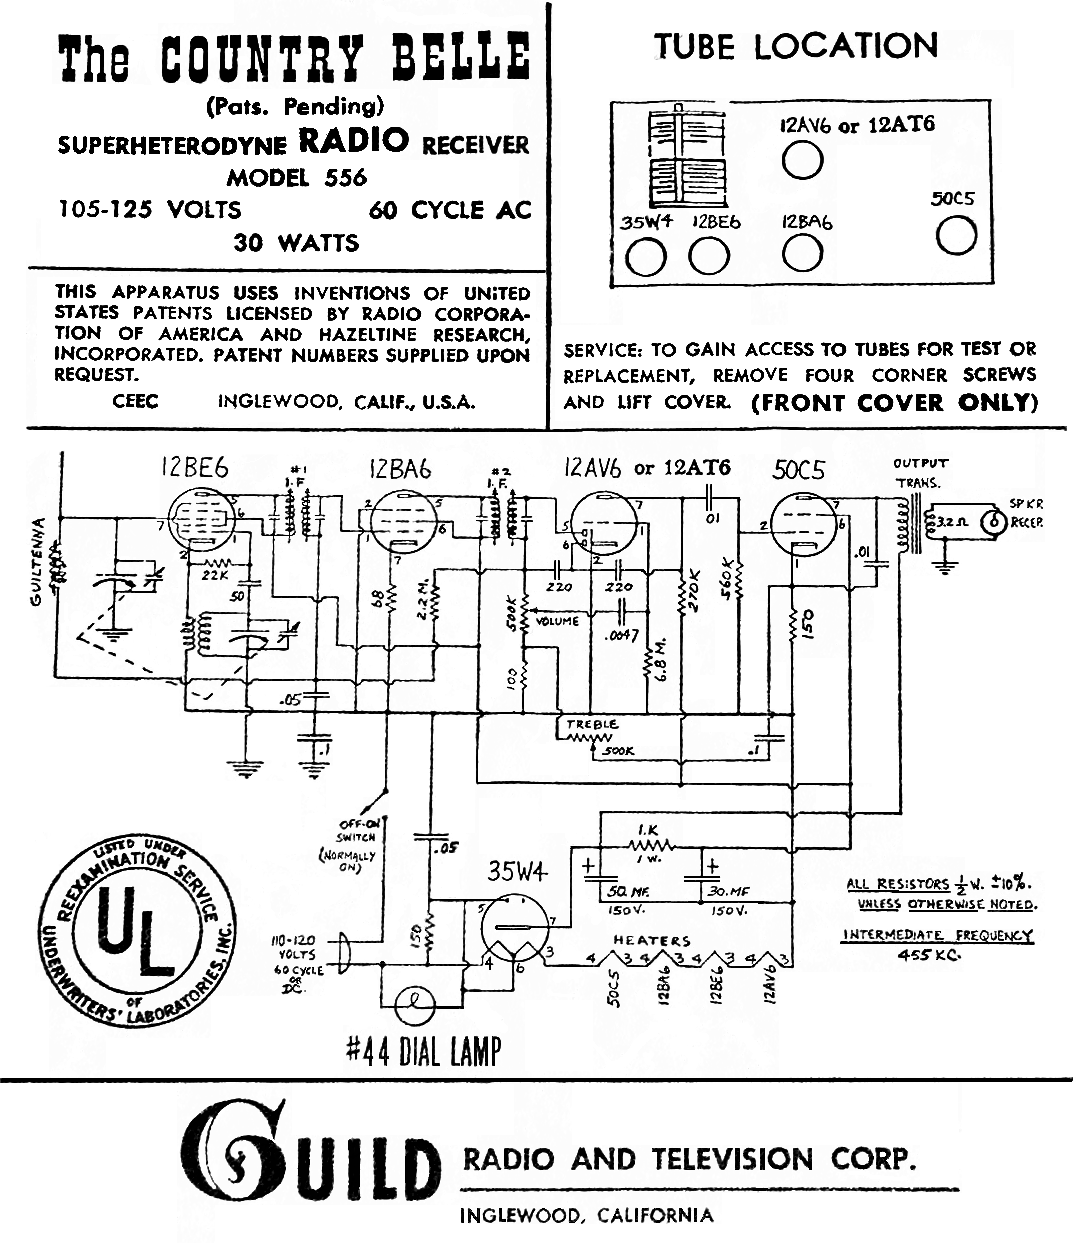
Guild Country Belle Telephone Radio (1956)
The Country Belle was produced during the late 1950s and early 1960s, alongside other novelty radios from Guild, but none of them hold significant monetary value. The electronics typically require some restoration, including capacitor replacement and speaker repairs, which can be accomplished with common materials. The restoration process may involve fixing the speaker cone with teabags and service cement, as well as restringing the tuning dial with replacement string. The cabinet, while often in good condition, may require minor repairs and refinishing to restore its original appearance.
The radio's design includes a decorative mouthpiece and bells, which serve no functional purpose but enhance its vintage appeal. The Country Belle's crank tuner is a charming feature, though it is prone to breaking dial strings, particularly in the hands of children. Replacement parts are scarce due to the company's closure decades ago, making salvaging parts from non-functional units a common practice among collectors. Overall, the Country Belle represents a unique blend of aesthetic design and basic radio technology, making it a popular choice for vintage radio enthusiasts.
The Guild "Country Belle" novelty radio is characterized by its artistic design, resembling a vintage wall telephone. This model, designated as model 556, showcases a solid pine cabinet finished with Early American lacquer, enhancing its visual appeal while providing durability. The radio's construction reflects a commitment to quality, utilizing solid wood instead of the more common veneer found in other radios of the era.
The integration of radio controls into the telephone design is a notable feature; lifting the earpiece activates the radio, while a crank located on the side is used for tuning. The tuning dial, visible through a small opening above the crank, is accompanied by two wooden knobs for volume and tone adjustments. The speaker is mounted at the bottom of the cabinet, directing sound downward, while the decorative elements, including the mouthpiece and bells, serve to enhance the radio's nostalgic aesthetic without contributing to its functionality.
Internally, the Country Belle employs a five-tube superheterodyne circuit, a common configuration for radios of this period. While the performance is satisfactory for a radio of its time, it is not comparable to high-fidelity equipment. The radio's simplicity makes it an approachable restoration project for enthusiasts, particularly those new to vintage electronics.
Restoration of the Country Belle typically involves addressing common issues associated with aging electronics. Capacitor replacement is often necessary, as older capacitors can degrade over time. Additionally, speaker repairs may be required, particularly if the speaker cone has been damaged, which can occur if a rodent gains access to the cabinet. Repairing the speaker cone can be achieved using teabags and service cement, which provide a lightweight and flexible patch that can withstand vibrations.
Restringing the tuning dial is another common restoration task. Replacement string is available from specialty suppliers, and using strong braided fishing line is also an option. Achieving the correct tension is crucial to ensure smooth operation of the tuning mechanism. The crank's design, while charming, can lead to wear on the dial string, necessitating careful handling to prolong its lifespan.
The cabinet of the Country Belle may also require attention, as joints can weaken over time, and surface blemishes may appear. Minor repairs can be made by re-gluing loose components and refinishing the surface to restore its original luster. The restoration process is generally straightforward, making the Country Belle a suitable project for those interested in vintage radio repair and restoration.I am not a great fan of novelty radios, but this one looks swell on the wall and doesn`t take up any shelf space. The Guild "Country Belle" is one of the most recognizable tube novelty radios. Patterned after an old-fashioned wall telephone, this model was manufactured in large numbers and is still quite common.
I bought mine for $35 in a local sh op. A label on the back identifies it as a model 556. Although I have seen them advertised at higher prices, I wouldn`t recommend paying more than $50 for this radio. It`s easy to find a nice one if you have a little patience. A couple of years after buying this one, I found another at a garage sale for $20. Guild made several novelty radios in the late 1950s and early 1960s, including the Spice Chest kitchen radio, a lantern-shaped Town Crier, the large, gramophone-shaped Grafonola, the aptly-named Teakettle, the Bonnet Box, shaped like an old fashioned dry sink, a radio/phono console called the New Englander, whose cabinet looks like a roll-top desk, and the Buccaneer Chest, fashioned like a pirate`s treasure chest complete with a map inside.
None of the Guild novelty radios is worth a lot of money. They are fairly common and the electronics inside are nothing special. On the other hand, the wooden cabinets tend to be good quality, using solid wood where other radios would typically use veneer. This cabinet is made of solid pine with an Early American lacquer finish. Above the mouthpiece are stenciled in gold the words "The Country Belle by Guild. " Brass is used for the bells and other shiny hardware. The earpiece and mouthpiece are made of cast pot metal painted with black lacquer. The following photo shows the set after restoration. The controls are cleverly integrated into the telephone design. To turn on the radio, you lift the earpiece from its brass hanger. To tune it, you turn the crank on the side. The dial can be seen through a small opening above the crank. Next to the dial are two small wooden knobs for the volume and tone. The speaker is mounted on the cabinet bottom, facing downward. The bells and mouthpiece are strictly for decoration, although the mouthpiece can be swiveled up and down, just as on a real vintage telephone.
The radio inside this amusing cabinet is a simple five-tube superheterodyne with miniature tubes and a ferrite loop antenna. Not a bad performer, as inexpensive 1950s radios go, but nobody would mistake this for hi-fi equipment.
Several years after I first wrote this article, fellow collector Jim Locke sent me a scan of an original Country Belle information sheet. Typical of such "manuals, " it is a little page which mostly states the obvious: To increase volume, turn the volume control, and so on.
Guild made a later version of this radio (model 6407) which received FM as well as AM. In a photo of the label on an AM/FM model, I noticed US patent number 2, 895, 044. At the US Patent & Trademark Office website, I found that patent: The patent was applied for in 1954 and granted in 1959, almost five years later. The records include two pages of detailed drawings and two more pages of description, explaining how the methods of turning on/off, tuning, encasing the radio in a phony telephone cabinet, and even hanging a radio on the wall, are new and useful stuff.
The label on the back of my AM-only Country Belle says "patents pending, " so it was made some time between 1954, the year of application, and 1959, when the patent was granted. It can be interesting to look up old patents. In many cases, the basic technology was covered in general patents, often cross-licensed from other radio companies.
The patent for my Philco 90 consists of a design patent for the cabinet shape. Other aspects of the radio, such as the electronics, were not unique to that particular model, and covered by general patents. Both of those patents were granted in the names of the individual designers rather than the company. It was common practice (and still is) for employment contracts to state that all creative work done by the employee automatically becomes the property of the company.
The electronics were in passable shape. The capacitors needed replacing, as in virtually all old tube radios. A mouse had gotten inside the cabinet and eaten some holes in the speaker cone, as well as chewing up about half of the dial string. Fixing the speaker cone was a simple matter, requiring only glue and a couple of teabags. For this job, I used "service cement, " a special glue designed for this purpose. You can also use ordinary fabric glue. Teabags provide a light, tough paper that stands up well to speaker vibration. To apply the patch, you cut a piece of teabag the right size, apply cement around the hole, and stick on the piece of bag.
Smooth out any wrinkles in the patch. After the cement dries, you can brush another coat around the joint for good measure. For larger holes, you can apply a double layer for greater strength, but don`t overdo it. The goal is to approximate the original thickness and pliability of the cone. Fixing the dial string was equally simple. Replacement dial string is available from Antique Electronic Supply. You can also use strong braided fishline from a sporting goods store. When restringing a tuning dial, it`s crucial to get the right tension, to prevent slipping. Many radios use a tiny spring on one end of the string to provide tension. This radio was missing the spring as well as about half of the string (perhaps that was chewed by the mouse, too). I picked up a replacement spring of the right size at a local hardware store. This radio`s string path was obvious. I wound the string three times around the shaft of the crank, and fastened each end to the large pulley that carries the dial face.
On this set, each end of the string hooks onto small metal ears inside the large pulley, which is hollow. Getting the spring hooked inside the pulley took some patience and a very thin needle-nose pliers. Once in place, it worked just fine, with no slipping. Although the Country Belle`s crank tuner is cute, it probably accounts for a lot of broken dial strings.
Kids find it irresistible to spin the crank, which can wear out a string in a hurry! Many Country Belles are missing parts such as the earpiece, crank, or earpiece cradle. The company went out of business decades ago, so there is no source for factory replacement parts unless you find a junker Country Belle to use for salvage. My cabinet was basically sound but had a few boo-boos. The wooden writing pad below the mouthpiece had been broken and clumsily reglued in the past. You could see daylight through the sloppy joint between the pad and the cabinet. One of the small wooden controls knobs was missing. In addition, some of the brass pieces were tarnished and the earpiece`s black lacquer was slightly chipped, showing the underlying metal.
To remove the writing pad, I first unscrewed its lower supports and pulled them loose (their glue joints had completely let go). Then I carefully broke the pad along its bad joint and cleaned off every trace of old glue using a sharp craft knife with a pointed blade.
Finally, I applied glue to the supports, screwed them back on, applied glue to the pad, and clamped the whole thing tight. The pad is mounted at an angle, making clamping a bit tricky. I eventually found a combination of two clamps that worked. The next photo shows the patient on the operating table. The front panel of these radios is made of two pieces of wood glued along a vertical center joint. It`s not uncommon for that joint to separate when the glue dries out. Mine showed no signs of cracking; if it had, I would have rebroken and glued that joint, as well. To erase slight blemishes on the cabinet surface, I wiped on a light coat of Early American Min-Wax finish.
After letting the finish set for a couple of minutes, I wiped it off with a clean cloth and buffed the entire cabinet to a satin shine. I was able to find an unfinished wooden knob exactly the right size at a local home improvement store.
After staining and finishing it to match the other knob, I whittled out the center with a thin craft knife to fit the tone control shaft. I doubt that anyone could tell which knob is the original one. I then disassembled and refinished all of the exterior hardware. The brass pieces were polished bright and sprayed with a coat of clear lacquer to prevent tarnish. Nicks and scratches on the earpiece, mouthpiece, and crank were eliminated with a fresh coat of black lacquer.
The next photo shows the hardware ready to reassemble. Then it was simply a matter of putting everything back together. I liked the radio`s tone better once it was back in the cabinet! This was a fairly simple restoration, all things considered. If you are just learning to repair tube radios, a simple chassis like this one would be a good first project. 🔗 External reference
Related Circuits

This is a radio transmitter circuit diagram designed for integration into radio collars using the NE 555 integrated circuit. The circuit transmits a pulse in the FM band, specifically between 88 MHz and 105 MHz. The radio transmitter circuit utilizes...
The TPTG transmitter has been transformed into a modern TNT model. This transmitter can utilize the existing K-111 power pack for both the transmitter and receiver, eliminating the need for a separate power supply unit. Building this compact transmitter...
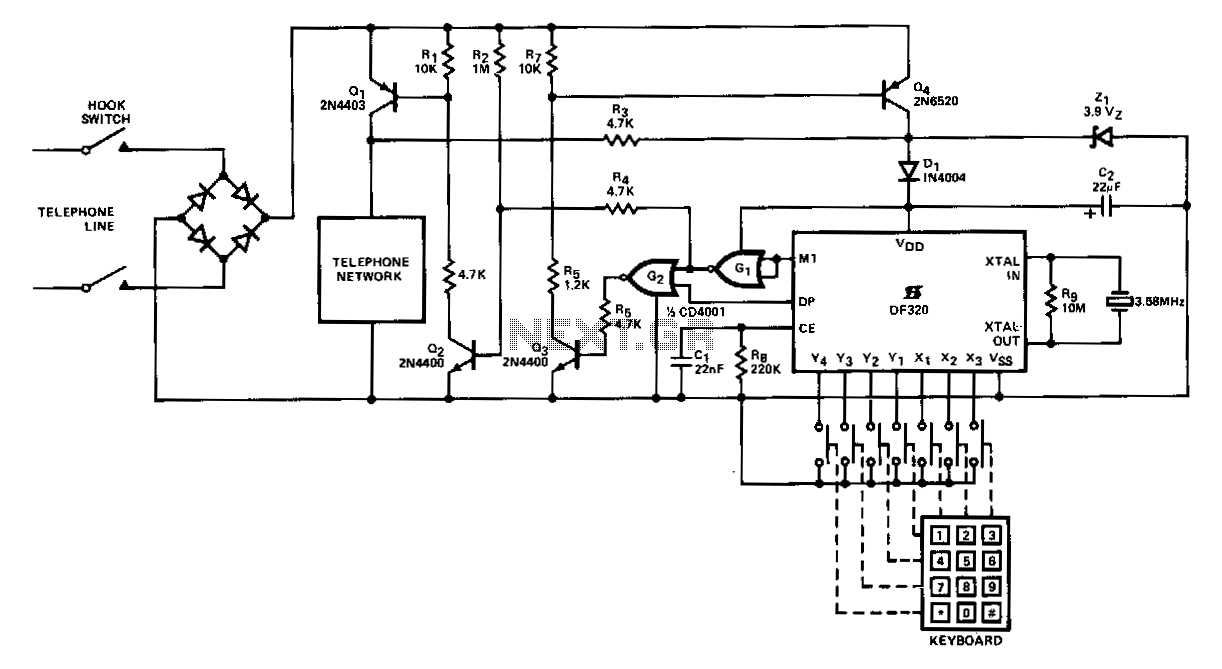
When the handset is lifted and power is applied to the circuit, Q2 receives base current through R2, which subsequently activates Q1. Capacitor C2 charges via resistor R3 in series with diode D1 to a voltage of (Vz1 -...
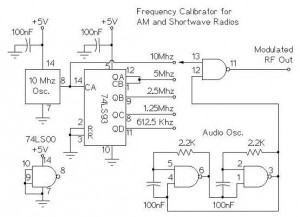
The following circuit illustrates an AM/Shortwave Radio Frequency Calibrator Circuit Diagram. This circuit is based on the 74LS93 IC. Features: The .. The AM/Shortwave Radio Frequency Calibrator Circuit utilizes the 74LS93 integrated circuit, which is a 4-bit binary counter. This...
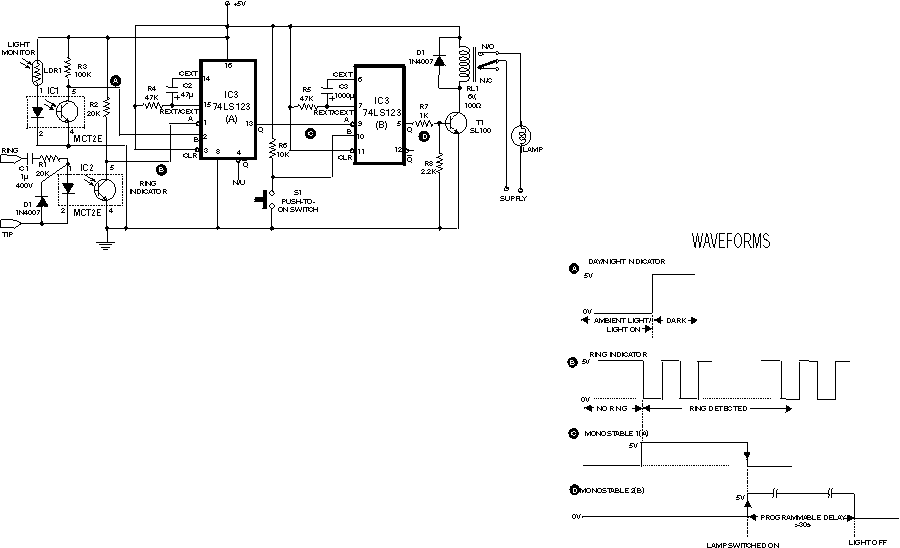
The circuit shown here is used to switch on a lamp when the telephone rings, if the ambient light is insufficient. The circuit uses only two ICs and it can be implemented very easily. A light dependent resistance (LDR),...
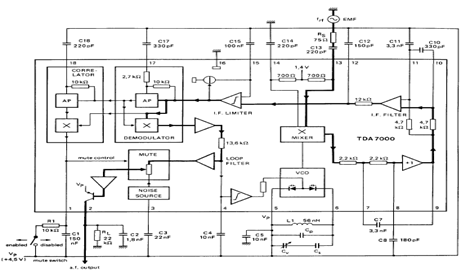
The TDA7000 is an integrated circuit (IC) designed for FM portable radios, featuring a Frequency-Locked Loop (FLL) system with an intermediate frequency of 70 kHz. It incorporates several functions, including an RF input stage, mixer, local oscillator, IF demodulator,...