
infrared IR Arduino Transmit n Receive

To create a schematic for this project, two Arduino Uno boards will be employed, one acting as the transmitter and the other as the receiver. The transmitter will be connected to a digital IR transmitter module, which will send modulated infrared signals corresponding to the data being transmitted. The receiver will be connected to a digital IR receiver module, which will decode the incoming infrared signals back into digital data.
The connections for the transmitter Arduino will include the following: the digital IR transmitter module's output pin will connect to a designated digital pin on the Arduino (for example, pin 3). The Arduino will be programmed to send the data "1234" when a button is pressed or automatically at intervals. A simple sketch using the Arduino IR library will facilitate the encoding of the data into an IR signal.
For the receiver Arduino, the digital IR receiver module's output pin will connect to another digital pin on the Arduino (for example, pin 2). The Arduino will be programmed to listen for incoming IR signals and decode them using the same IR library. Upon receiving the data, the Arduino will send it to an LCD display connected via I2C or direct pin connections, depending on the setup. The LCD will be configured to display the received data clearly.
Powering both Arduino boards can be done via USB or an external power supply, ensuring that the IR modules are adequately powered for reliable communication. The overall system will allow for straightforward data transmission without the need for complex remote control codes, focusing solely on the transmission of simple numeric data.Using digital IR Receiver Module and digital IR Transmitter Module connected each with different Arduino Uno. How can I transmit data like "1234" to the receiver and display data on LCD This is because most of the example that I found using IR remote code like Sony and RC4.
I just want to send a simple data. 🔗 External reference
Related Circuits
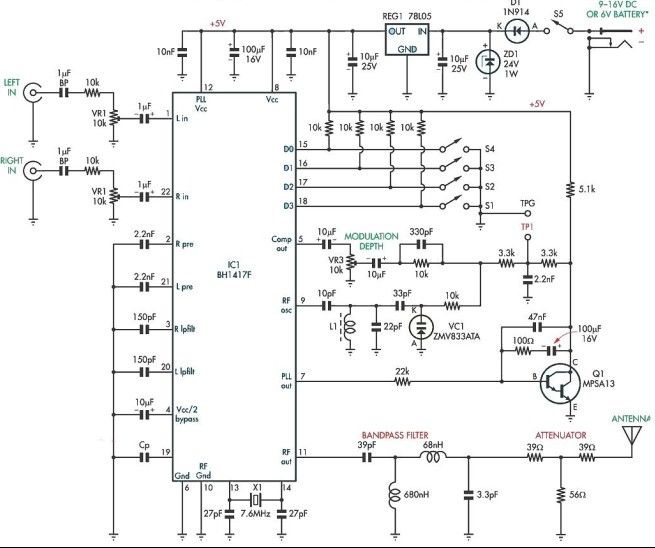
This stereo FM modulator circuit utilizes the BH1417F FM stereo transmitter IC, which includes a stereo modulator for generating stereo composite signals and an FM transmitter for broadcasting an FM signal wirelessly. The stereo modulator produces a composite signal...
The schematic presented is a circuit for a 555 tracking transmitter. The 555 timer is a well-known versatile integrated circuit utilized in various electronic projects. In the circuit described, this IC generates a tone that is transmitted through an...

FM transmitter IC manufacturers and suppliers include FM transmitter IC manufacturers with Bluetooth capabilities. The FM transmitter features an integrated circuit with four channels. The TNA029 IR audio transmitter IC is a low-cost solution with high performance. The FM transmitter...

The following circuit illustrates the IC BA1404 used in a stereo FM transmitter circuit diagram. Features include ease of construction, making it accessible for anyone to build. The BA1404 is a versatile integrated circuit designed specifically for FM transmission applications....
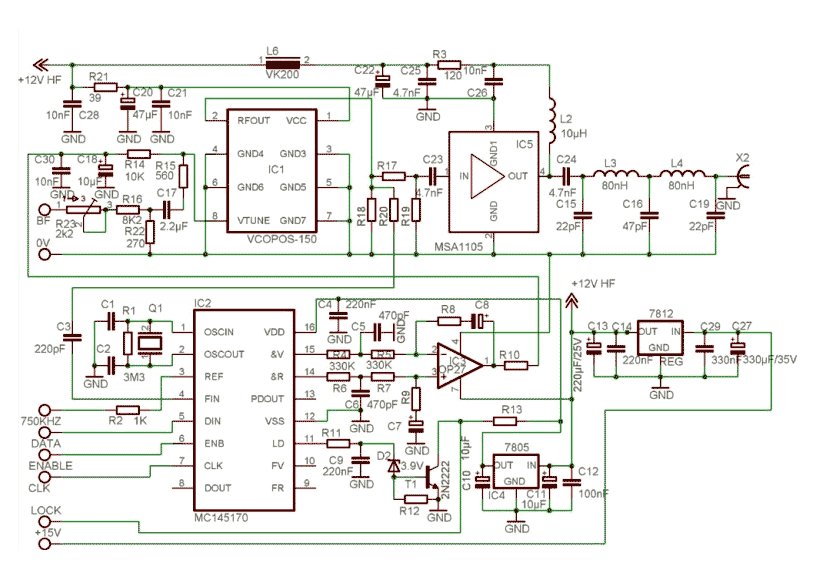
This new FM transmitter is very easy to make and doesn't need any RF tuning. First of all, we have used an integrated VCO: The POS150 from Mini-circuits. This excellent RF circuit covers all the FM Band in a...
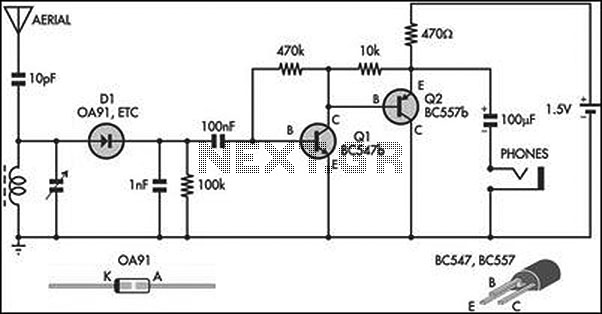
This circuit is an amplified crystal set. The inductor can be a standard AM radio ferrite rod antenna, while the tuning capacitor is a variable plastic dielectric gang designed for small AM radios. The aerial tuned circuit feeds diode...