
pic32mx220 tutorials
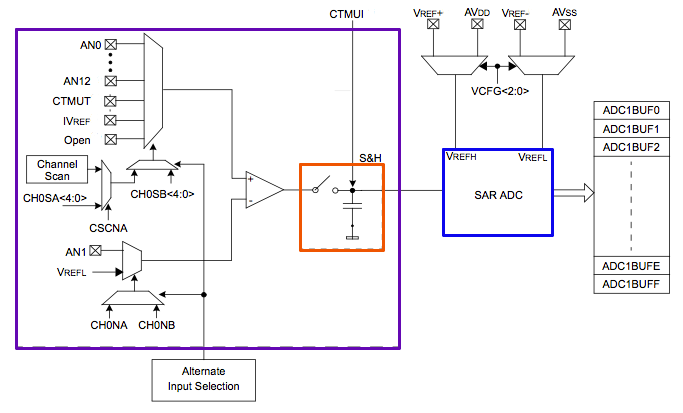
The PIC32 microcontroller features an integrated Analog to Digital Converter (ADC) that is capable of converting analog signals into digital data, allowing for the processing of real-world signals in embedded applications. The ADC in the PIC32 is designed to handle multiple input channels, providing flexibility for various sensor interfaces.
To set up the ADC, several key parameters must be configured, including the reference voltage, sampling time, and resolution. The reference voltage can be set to either the internal reference or an external voltage source, which determines the range of input signals that can be accurately converted. The sampling time is crucial as it affects the accuracy of the conversion; longer sampling times can improve accuracy at the cost of increased conversion time.
The resolution of the ADC in the PIC32 can be configured to various levels, typically up to 12 bits, allowing for a range of values from 0 to 4095 for a single channel. This resolution is important for applications requiring high precision in measurement.
In addition to basic configuration, the PIC32 ADC supports features such as interrupt-driven conversions and DMA (Direct Memory Access) for efficient data handling. This allows the microcontroller to perform other tasks while the ADC is processing, enhancing overall system performance.
To implement the ADC, users will typically initialize the ADC module, configure the desired settings, select the input channel, and start the conversion process. The results can be processed in real-time or stored for future analysis, making the ADC a versatile tool in various applications, including data acquisition, sensor interfacing, and control systems.
Overall, while the configuration of the PIC32 ADC may seem daunting at first, understanding the fundamental parameters and utilizing available resources can facilitate a successful implementation.The PIC32?s Analog to Digital Converter (ADC) is surprisingly difficult to set up if you re using it for the first time. Like so many of the PIC peripherals, the number of configuration options seem endless. This tutorial will help you.. 🔗 External reference
Related Circuits
Current sensing involves detecting the amount of current being used by a specific circuit or device. It is particularly useful for assessing the power consumption of various components within a robotic system. Although not commonly required in robotics, current...
The unijunction transistor (UJT) consists of a bar of N-type material with a P-type junction (the emitter) positioned near the center. Base 1 is connected to zero volts, while base 2 is connected to the positive supply. The resistance...
In this project, an ATMEGA16 microcontroller operating at 16MHz will be utilized. To distinguish this project from others, a unique feature has been incorporated: a battery monitoring system. Many robots operate on new or freshly recharged batteries, and if...
The most essential schematic to understand for any robot, whether for beginners or advanced users, is the circuit designed to control the robot's power source. It is inadequate to connect a battery directly to all components and expect proper...
Following the development of the original 4-pin OM802 timer IC by SIGNETICS ITT - GEMINI in 1969/1970, a new and innovative integrated circuit known as the NE-555 timer IC was introduced to the market in May 1971 by Signetics...
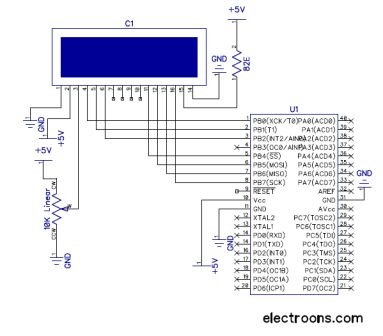
The RW line is the "Read/Write" control line. When RW is low (0), the information on the data bus is being written to the LCD. When RW is high (1), the program is effectively querying (or reading) the LCD....
Warning: include(partials/cookie-banner.php): Failed to open stream: Permission denied in /var/www/html/nextgr/view-circuit.php on line 713
Warning: include(): Failed opening 'partials/cookie-banner.php' for inclusion (include_path='.:/usr/share/php') in /var/www/html/nextgr/view-circuit.php on line 713