
random

The project involves constructing a landing at the top of a staircase leading to an attic, which is at the same height as the attic floor. The ramp has a 39-degree slope, making it difficult to walk up without the addition of cleats. The design was complicated by the ramp's unevenness, requiring careful calculations to ensure the landing was level. The bottom three steps were built on triangles to accommodate the slope, with varying rises due to the ramp's unlevel nature. A secondary plan was implemented to simplify construction by adding plywood and additional support, avoiding the need to recut a stringer, and utilizing materials efficiently.
A microcontroller-based solution was developed for a linear motor project, incorporating a Microchip PIC10F206 microcontroller, a 7805 power regulator, pull-up resistors, a diode, a capacitor, and a relay. This setup simplifies the control of the motor's direction using software, making it more efficient than traditional logic circuits.
The description of the camera mount highlights a practical and efficient solution for securing a camera during outdoor activities. The use of a dog collar as a safety strap exemplifies resourcefulness in design, ensuring that the camera remains secure while allowing for easy removal when needed. The integration of a quick-release mechanism enhances usability, making it suitable for dynamic environments such as skiing.
The staircase project illustrates the complexities of home renovation, particularly when dealing with older structures. The decision to create a level landing demonstrates an understanding of user convenience and safety, while the challenges faced during construction emphasize the importance of precise measurements and adaptability in engineering design.
The linear motor project showcases the application of modern microcontroller technology in simplifying mechanical systems. By utilizing a programmable microcontroller, the design achieves greater flexibility and functionality, allowing for sophisticated control without the need for extensive hardware. This approach not only streamlines the project but also highlights the advantages of integrating software solutions in electronic design.Now the camera mount is very sturdy, and I went a year without using one a tether, but if you like to ski through the woods filled with deep powder, let me tell you: a safety strap is a good idea. It`s made from a 12" toy dog collar! All you do is slide the adjustment loop tightly around the camera mounting stud holder. A drop of glue keeps the le ash tight so it won`t slip off, and you can still remove it if you need to by removing the stud from the mount. There are no permanent modifications to the camera or the helmet. Then just loop it around your goggle strap. This works well because it fits pretty tight to the helmet so it`s less likely to get snagged on a branch.
Of course it needs to be detachable so you can remove the camera from helmet, and the quick release on the collar works perfectly! If I were doing it again, a slightly longer collar probably wouldn`t be a bad idea, but you don`t want it too wide, either, because the strap won`t fit over the stud.
One of the features of my condo is that I have private access to the attic over my unit, and there is a plywood floored storage area over part of it. And not just a little hatchway, either. Okay, it`s not entirely a ramp because it has a 39 ° slope of and you wouldn`t be able to walk up it so someone nailed down some 2x4 cleats.
But it`s no staircase, either. As you can probably guess from ye olde cedar shakes at the top of the ramp, this was a roof at one point in time. Parts of my house are 145 years old, so there are a lot of oddities like this caused by many renovations over the years.
The sheathing was a little suspect based on the several holes. Actually, I`m pretty sure it`s not sheathing. It doesn`t match the sheathing above, and it`s varnished. Who would varnish the ramp to their attic I suspect that they pulled off the original rough cut skip sheathing under the shakes and laid down some scraps of used tongue-and-groove flooring. That change might have pre-dated plywood or just might have been Yankee ingenuity. You can see the exterior wall on the left and the cleats are modern (probably 1960s) construction. The left wall probably had to be rebuilt when they tore down the barn that used to be attached to the building on that side.
The easiest solution would be to just lay plywood over the ramp and build a staircase with little plywood triangles holding up the treads. I did not do this. I, instead, opted for the most over-engineered and complicated solution to this problem, which was nearly my downfall.
I decided that there needed to be a landing at the top of the stairs at the same height as the attic floor. Aside from just being convenient, there`s a column in the way so it would be a pain to get from the top step into the storage attic without a landing.
Here`s the nice completed landing: Problem #1: I carefully calculated the angles to make this work out. What I neglected to take into account was that the ramp is not level left-to-right. In fact, it`s off by nearly 3/4" over 3`! I had to re-cut the right horizontal landing support, but it all worked out in the end. Now the bottom three steps are built on little triangles. That`s because 39 ° is so close to 43 ° that there wasn`t enough room to fit the depth of the stringer.
Unfortunately they`re not just triangles. There`s a varying amount of rise on each triangle to account for the change in slope and the unlevel-ness of the ramp so each triangle is different! But so far so good. Problem #2: After much head-scratching I eventually decided that my plan for making the stringer from that point was so difficult as to be nearly impossible due to a combination of angles and having to make up for the unlevelness.
Plan B added some more plywood and one more triangle support. This also eliminated the need to re-cut a stringer which would have caused me to run out of lumber prior to finishing the project. That included cleaning up, putting away all my tools, etc. And a lot of running up and down the stairs since the attic is above the second floor and did all of the cutting outside at ground level.
And as I was trying to calculate all of these crazy angles and distances I also wrote a Builder`s Calculator web page that does addition, subtraction, multiplication, division and angle calculations in feet, inches, and 1/16th inch fractions. My treadmill sits mostly unused during the warm months. I also spend a fairly large amount of time sitting at my desk doing relatively worthless tasks on the Internet, like looking at funny pictures of cats.
At speeds up to 3 miles per hour (20 minute mile) it`s not bad to use the trackpad and even do some limited typing. It only takes a few seconds to remove the desk, which is probably a good idea when running. It seems little easier to read using Kindle for Mac than on the actual Kindle due to the larger, backlit screen and adjustable angle.
It`s also much safer than walking around outside while reading my Kindle. It`s pretty good for watching TV. I have an actual TV in the room but it`s sort of at a weird angle so it`s kind of nice to not have to look to the side. I`m considering a personal rule that Jersey Shore can only be watched while walking. It may still dissolve my brain, but at least it would be good exercise. The thought of two people doing this while on Skype video chat makes me laugh - it would like going for a walk together without actually being in the same location.
Cut the plastic pipe strap to length so it forms nice rings bigger than the size of the treadmill handrails. Make 4. They don`t have to fit perfectly, since their purpose is really just to prevent the shelf from sliding off if you bump it.
The plastic grippy shelf liner is there just to make sure the laptop doesn`t slide off. I don`t suspect it would, but better to be safe. Probably best to avoid steep incline mode, as well. At least in my dishwasher, the flopping over happens when the plates in the front roll backwards, which then causes the plates in back to move out of the way by falling over, then get stuck in the sprayer arm for the upper rack. I think this might be because my plates are slightly too large to be stable in the front row and naturally want to roll back, so probably not everyone experiences this as often as I do.
I don`t use the heat drying cycle in my dishwasher to save energy, but I`m pretty sure the plexi should be safe. It`s actually lexan polycarbonate plastic and it has a melting temperature in excess of 300 °F, so it should be fine even in a heated drying cycle.
Every summer my nephew attends "Camp Grandma and Grandpa" for a week. Or two, this year. For the last several years I`ve been going up at the same time. He`s 10. We build things. He`s been fascinated by the linear motors that appear on Mythbusters periodically and this year got a linear motor proxy. It`s actually a regular DC motor with a screw drive assembly that moves a carriage forward or backward, depending on polarity.
It`s pretty neat, but unfortunately it needs some help to go automatically in a back-and-forth motion. He`ll take care of building a new metal superstructure to hold the carriage and limit switches, but I developed a possibly somewhat over-engineered solution for reversing the motor when it hits the end of the carriage: That`s a Microchip PIC10F206 programmable microcontroller.
And 7805 power regulator, a couple pull-up resistors, a 1N4148 diode, a 0. 1 F capacitor, and a relay. Granted the PIC10F206 is a very small microprocessor with 512 words of program memory and 24 bytes of RAM. But at $ 0. 68 each in single quantities, it`s really kind of neat how easy it is to just drop one of these in instead of dealing with a pile of logic and flip-flops to do the same sort of thing.
And doing things like debouncing the switches and making sure the limit switch overrides the reverse button is a whole lot easier in software! I do this infrequently enough that I forget exactly how to do it almost every time. Then I have to look up a half dozen Photoshop masking tutorials to find the step that I`m forgetting.
So here it is, once and for all: There are a number of shortcuts ways to obscure things, not the least of which is painting a solid color rectangle over the spot and the totally ghetto "ms paint spray can technique" but I like the final result when done with a bit more finesse: If the picture is in the background layer, select the background, then the menu item "Layer - New - Layer from Background. " Set the name of the layer to "image" and accept the remaining defaults. In the Layers palette, select the new layer ("image") and then the menu item "Layer - Duplicate Layer.
" Set the name of the layer to "blurred. " It obviously is not yet blurred, but it will be later on. Set the paint color to white and using your tool of choice, paint white over the part you want to obscure. I usually use the pen tool which is good for rectangular items that are tilted/rotated. In the Layers palette, drag the layers so the order is "blurred" then "Shape 1" then "image. " If you have multiple things to blur, create shapes for each of the items then merge the layers into a single mask layer between "blurred" and "image.
" Make sure "blurred" is selected in the Layers palette. Select the menu item "Filter - Pixellate - Mosaic. " and choose a pixel size that will obscure what you want to sufficiently. This will obscure the entire image but we`ll fix that next. The Times Argus reports that the Rialto Bridge, where State Street crosses the North Branch of the Winooski river is in need of emergency repairs. Apparently a bridge abutment has failed. In September 2009 I took a bunch of pictures along the North Branch including several under the bridge, and I`m not sure what most recently has failed, but certainly the bridge needs some TLC!
The most badly deteriorated part of the structure in the last picture is underneath the sidewalk, not under the roadway or building, which I`d guess is why that`s not a more urgent problem. It is possible that computer accessories are getting too small This is a Bluetooth adapter sitting next to a US quarter.
Really If it weren`t for there being essentially nothing on my desk I would so easily lose that. Also, as a side note, the manual for it is 70 pages of which one page is for the Mac. It basically says to ignore the CD that came with it, plug it in, and it will work. The other 69 pages describe how to make it work with Windows. 🔗 External reference
Related Circuits

A circuit is needed to drive three or more LEDs at a current of 200-350mA each, with the capability to randomly flash or strobe them at a frequency of 5-20Hz. The input power should be low-voltage DC, with a...

The circuit illustrated produces a brief sequence of rapidly alternating tones, reminiscent of the sounds associated with advanced computers, often featured in science fiction. This circuit was designed for the composition "Be Quite Still" by the band "The Cassettes."...
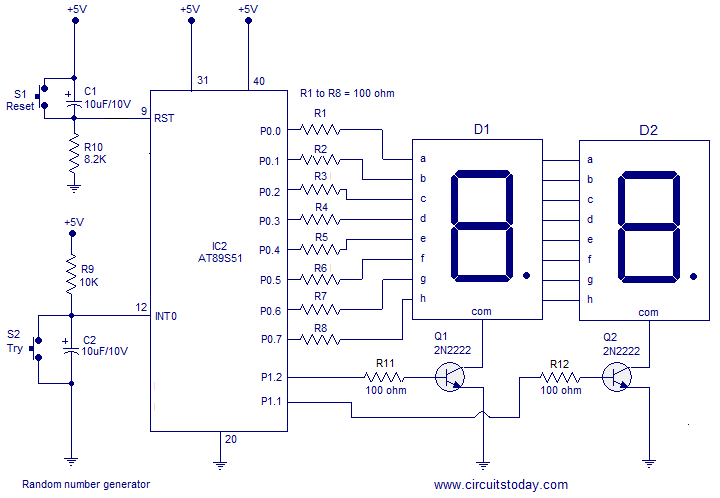
A simple random number generator utilizing the 8051 microcontroller. The AT89S51 is the controller employed in this setup. The circuit design for the random number generator based on the AT89S51 microcontroller involves several essential components and connections. The AT89S51 microcontroller,...

This circuit diagram illustrates the random behavior of a 7-segment LED display. The circuit includes an IC1 (LM555), resistors R1 and R2, and capacitor C2, forming a sensitive multistable configuration. The described circuit utilizes the LM555 timer IC, which operates...
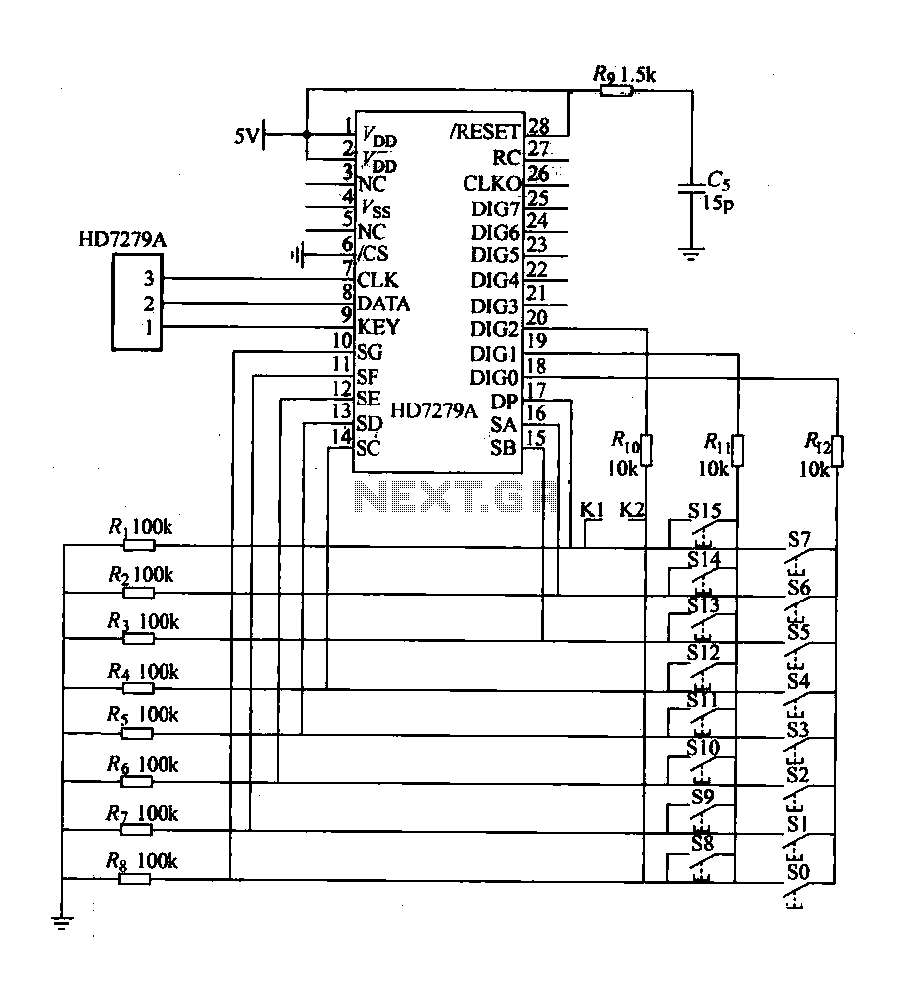
The design includes a front panel featuring buttons for setting 10 number keys (0-9), along with additional keys such as "Move Down," "Health," "Enter," "Recover," and a "Door Key," totaling 16 keys. The system also incorporates an interior door...
Raspbian on the Raspberry Pi is excellent, but the official image is large and includes various components that are not needed. The devices typically do not have screens, as they are used for playing music, functioning as GPS NTP...