
Rolling Shutter Motor Control
The electrically operated rolling shutter system is designed to provide both manual and automated control, enhancing user convenience and safety. The three-position switch allows users to manually operate the shutter with ease, selecting either the up or down position or stopping the movement as needed. For automated operation, the integration of a timer introduces a level of sophistication that enables the shutter to open and close at predetermined intervals.
To implement the automation feature, it is crucial to establish a proper wiring configuration. The control circuit should be carefully examined using an ohmmeter, ensuring all connections are secure and reliable. The 230-V relay serves as the critical component that interfaces between the timer and the shutter motor, allowing for controlled operation based on the timer's settings. The relay must be rated appropriately to handle the voltage and current requirements of the shutter motor, ensuring reliable performance.
The changeover switch functions as a safety mechanism, enabling users to switch between manual and automatic modes without risk. This is particularly important in preventing conflicting commands that could arise if both modes are activated simultaneously. The design of the control circuit should prioritize user safety, using components that are rated for the appropriate voltage and housed in a suitable enclosure to prevent accidental contact with live parts.
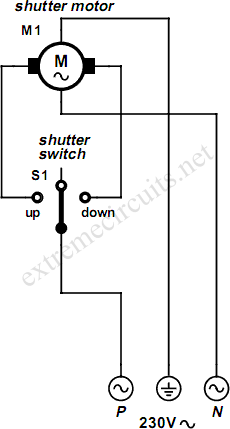
Overall, the integration of a timer with an electrically operated rolling shutter provides a practical solution for automated control, ensuring convenience while maintaining a high standard of safety. Proper installation and adherence to electrical standards are essential for the successful operation of the system.An electrically operated rolling shutter usually has a standard control panel with a three-position switch: up, down and stop. If you would like to automate the opening and closing with a time controlled switch, a few additional wires will have to be connected.
Typically, the controls are implemented as indicated in the schematic Normal Situation` . If this is indeed the case, then you can see in New Situation` how the shutter can be automated with a timer. There is only one method to determine the actual schematic of your control circuit, and that is to open the control box and using an ohmmeter, pencil and paper to check out and draw the circuit.
Make sure you turn the power offrst though! Connect a 230-V relay (with both the contacts and the coil rated 230 VAC) to the timer. The changeover switch between automatic and manual control needs to be rated 230 VAC as well and may not be a hazard for the user. The relay and switch are preferably fitted in a plastic mains adapter enclosure with built-in plug, which is plugged into the timer.
It is a good idea to check first if this will actuallyt. Because of the manual/automatic-switch, the operation is completely fail-safe and misunderstandings are out of the question. The switch prevents the issue of conflicting commands (with disastrous consequences) when, for example, the shutter is being automatically raised and manually lowered at the same time.
🔗 External reference
Related Circuits

AVC - The circuit regulates the volume line automatically, providing an output voltage of approximately 4 volts peak to peak. This voltage remains consistent. The Automatic Volume Control (AVC) circuit is designed to manage audio levels dynamically, ensuring a stable...
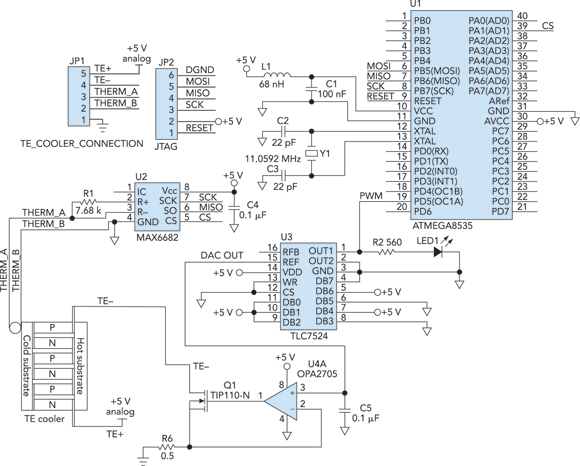
Cooling an instrument or device can enhance the signal-to-noise ratio (SNR) and extend the product's lifespan. For instance, the dark-and-noise signal of an infrared detector's output at room temperature can be significantly reduced when cooled. A custom cooling device...
To achieve optimal audio reproduction across various listening levels, it is essential to adjust tone control settings to accommodate the known characteristics of human hearing. Human ear sensitivity changes in a non-linear fashion throughout the audible frequency range, as...
The project involves displaying the current room temperature using an LM35 temperature sensor. This schematic differs from a previous schematic that utilized a multiplexed seven-segment display. In the earlier schematic, the display select I/O pins were RA0, RA1, RA2,...
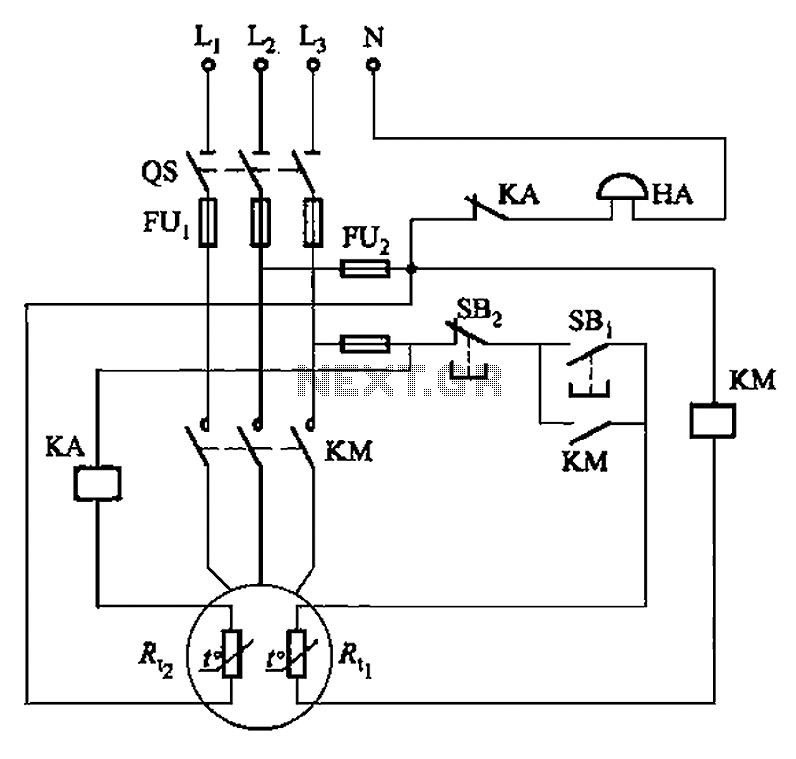
The circuit illustrated in Figure 4-2 employs two thermal resistors. One, designated as Rc, functions as overload protection, while the other, labeled Rt, serves as an alarm. The circuit in question integrates two thermal resistors to monitor temperature changes and...
Average vending machines are commonly found at railway stations, airports, fast-food restaurants, and even within companies. When a switch is pressed, the machine dispenses a cup of the selected beverage. Although this process appears straightforward, it involves complex logic,...