
Scientific Calculator Watch

The uWatch is a compact electronic device designed for versatility and user interaction, primarily functioning as a timepiece, calculator, and settings manager. The device is built around a printed circuit board (PCB) that incorporates surface mount device (SMD) technology, ensuring a high degree of miniaturization and reliability. The uWatch operates in a low-power sleep mode to maximize battery longevity, consuming approximately 3 mA when the LCD is active and only 15 µA when it is inactive.
User interaction is facilitated through a series of tactile keys: the MODE key, RCL/STO key, MENU key, and function keys (F1-F6). The MODE key serves as the primary control for activating the device and cycling through its operational modes. Upon activation, the uWatch displays the time and date, although initial settings may appear incorrect until configured. The RCL/STO key is multifunctional, providing access to the backlight feature in the Time/Date display mode, which can be toggled on for a limited duration or set to remain on.
In Calculator Mode, users can navigate through various functions using the MENU key, with the C key available for exiting this mode. The setup mode allows for configuration of time and date settings, with user inputs managed through the + and - keys for selection and the ENTER key for confirmation. The design anticipates typical user behavior, offering a straightforward interface for interaction.
The assembly of the uWatch includes careful installation of the LCD, which requires precision to avoid misalignment during the gluing process. The use of superglue to secure the LCD necessitates a steady hand, as tilting can occur if not managed correctly. Post-assembly, the device is powered by lithium batteries, which are noted for their initial high voltage output that stabilizes over time, affecting LCD contrast. This characteristic is essential for users to understand, as it influences the readability of the display immediately after battery installation.
Overall, the uWatch embodies a blend of functionality and user-friendly design, making it an effective tool for both timekeeping and basic calculations while ensuring efficient power management.The uWatch comes as a kit of parts. All of the electronic SMD parts on the PCB are pre-assembled. The uWatch is normally in sleep mode and powers down the LCD to save battery power. (approx 3mA LCD on, and 15uA LCD off) To switch the uWatch on press either the MODE key or the RCL/STO key. The uWatch has three "modes": 1) Time/Date display. 2) Calculator Mode. 3) Setup mode. You can cycle through the modes at any time by pressing the mode key. In Time/Date display mode you can turn on the backlight by pressing the RCL/STO key which turns on the backlight for about 5 seconds.
If you press the same key a second time while the backlight is on then it will stay on permanately. Press the key again once to turn the backlight off again after 5 seconds.The calculator mode defaults to RPN mode. After you've tested the LCD is working you can glue it in place with superglue. The bottom of the socket head screws should ideally be flush with the underside of the PCB as shown in the photo, but do NOT force the LCD down to this level if it does not go. As long as the screws penetrate the holes in the main board enough for you to glue them, that is fine.
A small bad of glue is applied to the bottom thread of each screw and then the LCD is pushed into place and held until set. This is a fairly tricky operation, as the LCD may tilt during the gluing. The key is to keep the LCD straight and level until the glue sets. After you install the batteries the watch will be ready for use. Pressing the MODE button will turn the watch on. At first the time and date will not be set, so the display may contain some incorrect characters, this is normal.
Pressing the MODE button twice will get you to the setup menu from which you can set the time and date and other settings. In the calculator mode you can access the function menus by pressing the MENU key. Pressing the menu key again will cycle through the various menu options. The C key will exit the menu mode. Functions displayed on the LCD can be selected with the F1 to F6 function keys below the screen, the correspond in physical location to the options on the screen.
In setup mode use the + and - keys to toggle through the various options. ENTER will select the options. The C key will usually let you abort the current operation. With brand new batteries installed it is normal for the LCD contrast to be very dark, with the display not being very easy to read. This is due to the design of the LCD driver circuitry and is normal, as the LCD contrast varies with the battery voltage.
However, lithium batteries are designed to have a higher than normal terminal voltage when they are fresh, which then very quickly drops and stabilises. As shown in this typical discharge curve. 🔗 External reference
Related Circuits
Doppler effect sensor N1 (RD627), operational amplifier N2 (LM358), and a special integrated circuit for imitating dog barking (N3, KD5608) are utilized along with other components. When there is no activity detected in the monitoring area by N1, the...
The SE555/NE555 timer was first introduced by Signetics Corporation around 1971. The pin connections and their functions are as follows: Pin 1 (Ground) is the most-negative supply potential and is typically connected to circuit common when powered by positive...
This circuit is designed to indicate when a plant requires watering. An LED flashes at a low frequency when the soil in the flower pot is excessively dry, and it turns off as the moisture level rises. The sensitivity...
All LEDs require some form of current limiting. Connecting an LED directly to the power supply will burn it out almost instantly. Overdriving, even briefly, will significantly reduce its lifespan and light output. Fortunately, driving a single or a...
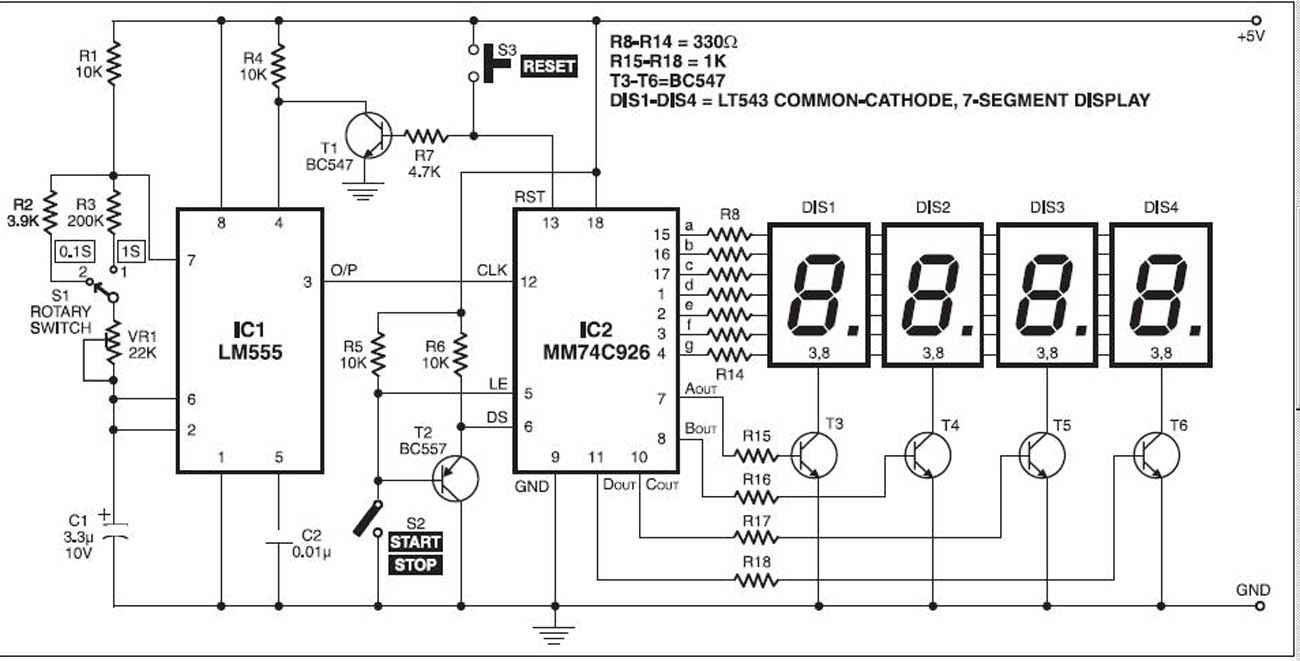
The stopwatch is constructed using a digital timer IC LM555 and an MM74C926 4-digit counter with a multiplexed 7-segment LED display. The MM74C926 features a 4-digit counter, an internal output latch, NPN output for controlling the common cathode source...

This circuit can be connected to any existing calculator battery using a push-on automatic switch, allowing it to function as a stopwatch while the calculator is not in use. The circuit utilizes a 555 timer configured in monostable mode to...