
Simple MIDI interface tester
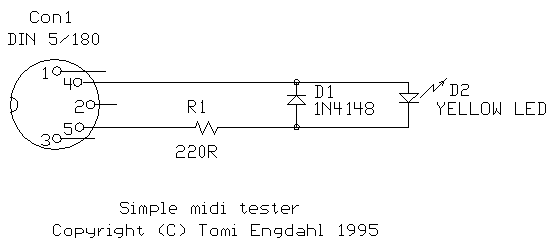
The described MIDI signal tester circuit functions as a visual indicator for MIDI data transmission. The primary component of this circuit is an LED, which illuminates in response to MIDI signals. The circuit operates by receiving MIDI data through a standard 5-pin DIN connector, commonly used in MIDI interfaces.
Upon connection to the MIDI output of a computer or MIDI device, the circuit detects the digital signals transmitted over the MIDI lines. The MIDI protocol sends data as a series of voltage levels that correspond to musical note information and control changes. The circuit includes a microcontroller or a simple transistor-based design that interprets these signals. When a MIDI signal is detected, the circuit activates the LED, causing it to flash. This visual feedback is particularly useful for troubleshooting and verifying that MIDI data is being sent correctly.
The circuit can be powered through the MIDI interface itself, as MIDI devices typically provide a small amount of power through the connector. It is essential to ensure that the circuit is designed to handle the voltage levels present in the MIDI signals, usually around 5V. Additionally, current-limiting resistors are required to protect the LED from excessive current, which could damage it.
For optimal performance, the circuit may also include filtering components to eliminate noise and ensure that only valid MIDI signals trigger the LED. This can enhance the reliability of the tester in environments with multiple electronic devices.
In summary, this MIDI signal tester is a straightforward yet effective tool for verifying MIDI data transmission. Its design allows easy integration with existing MIDI setups, making it an invaluable resource for musicians and engineers working with MIDI technology.Sometimes when experimenting with different soundcards and MIDI interfaces it is useful to see if there is some data going in MIDI interface. This can be easily tested with this adapter, which converts the midi signals to visible light pulses.
Just the circuit and plug it to the MIDI output of your computer. When computer sends any midi data out, you see the LED flashing. I found this tester very useful in testing homebuilt soundcard MIDI interface. 🔗 External reference
Related Circuits
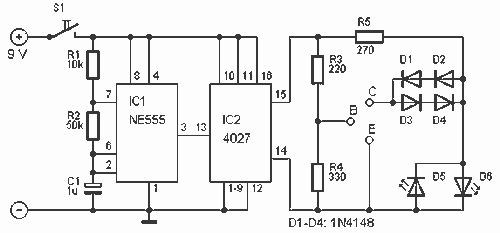
This is a convenient design for a transistor tester. The advantage of this circuit is that transistors can be tested without actually doing the circuit soldering. The tester uses two ICs: an NE 555 timer and a CMOS IC...
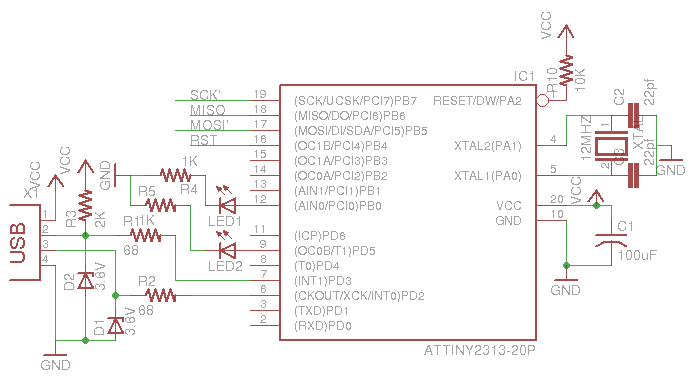
This is a low-cost AVR programmer using the ATtiny2313. The schematic diagram is provided below. First, set up the circuit as shown. One important consideration is to configure the fuse bits using the command: avrdude -c usbasp -p t2313...
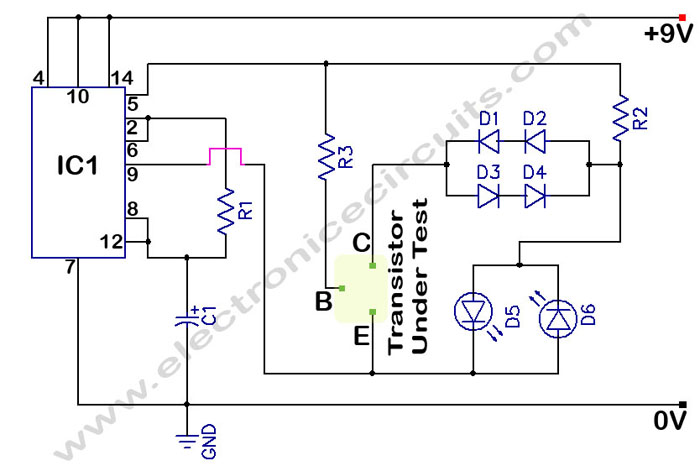
In a circuit transistor tester schematic, there is a circuit that can indicate the condition of a transistor using two LEDs. A good NPN transistor... The circuit transistor tester is designed to evaluate the functionality of both NPN and PNP...
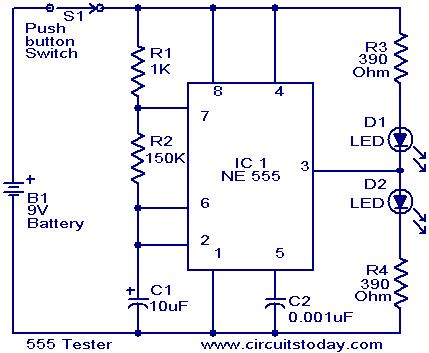
The NE555 timer is configured as an astable multivibrator. When the push button switch S1 is pressed, the LEDs D1 and D2 will flash alternately. When the output is high, D2 will illuminate, and when the output is low,...

This converter provides frequency coverage from 25 kHz to 500 kHz. It is recommended to use a short coaxial cable to connect the converter to the receiver's antenna input. To operate, tune the receiver to 3 MHz, adjust for...
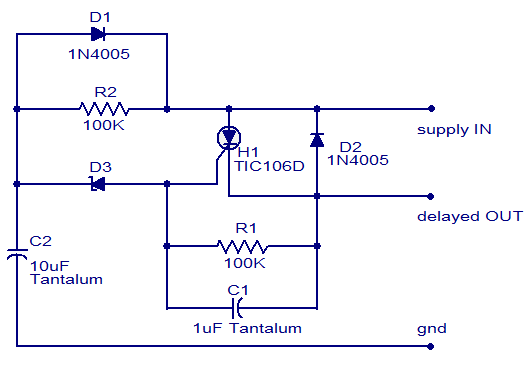
The circuit diagram presented is of a straightforward DC power delay circuit utilizing a silicon-controlled rectifier (SCR). This circuit is quite useful and can be applied in various scenarios. The operation of this circuit is uncomplicated. Upon the application...