
Solar iPod Charger

The implementation of this solar charger involves several critical components. The solar panel is the primary energy source, converting sunlight into electrical energy. The LM317T voltage regulator is used to ensure a stable output voltage of 5 Volts, which is essential for safely charging the iPod. The resistors (R1 and R2) form a voltage divider that helps achieve the desired output voltage. The blocking diode serves a protective function, preventing reverse current flow that could drain the battery when sunlight is not available.
For optimal performance, the solar panel should be positioned to maximize exposure to sunlight, and the connections should be securely insulated to prevent short circuits. Additionally, it is advisable to use components rated for outdoor use if the charger will be exposed to the elements. Testing the circuit with a multimeter before connecting the iPod is crucial to ensure that the output voltage remains within safe limits. Proper assembly and soldering techniques will enhance the durability of the charger, allowing for reliable charging of the iPod in various conditions.A solar charger for an iPod is no more difficult than making our Solar battery charger. Built in iPod batteries are 3. 7 Volts with the capacity (measured in mAh) dependent on the type of iPod - e. g. 1, 200mAh for a 2nd Gen, 850mAh for a 3rd Gen, 500mAh for the Mini iPod, and 400mAh for the Nano. In our instructions for making a solar battery charger for AA and AAA batteries we made a current limiting circuit. Because the iPod range has batteries of a wide selection of capacities, our solar iPod charger is instead voltage limited. Since iPods can be charged via a USB port with a fixed 5 Volts DC, this is the voltage we will use. Please scroll down to the bottom of this article for details on commercially available Solar iPod Chargers if you are not interested in finding out how to make your own.
To make our iPod solar charger we used a 250mA 6 Volt Solar Panel (available in the REUK Shop ). Even in the brightest sunshine the voltage is not excessively above that of the iPod battery, and the current is plenty enough to charge the battery in a few hours in bright conditions (even in the UK!). A blocking diode should be used (in the positive solar panel lead) to prevent the iPod battery from slowly draining at night if it is still connected to the panel.
Unforunately this results in up to 0. 7 Volts being lost as heat in the diode, so it can be left out if you prefer to have a faster charger which will charge the battery in lower light conditions. Since our desired charging voltage is 5 Volts, we see that ideally R2 would be 270 * (5/1. 25) -1) = 810 Ohms. This is not a standard resistor size, however we had an 820 Ohm resistor which should result in an output voltage of 5.
05 Volts. Wiring up the above circuit on a prototyping breadboard with a 270 Ohm R1 resistor, and 820 Ohm R2 resistor we can confirm that the output voltage is 5. 06 Volts - perfect for our iPod charger. It is essential to check that the output voltage is around 5 Volts using a suitable multimeter before attempting to charge your iPod or the battery and/or iPod itself could be damaged.
The iPod is supplied with a USB cable. One end is plugged into the iPod and the other end has a male USB-A plug. To connect this to the solar charger a female USB-A connector (socket) is required such as the one pictured below: It can often be cheaper to buy a cable with a fitted female USB-A connector and cut it off to use in this project. Simply connect the red USB cable wire to the 5V positive output from the LM317T, and the black USB cable wire to the ground (negative).
. however when we made those connections using a scavenged male USB connector plugged into a similarly scavenged female USB connector the voltage output was zero. After a bit of fiddling around we found that connecting the ground to pin 3 (rather than to pin 4) resulting in the expected voltage getting through as shown below.
Unplugging the test male USB connector and plugging in the male USB connector from the iPod, the charging icon appeared on the display indicating that our charger worked. Now all that remains is to solder (or otherwise join) the connections to make them permanent. The whole small assembly can simply be superglued to the back of the solar panel, and the iPod cable plugged into the female connector as and when necessary.
Disclaimer - This is just a demonstration of how we built our solar powered iPod charger. We are not responsible if in following in our footsteps you damage your iPod. There are now a few high-quality commercially available solar chargers supplied with adapters to enable direct charging of many mobile phones, hand held devices, and the full range of iPod models (except iPod nano). These include Solio Solar Charger, PowerMonkey-Explorer (pictured above), and Freeloader Solar Charger.
These commercial chargers feature a small solar panel and an onboard rechargeable battery which in turn is used to rechar 🔗 External reference
Related Circuits

The sun trucker employs three photoresistors, R7, R8, and R9, to enable the circuit to track the sun during daylight hours while ceasing operation at night. Additionally, the circuit can be duplicated to achieve movement along four axes by...
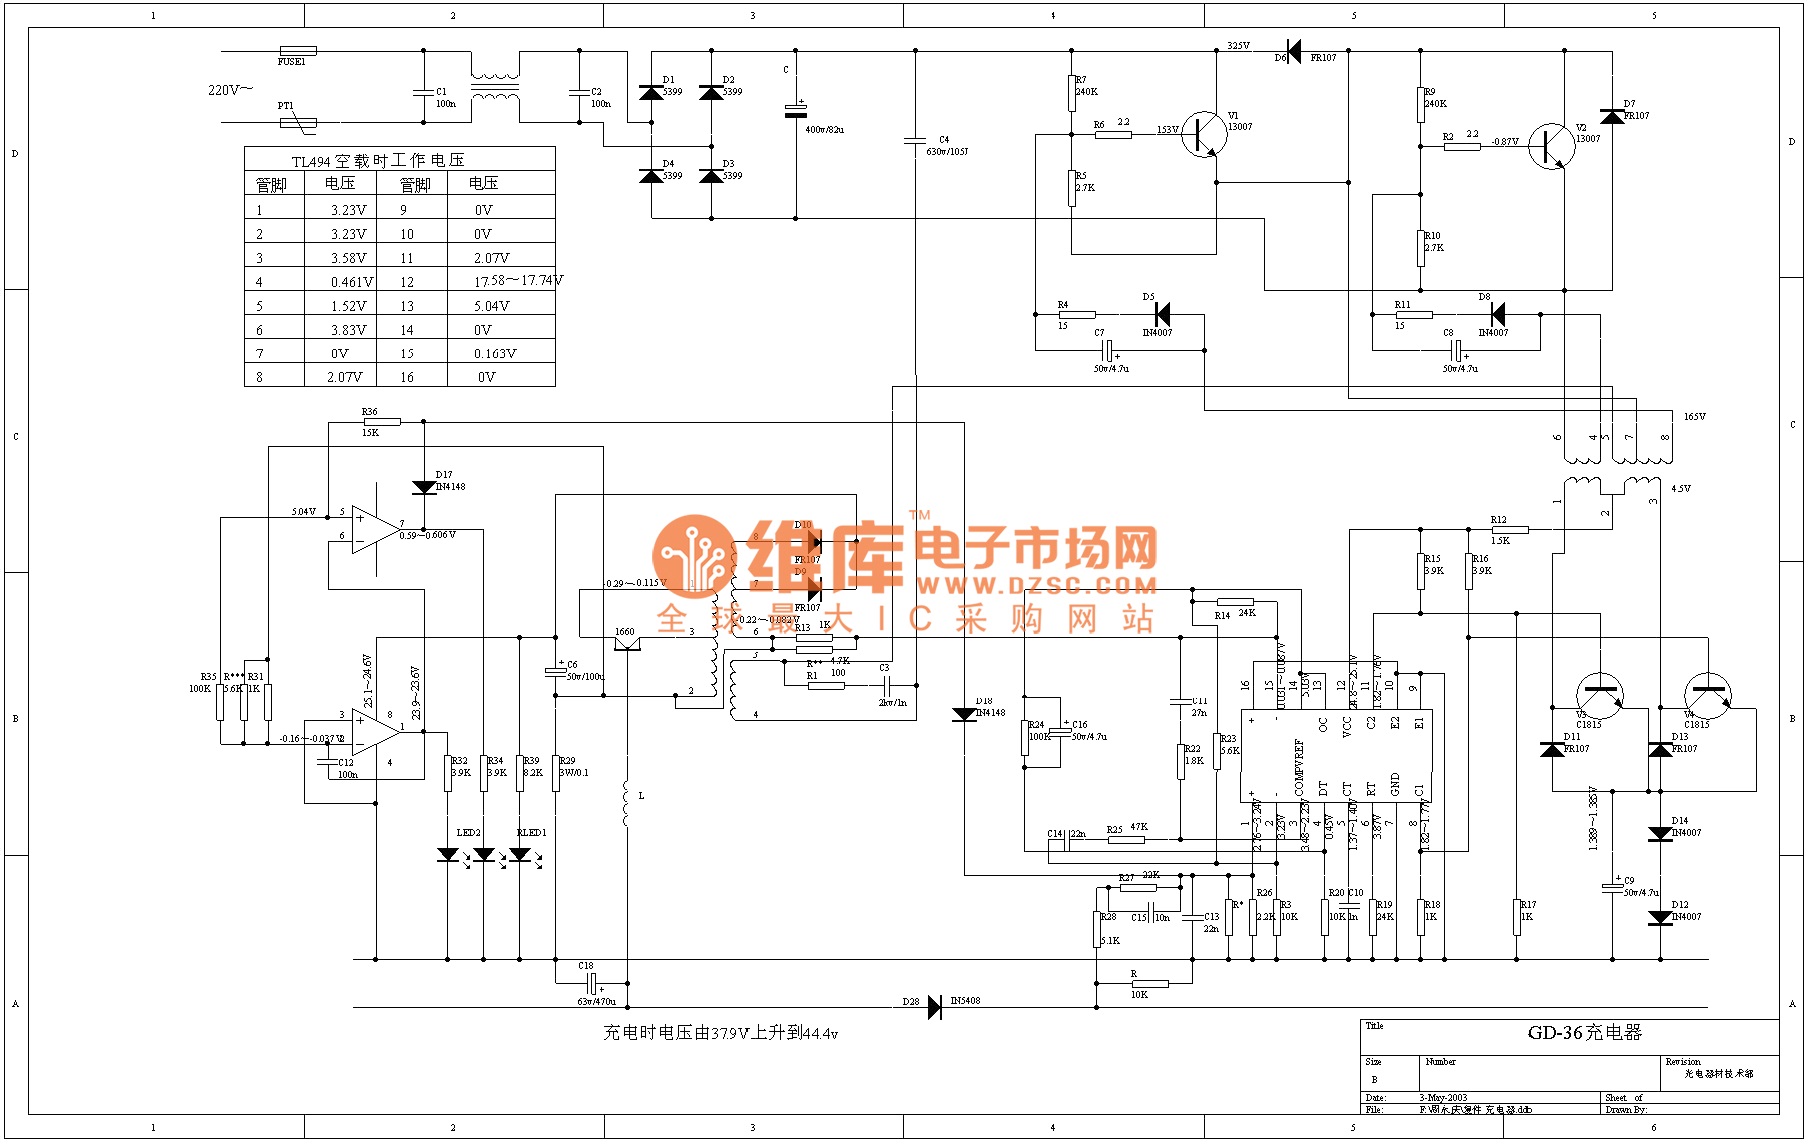
The TL494 is a voltage-driven pulse width modulator produced by the United States company IR. It serves as a switching power circuit in various applications, including displays, computers, and other system circuits. The output transistor of the TL494 can...
One of the most interesting aspects of the Yahoo Purple Pedals project was determining how to maximize the bikes' off-grid capabilities. After selecting the N95 as the control unit for the bikes, it became necessary to assess the power...
This document discusses a simple solar LED circuit. Solar panels range from 12 volts and 3 watts to larger sizes. To store energy, a 12-volt battery is required. The preferred choice is a sealed lead-acid (SLA) sealed maintenance-free (SMF)...
The LTC4425 is a constant-current/constant-voltage linear charger designed to charge a two-cell supercapacitor stack from a Li-Ion/Polymer battery, a USB port, or a current-limited supply ranging from 2.7V to 5.5V. This component functions as an ideal diode with a...
This voltage regulator for devices that utilize solar cells is straightforward and requires only a few electronic components. When a rechargeable energy storage device is employed, the voltage regulator circuit facilitates charging when the output voltage of the cell...